 Contact Us


Notch Block Setup
Content
-
How to Prepare and Expose Parameters in a Notch Block for Pixera.
- Create your own Notch Block with Notch VFX - “IMAG_Pixera_SHOWCASE”.
- Expose Parameters (Parameters, Limit Range Values, Grouping).
- Export Notch Blocks for Pixera.
-
How to use Notch Blocks in Pixera.
- Methods to Import Notch Blocks to Pixera.
- Control “IMAG_Pixera_SHOWCASE” via Composite Layer.
- Control 3D Scene “COMP_LAYER_Pixera_SHOWCASE” via Composite Layer.
- UV Notch Block to Pixera Setup.
- Control UV Notch Block in Pixera.
- Pixera Controls (Fader, Browser, ArtNet, DMX).
1. How to Prepare and Expose Parameters in a Notch Block for Pixera
This overview focuses on working with Notch Blocks inside Pixera.
Pre-Preparations
You will need:
- Pixera Manager or Creator License (watermarked).
- Notch Builder Installed on the Server
- Notch VFX Player License / or Trail (watermarked) to play Notch Blocks (Manager or Client).
- Notch VFX Learner License or Second Player License to see Notch Blocks in Preview (Manager).
You can download all the Notch Blocks and their Project files used here.
We will start using Blocks inside Pixera at Section 2.
You can follow along by creating the “IMAG_Pixera_SHOWCASE” Block in the next section, but you'll need a Notch VFX Builder License to do so.
visit notch.one/license for more information.
In this intro we use Notch VFX Version 0.9.23.253 and Pixera 2.0.65
1.1 Create your own Notch Block with Notch VFX - “IMAG_Pixera_SHOWCASE”
See also https://manual.notch.one/0.9.23/en/docs/blocks/.
We start with a blank project. This will not be a Notch VFX workshop so we will just tackle the necessary steps to get a simple IMAG FX with exposed parameters working in Pixera.
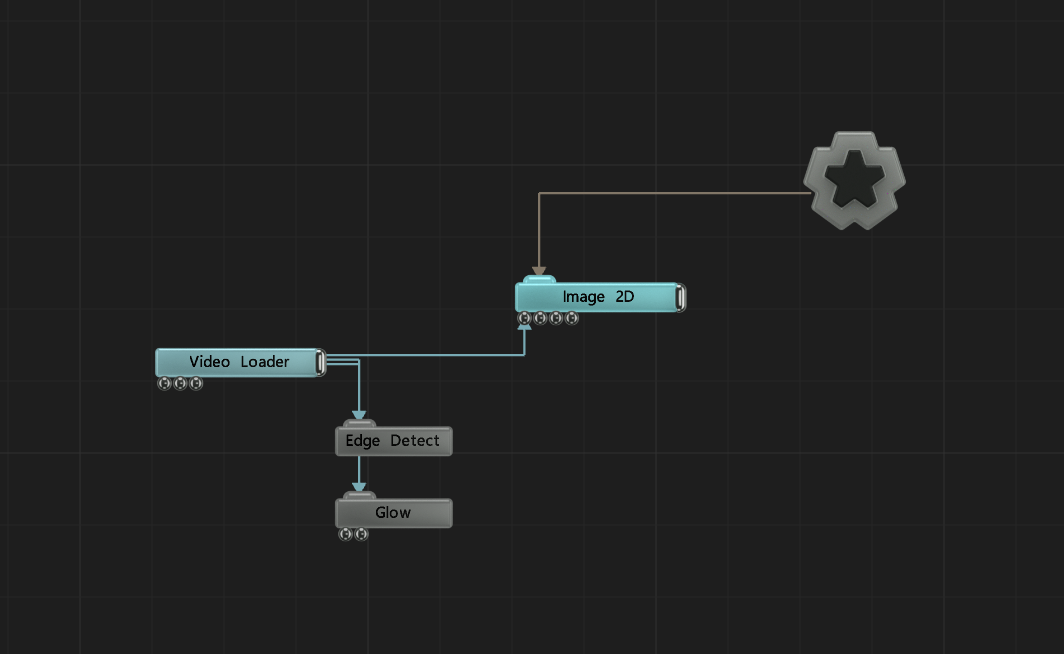
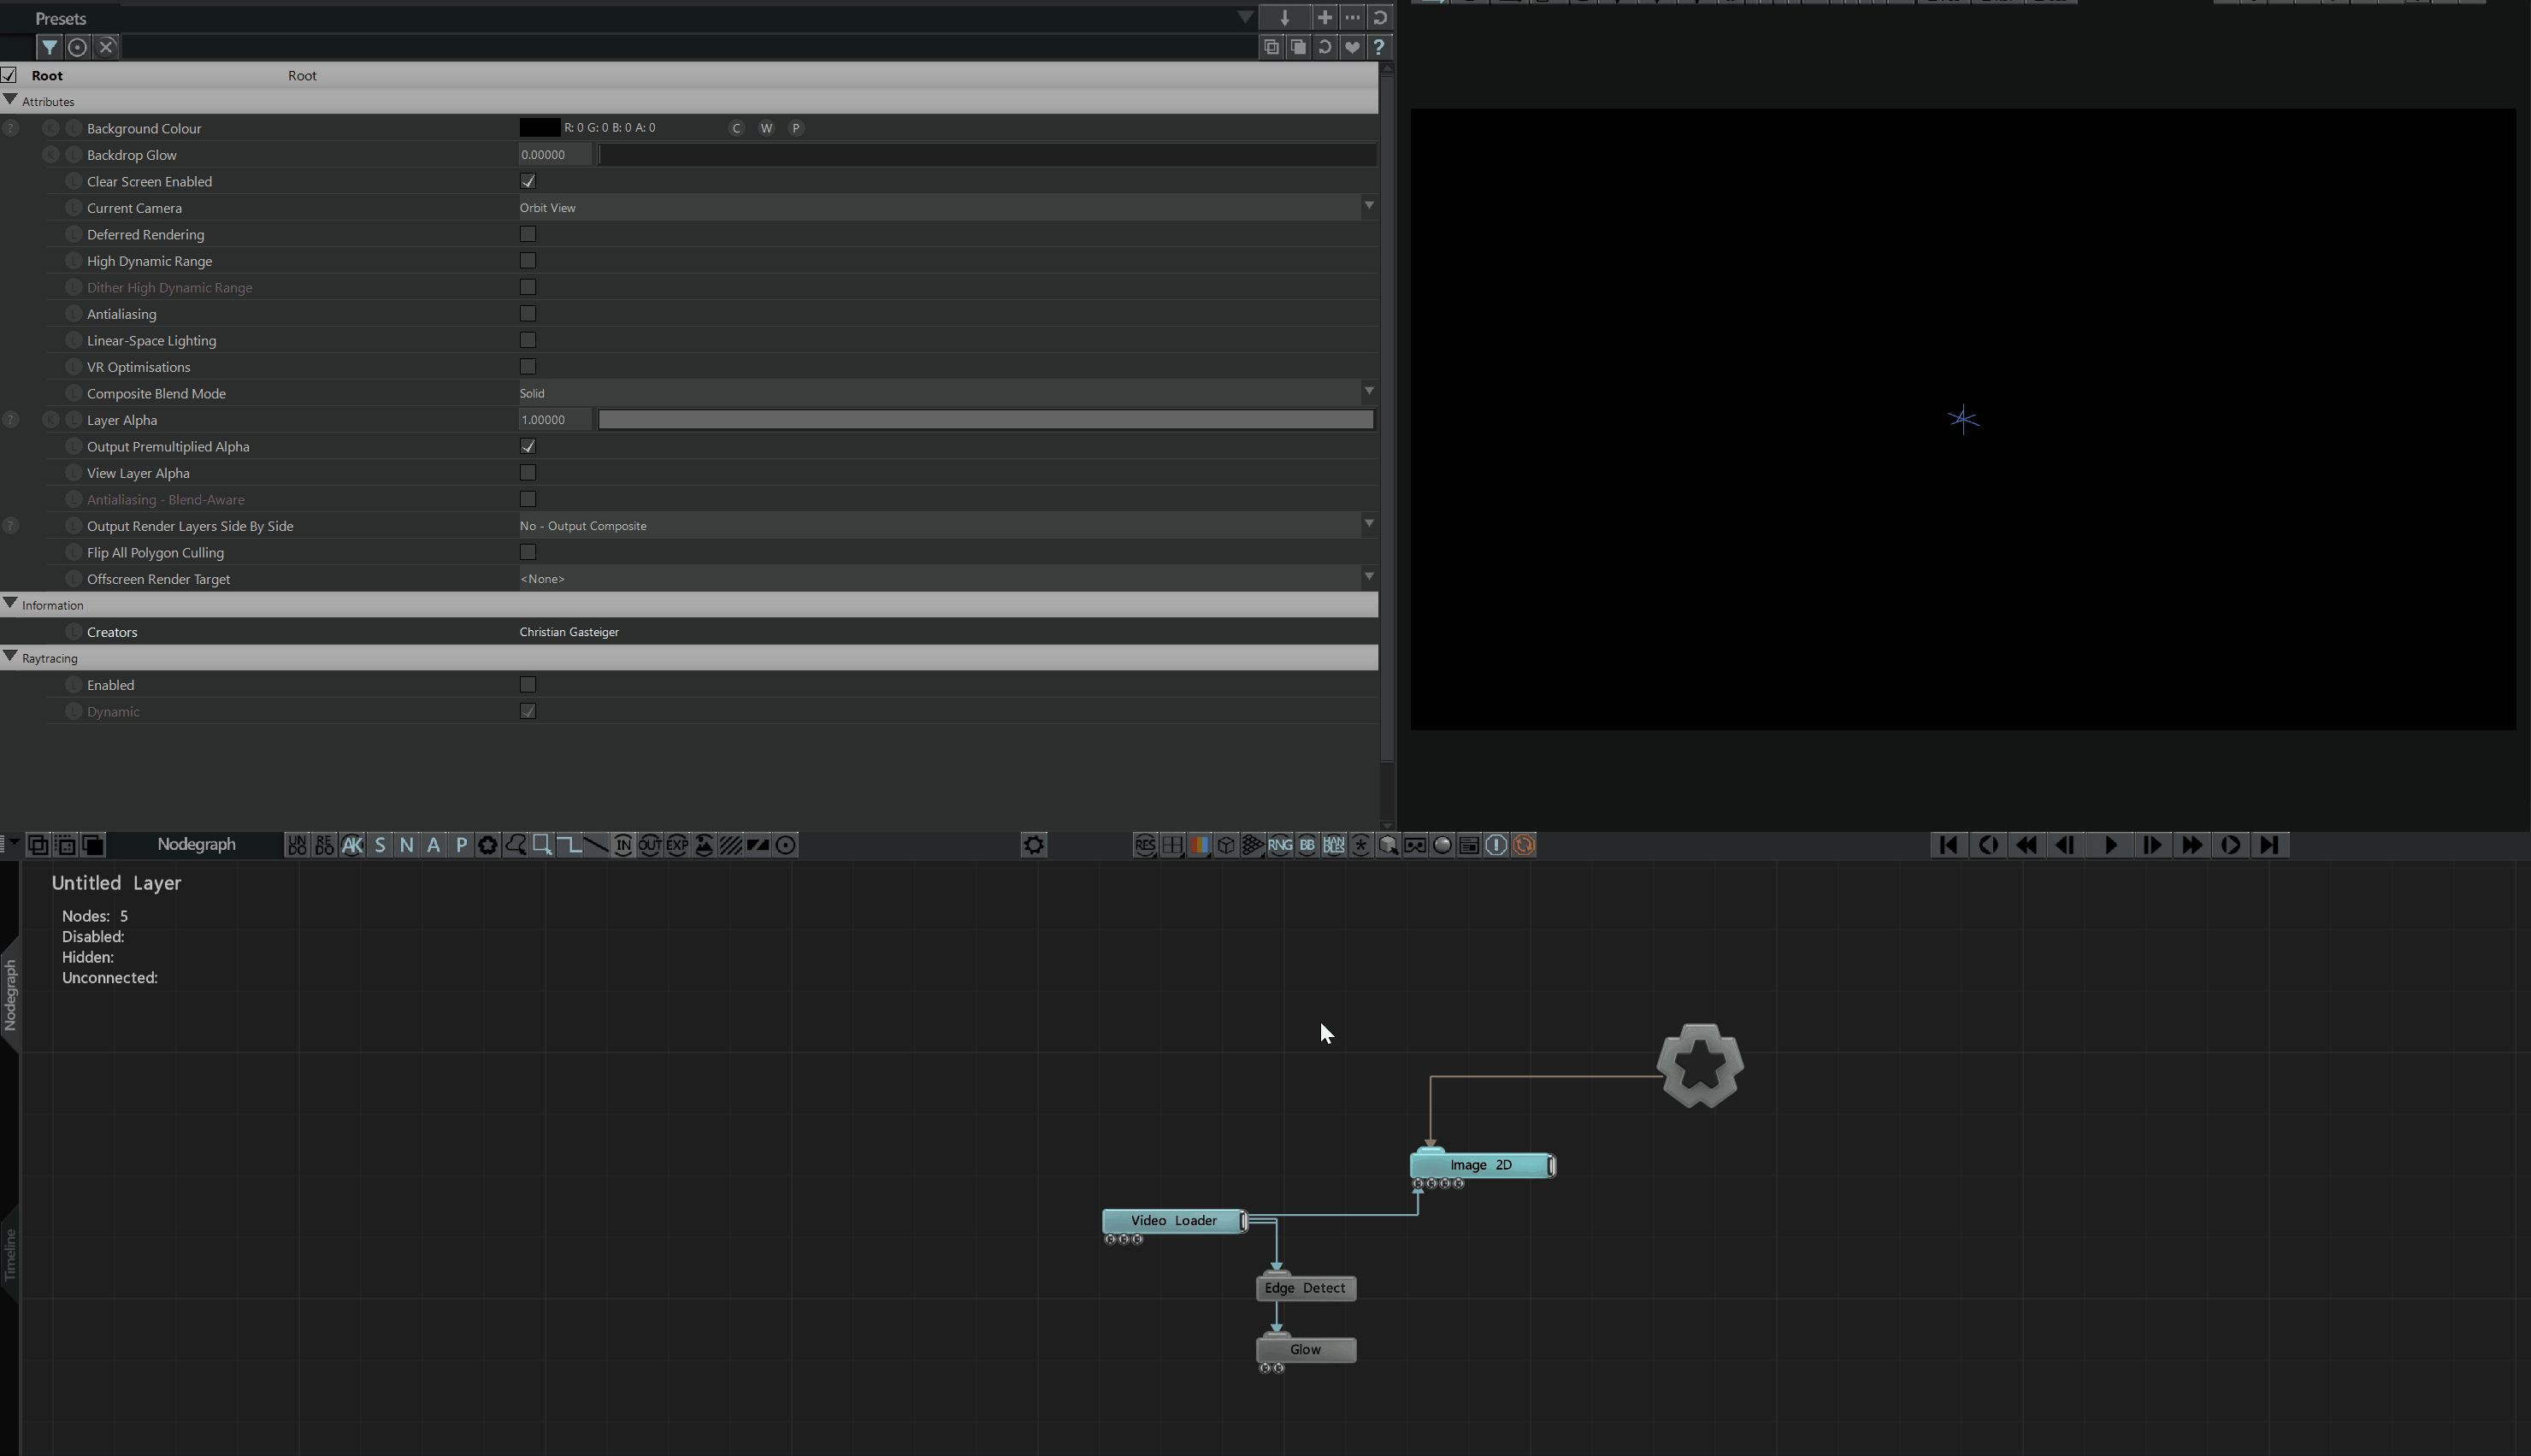
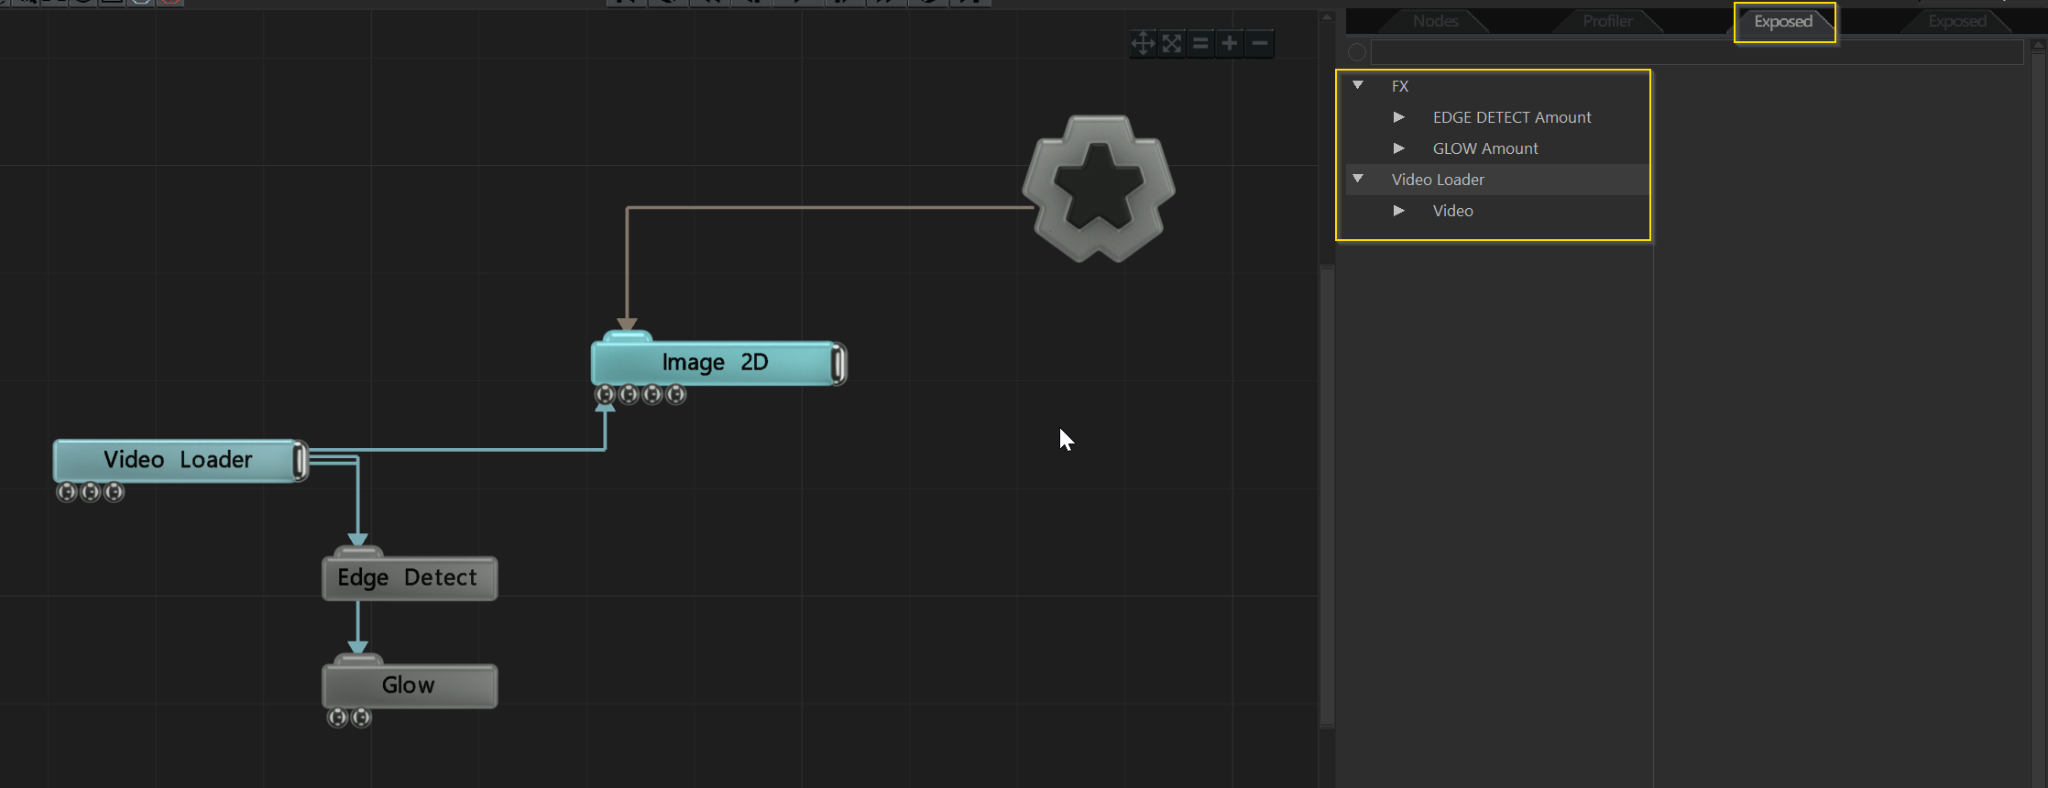
Let's add a “Video Loader” to use later as a Texture Slot inside Pixera. Next, let's add some FX, in this case “Edge Detect” and “Glow”. Finally, to see it on our screen we add a “Image 2D" Node. All settings are at default.
1.2 Expose Parameters
(Parameters, Limit Range Values, Grouping)
See also https://manual.notch.one/0.9.23/en/docs/blocks/exposing-values/.
Now let’s expose some parameters to get Pixera to work with them.
First, we expose the “Video Loader” Video so we can pipe in some sources (live cam, video) inside Pixera either as a Composite Source or as a Custom Effect.
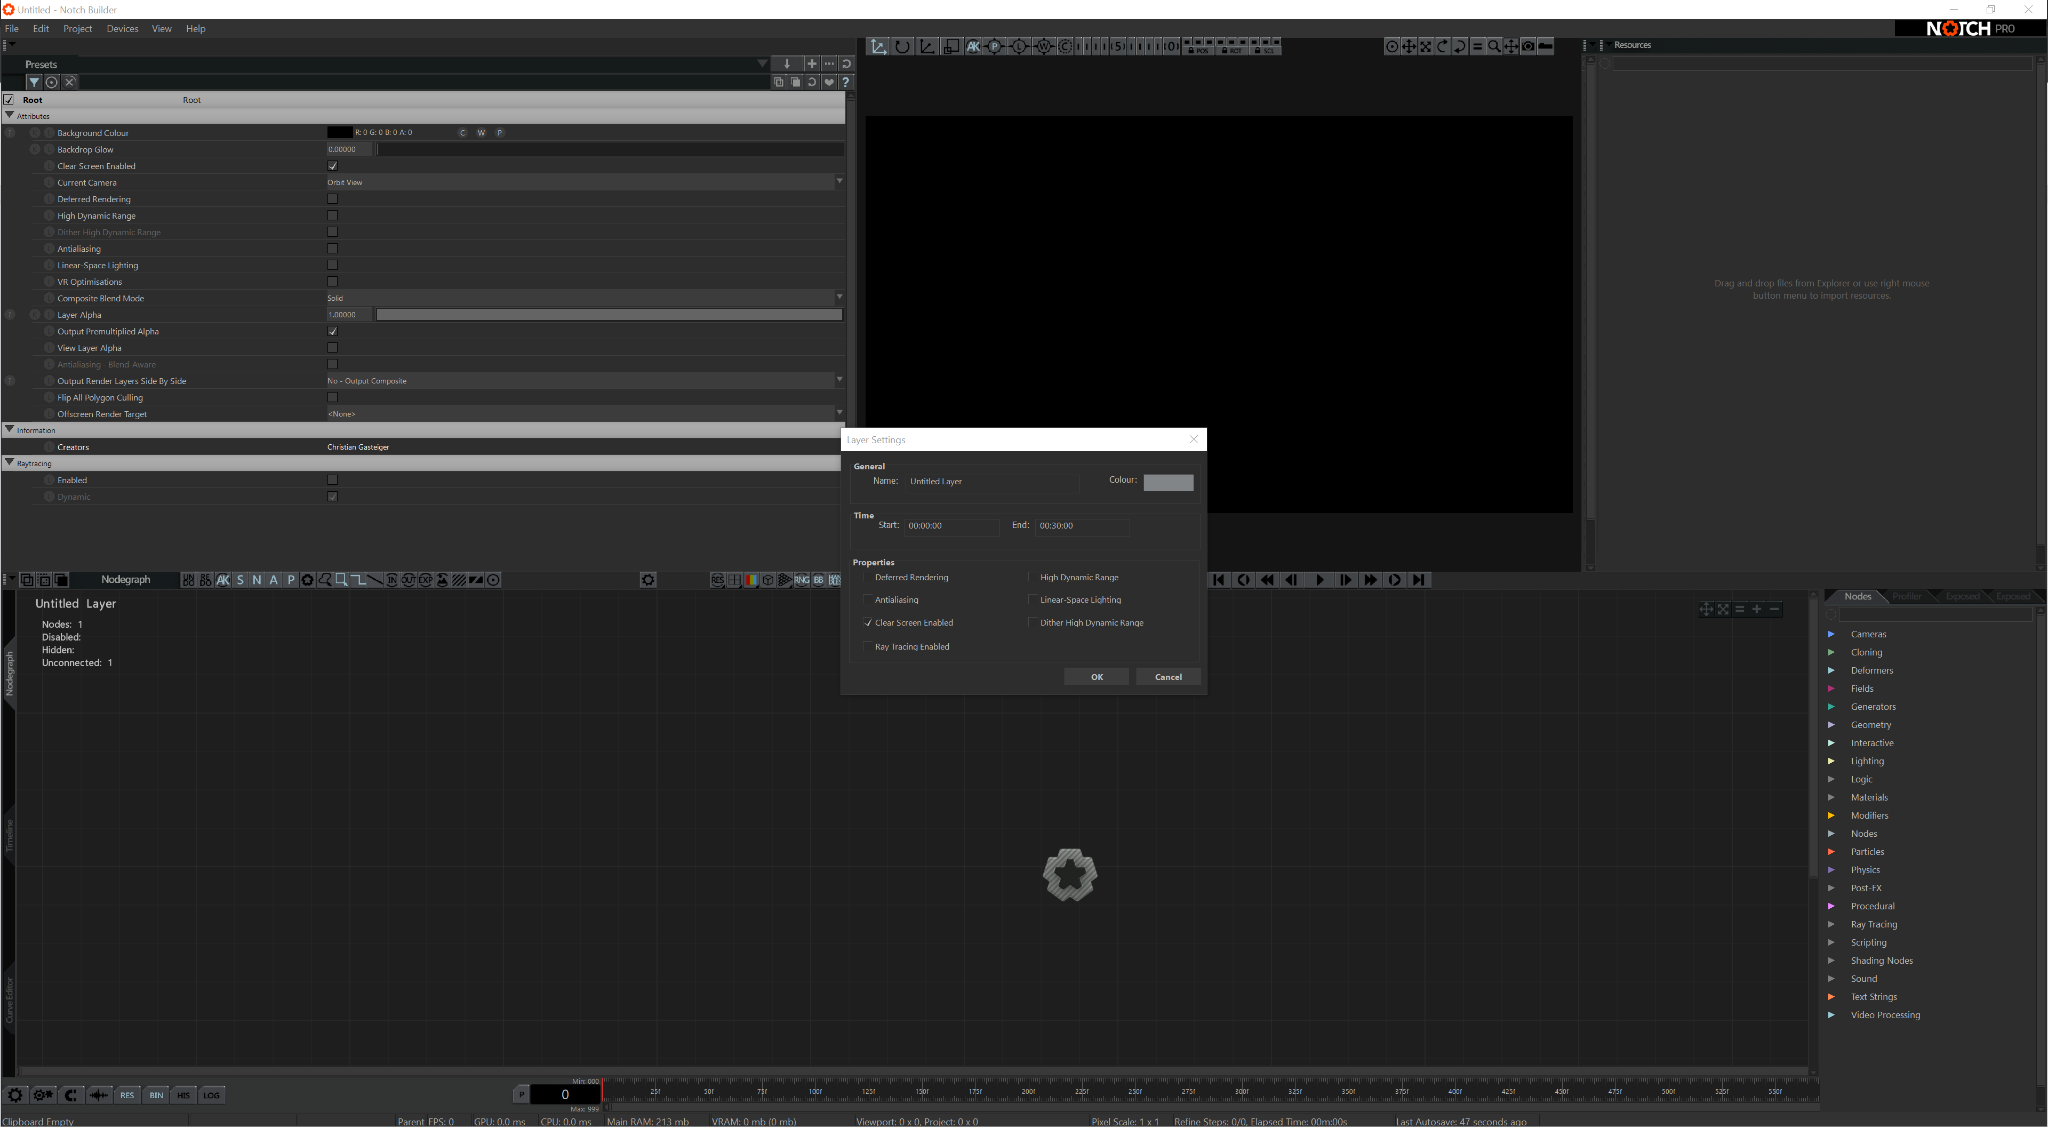
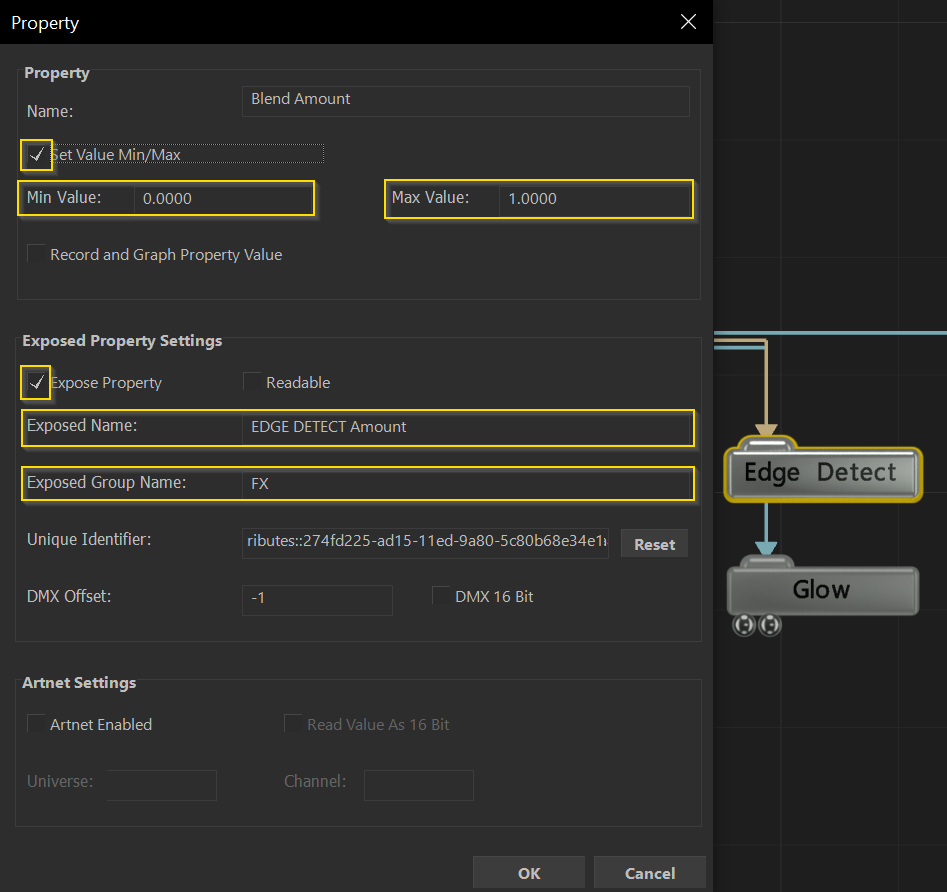
Select the “Video Loader” node. In the parameters panel there is a question mark at the left side of “Video”. If you click it a dialog box will open. Now select “Expose Property” and Pixera will now see the “Video Loader” as a Texture Slot in the Timeline.
Next, we expose “Blend Amount” parameters from “Edge Detect” and “Glow” to control those effects in Pixera's Timeline. To make things easier for the operator, we add an “Exposed Name”, an “Exposed Group Name” and a "Value Range" for the exposed parameters.
Tip
To see what parameters are exposed and how they appear in Pixera, go to the very right and click exposed. As you can see the two effects are put in one group while the loader is placed into another.
1.3 Expose IMAG Notch Block
To export the Block: Click “Project” - “Compile Block for Media Servers” - enter a name and your desired path, and then you’re ready to import it into Pixera.
2. How to use Notch Blocks in Pixera
Notch Blocks require a Notch License to be attached into/loaded onto the Manager for the Block resource to be placed onto the Timeline. If using a Manager - Client setup with only enough dongles for the Clients, the Notch Learning License can be loaded onto the Manager allowing you to see the Notch Block in the Preview, albeit with a Watermark.
https://www.notch.one/pricing/
If you do not have a Learning License and do not need the Preview, you can plug the licensed Dongle into the Manager and then drag the Block onto the Timeline. After restarting Pixera, unplugging the dongle from the Manager and plugging it into the Client, you should then see the Block load on the Client while the Manager Preview stays black.
2.1 Import a Notch Block as Custom Effect (Deprecated)
This will create an Effect similar to the other GLSL Effects in Pixera and can be stacked with other Effects on the selected Layer.
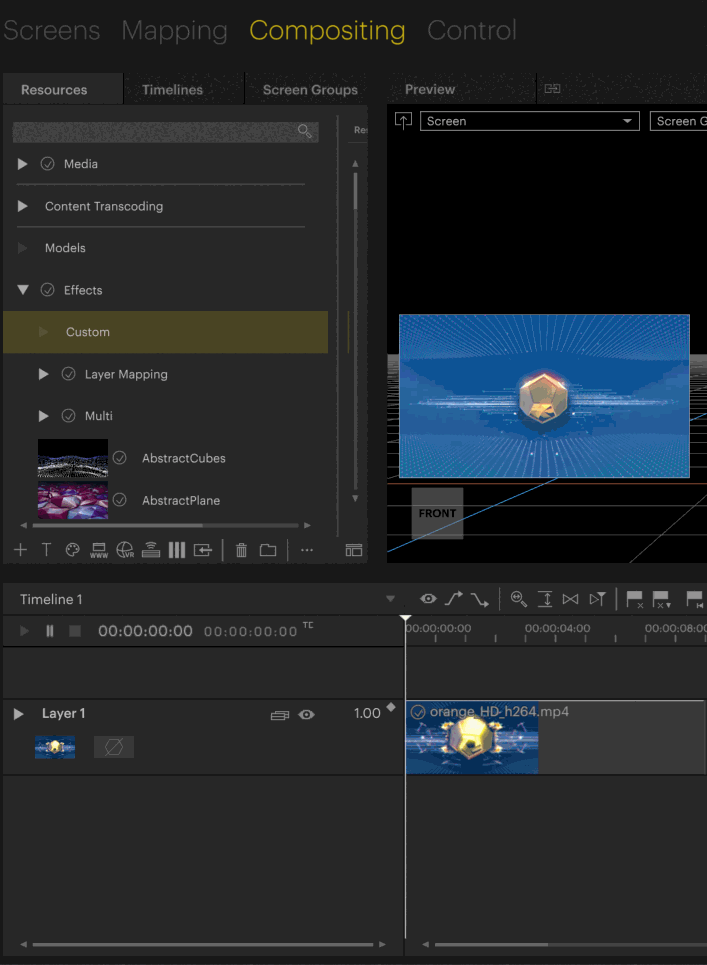
To Import a Notch Block, unfold the “Effects” folder in “Resources” and right-click on “Custom”. Under “Add Resources” add the desired Notch Block file. This will add the file under the “Custom” tree. In order to apply the Block, just drag and drop the Effect onto an existing Layer, which contains either a video or a live cam.
Warning
Using the Notch Block as a custom effect is not recommended due to its limitations. It is highly recommended to work with Notch Block as Compositing Layers as described in the next section.
2.2 Import a Notch Block as Compositing Layer
This will create a dedicated Layer for your Block to run on.
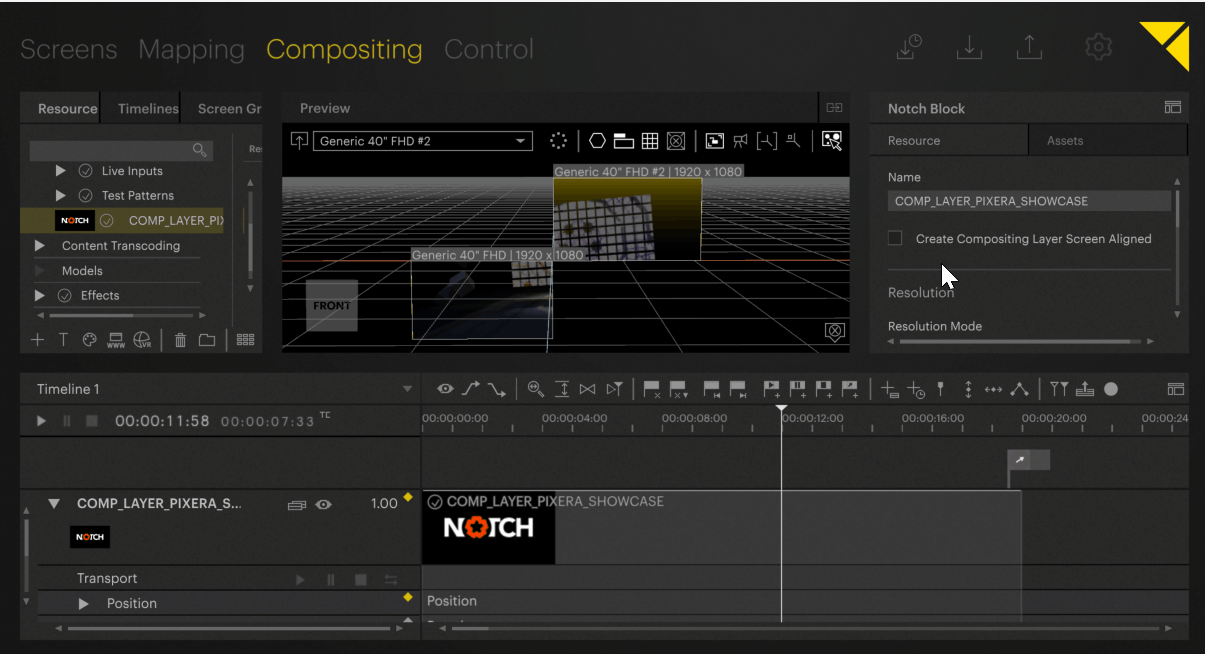
To do so head to the Compositing Tab and hit the “VR” button in the resource panel. Now let's import the “COMP_LAYER_Pixera_SHOWCASE” Block by selecting it and hit “Open” to add it to our resources. It is now inside our Resources, and we can drag and drop it onto our Timeline.
If we have multiple Notch Layers in a Block, Pixera 1.8 and 2.0 handle this differently. In 1.8 we will have to choose which Notch Layer to load. In 2.0 we have the option to choose one Notch Layer to load or we can load all of the Notch Layers at once.
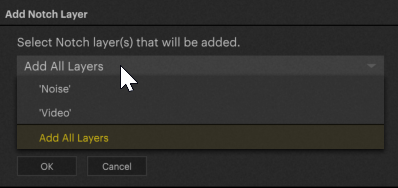
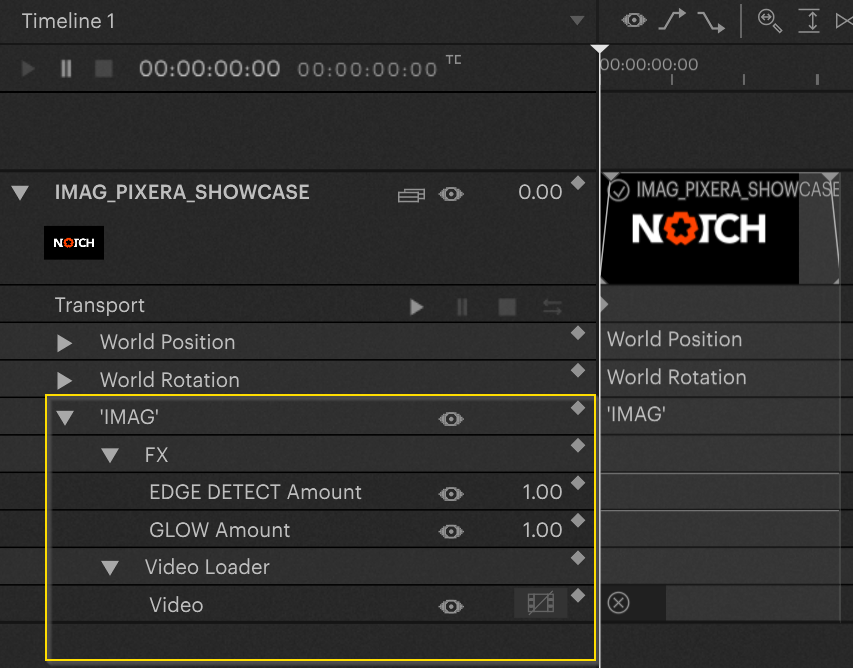
Adding all Notch Layers allows us to select which should currently be loaded by selecting the Notch Layer in the dropdown. We will also see all parameters for each Notch Layer and can change these values no matter what Notch Layer is selected.

Going back to a Notch Block with one Notch Layer, unfolding the parameter allows us to see the exposed Parameters in our predefined groups. For the "IMAG_Pixera_SHOWCASE" Block, there are the “FX” and the “Video Loader” groups.
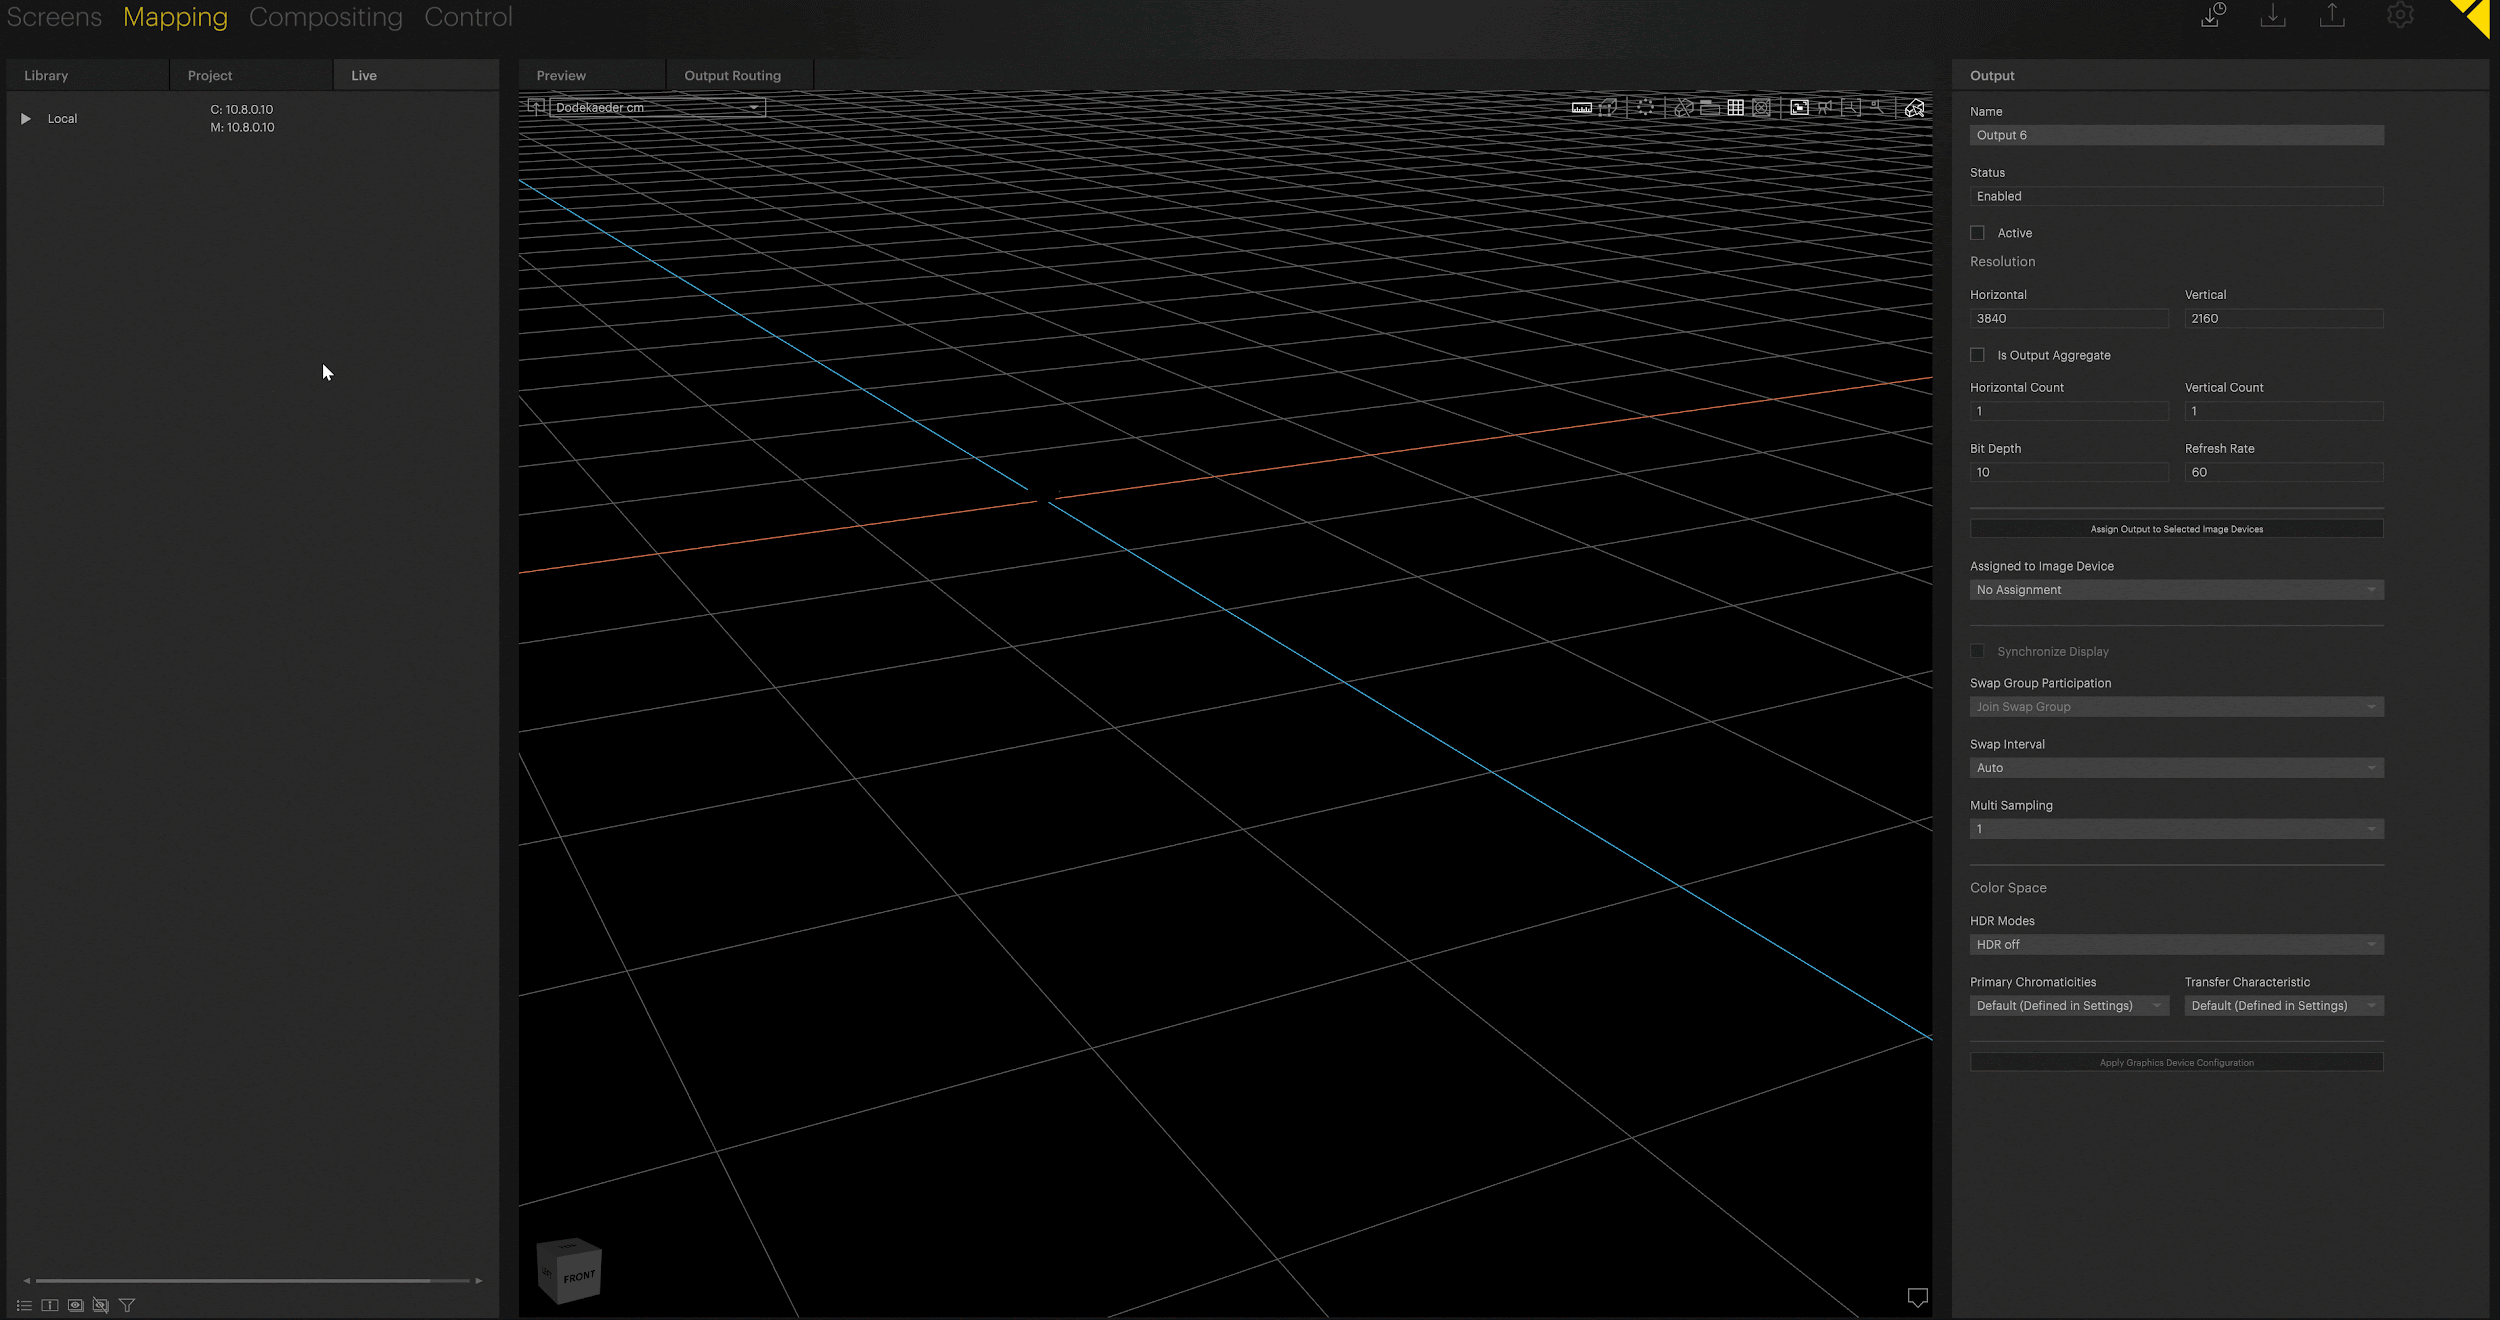
2.2.1 Notch Block Input Resolution
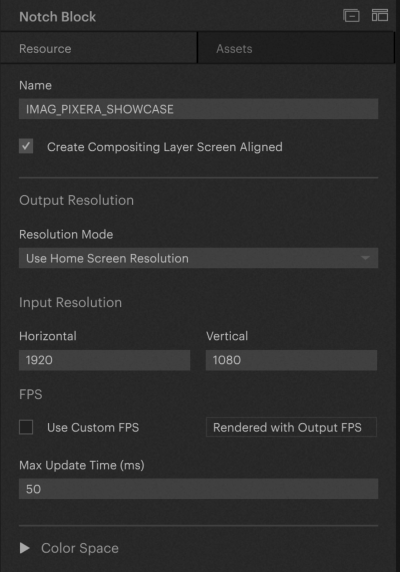
On the Notch Block resource, you also have a few settings you can change.
The first will be the Output Resolution that you want the Notch Block to render its texture into.
The second will be the Input Resolution which decides what resolutions inputed Video or images will be set to for the Notch Block to then use. NOTE, The Notch Block will always change the content to this resolution, so mixing different resolution media as the input on the timeline will force it into this res.
The third will be the FPS the Block will be rendered in, by default it will be whatever the Timeline is set to.
Warning
If aiming to get more performance out of the Notch Block by decreasing the FPS, you must also limit the FPS of the RX process being run rendering the Notch Block due to correct timing between the engine and the Notch Block requiring the same FPS.
Last is the Max Update Time (ms) which decides how fast the communication between the Notch Block and Pixera will be for value changes and other messages.
2.2.2 Control “IMAG_Pixera_SHOWCASE” via Compositing Layer
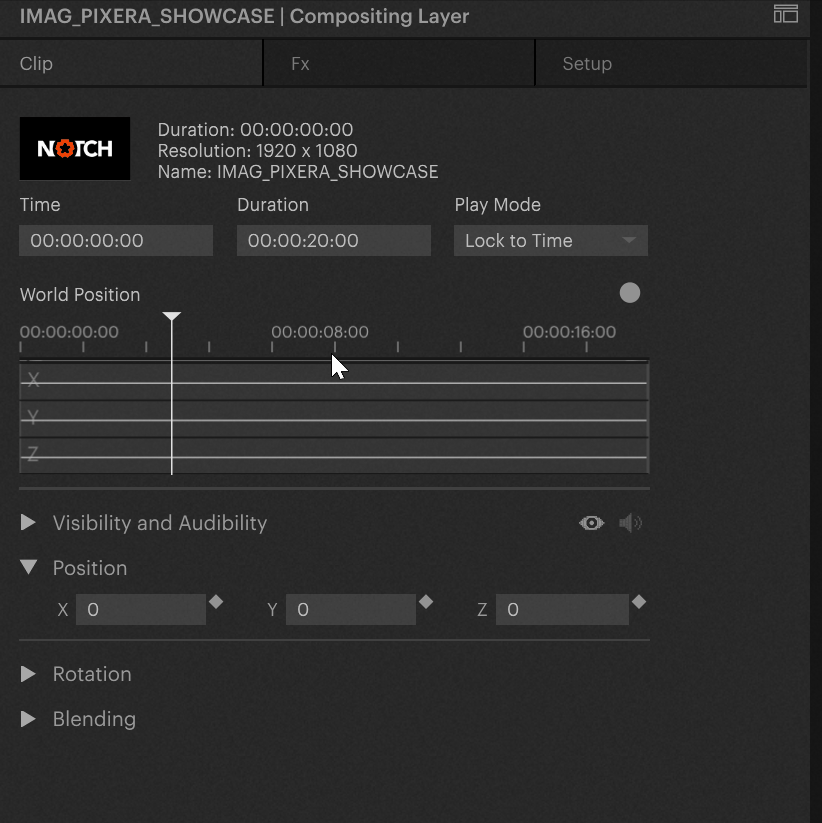
Now let’s have a look at how to control the "IMAG_Pixera_SHOWCASE" Block via a Composite Layer instead of a Custom Effect.
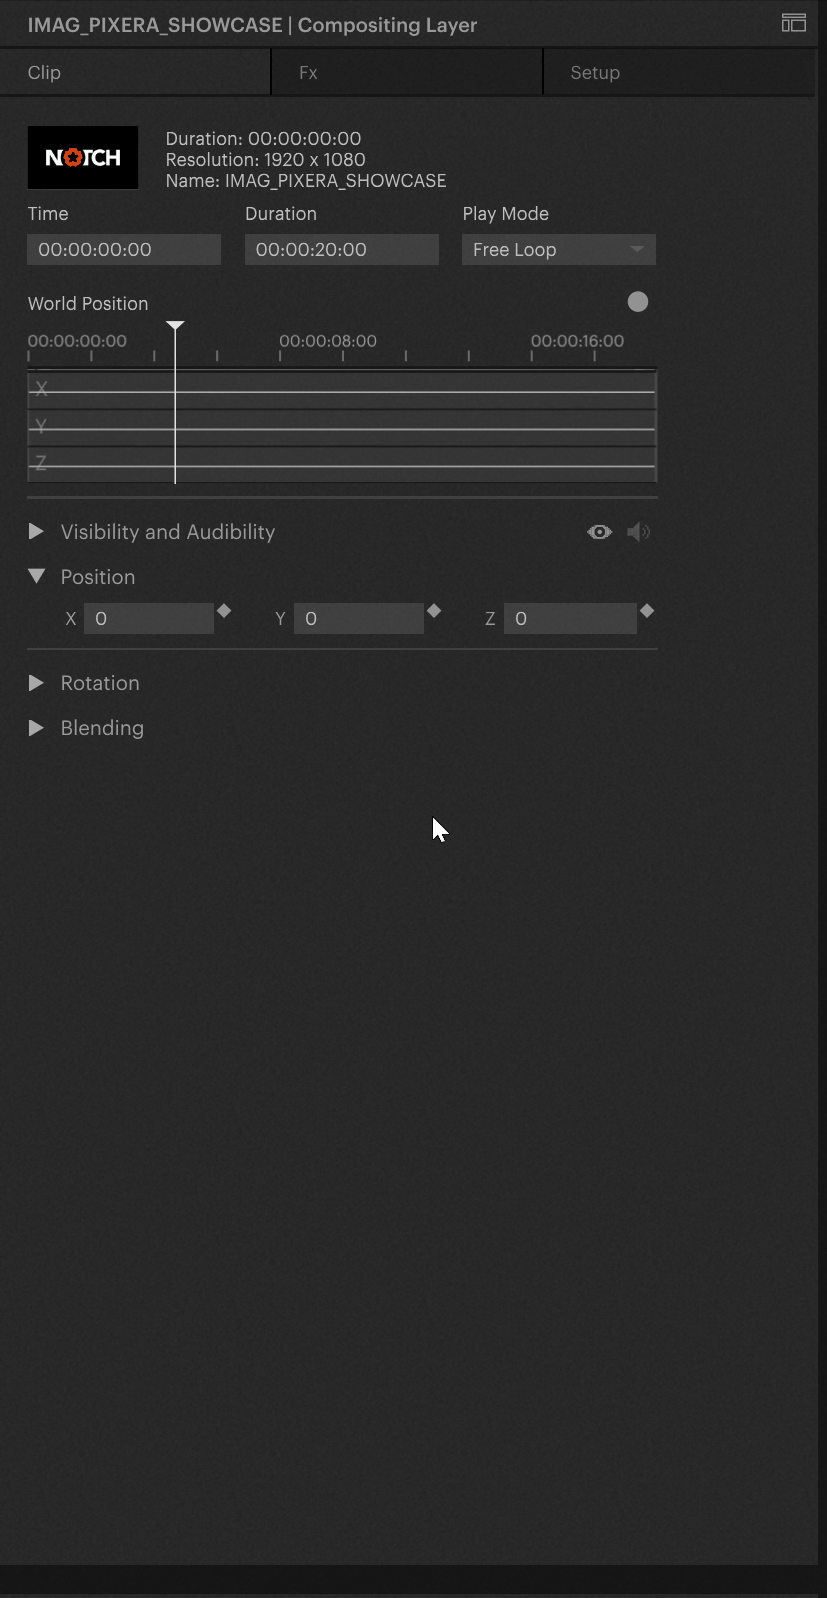
Since the Block has its own Timeline, and is therefore independent of Pixera's Timeline, you can choose whether you want to play it in "Free loop" or “Lock to Time” on Pixera's Timeline. In our case let’s choose "Free Loop" so the simulation runs regardless of Pixera's Timeline state.
Since there is no content inside the Block, we do not see anything. In order to add content, we need to drag a source onto the container in our Timeline. This can be a live cam or a video. In this instance let’s choose a Live Input from the Resource Tab and drag it onto the “Video” Slot of the “IMAG_Pixera_SHOWCASE” Layer.
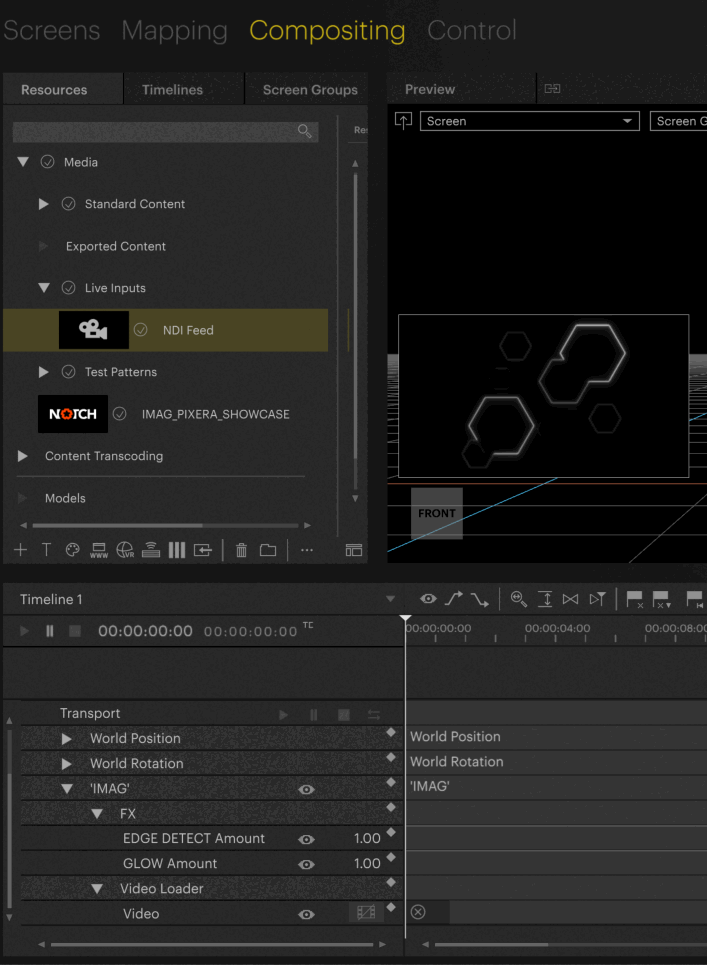
To keep the Notch Block loaded at all times you can select “Preload Effects Permanently”. You can find this option by selecting the Layer - on the right-hand side select “Setup” and scroll down to “Preload Effects Permanently”. Be aware - depending on your machine and the size of your Block this can slow down your machine.
There will also be a lock symbol on the Layer which we can toggle on and off to change this setting.

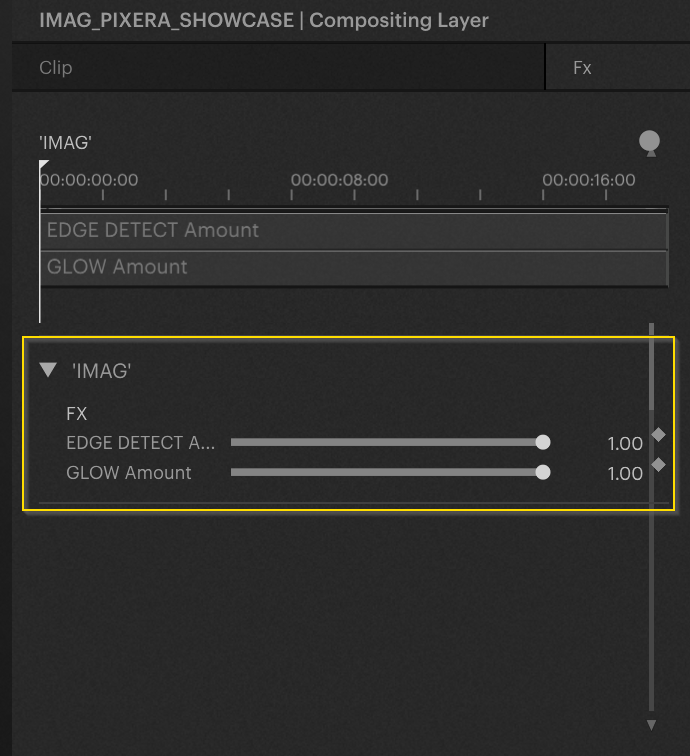
If we take a look at “FX” tab on the right-hand side of the screen, we also have the parameters there hooked up to some sliders. If your name is cut off due to its length you can hover over it to see a tooltip of its full name.
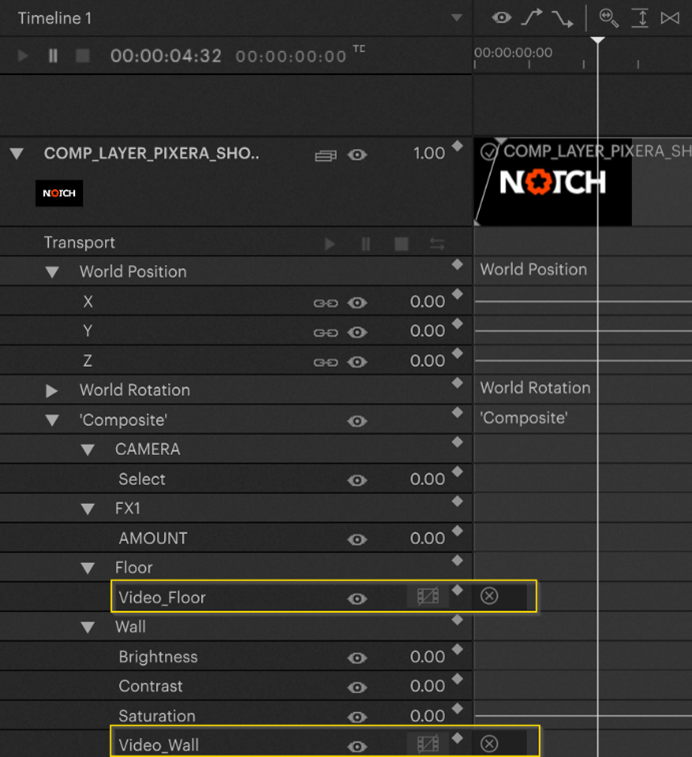
2.2.2 Control 3D Scene “COMP_LAYER_Pixera_SHOWCASE” via Composite Layer
You’ll find the Block and the Project file in the download package.
For this example, a scene called “COMP_LAYER_Pixera_SHOWCASE” is prepared which contains: a scene with a 3D Camera where “posxyz” and “rotxyz” are exposed and which contains three predefined positions, two exposed “Video Loader ' for Wall and Floor Video content, some Image adjustments for the wall, and an effect called FX1.
The two “Video Loaders” for the floor and the wall are now available for us to pipe content in.
Warning
Note that currently only the 3D Camera and UV Camera nodes are confirmed to work with Notch into Pixera. Other cameras are unknown, please test and send in a ticket with any issues using other Camera types.
In addition, Pixera will create its own view for all screens with a loaded Notch Block if there is no Exposable Camera. If there is an Exposable Camera, Pixera requires one for each screen you aim to have the Notch Block play on.
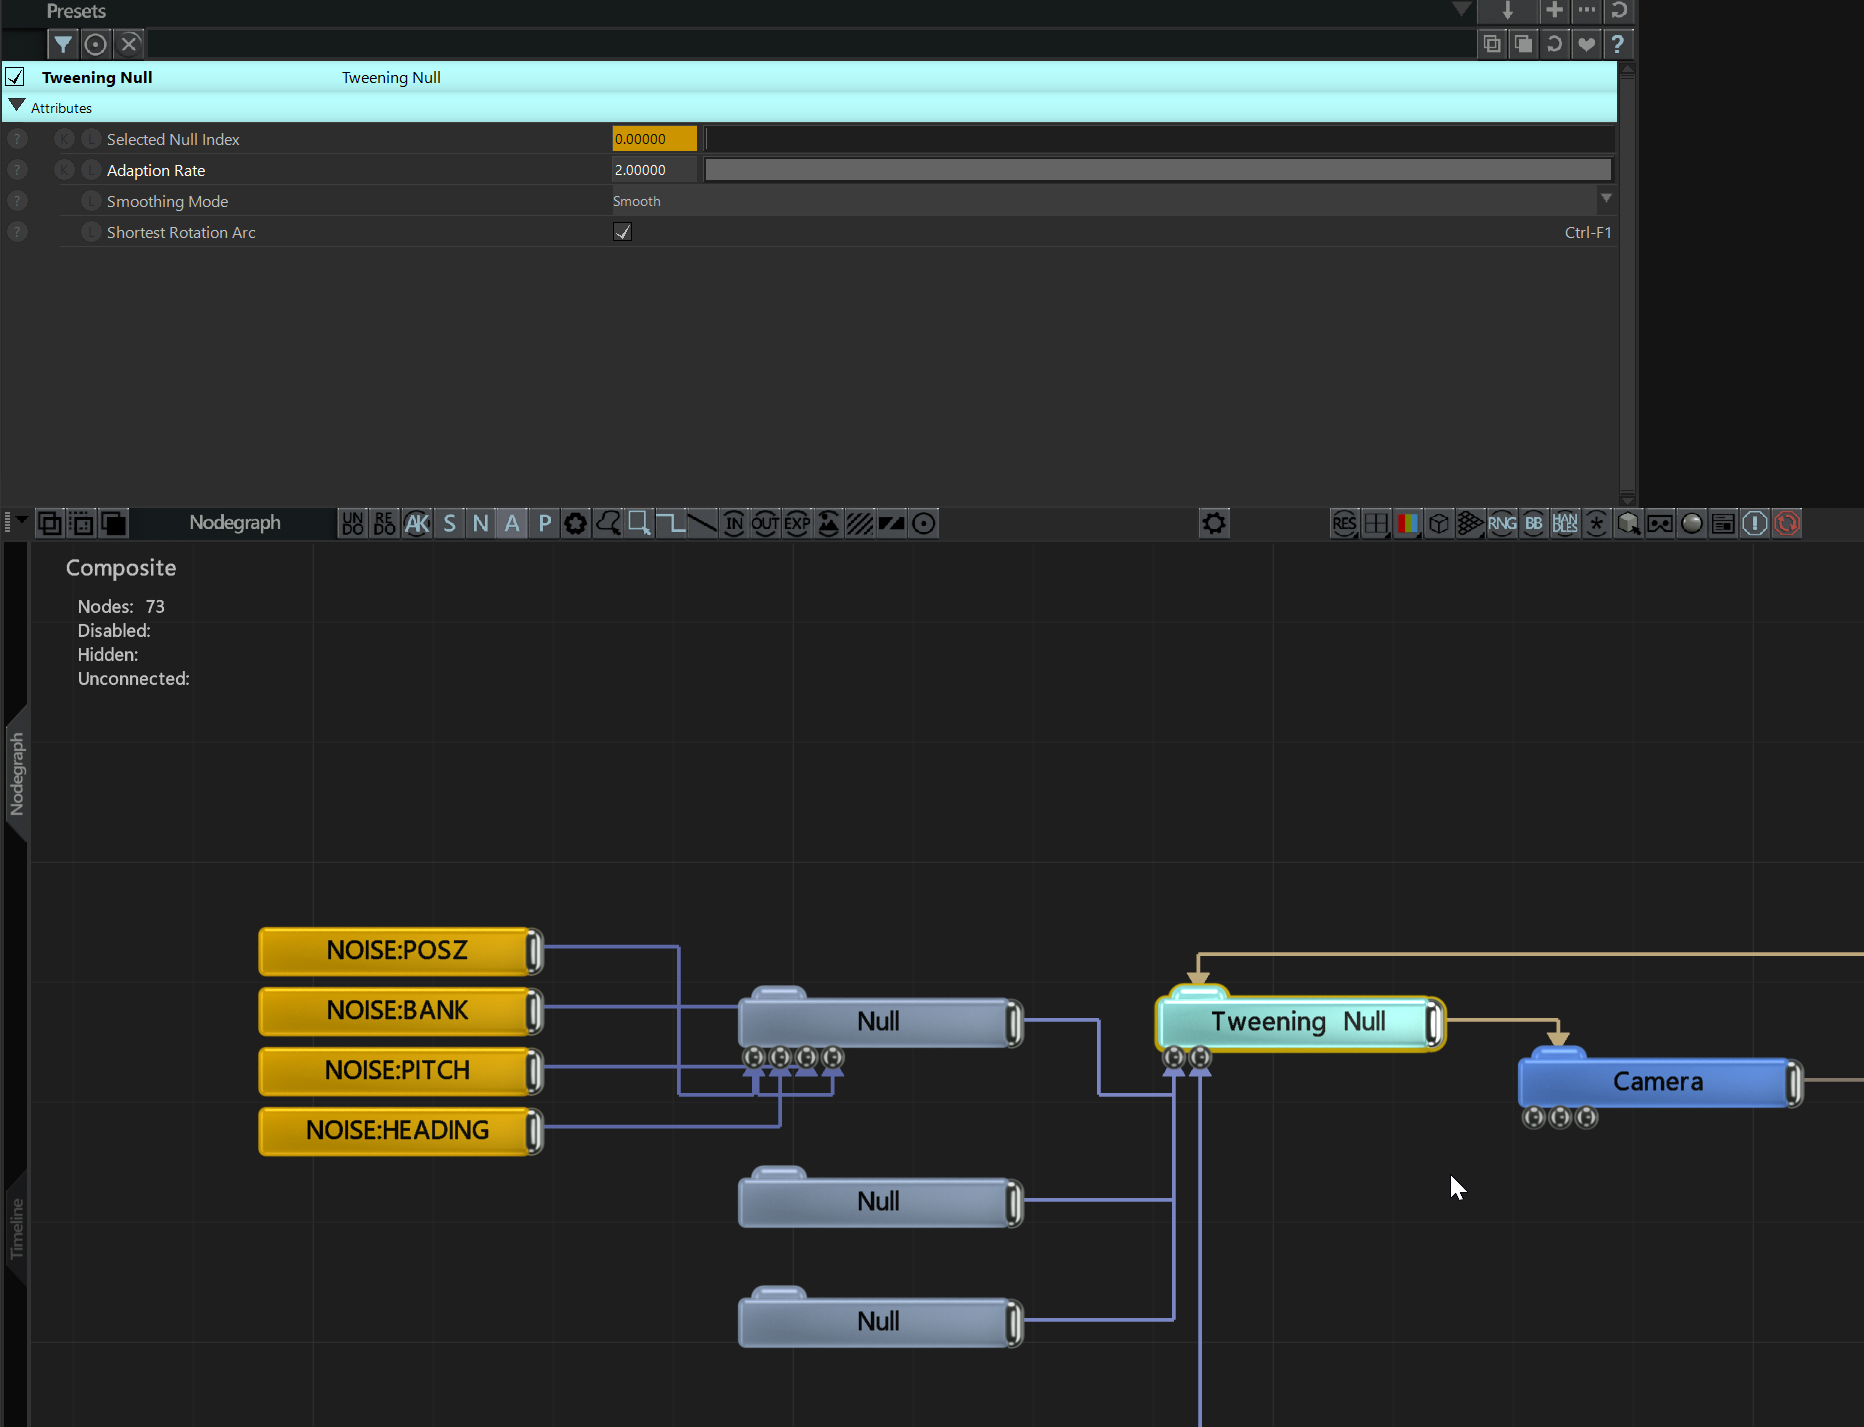
Pro tip: for the Parameter “CAMERA:Select” you can expose a tweening null index (0-2) that is attached to a camera and has nulls as coordinates. These serve as predefined camera positions which we can now transition to via the tweening null properties.
More info at: https://manual.Notch.one/0.9.23/en/docs/nodes/geometry/tweening-null/
3. UV Notch Block to Pixera Setup
You’ll find the Block and the Project file in the download package.
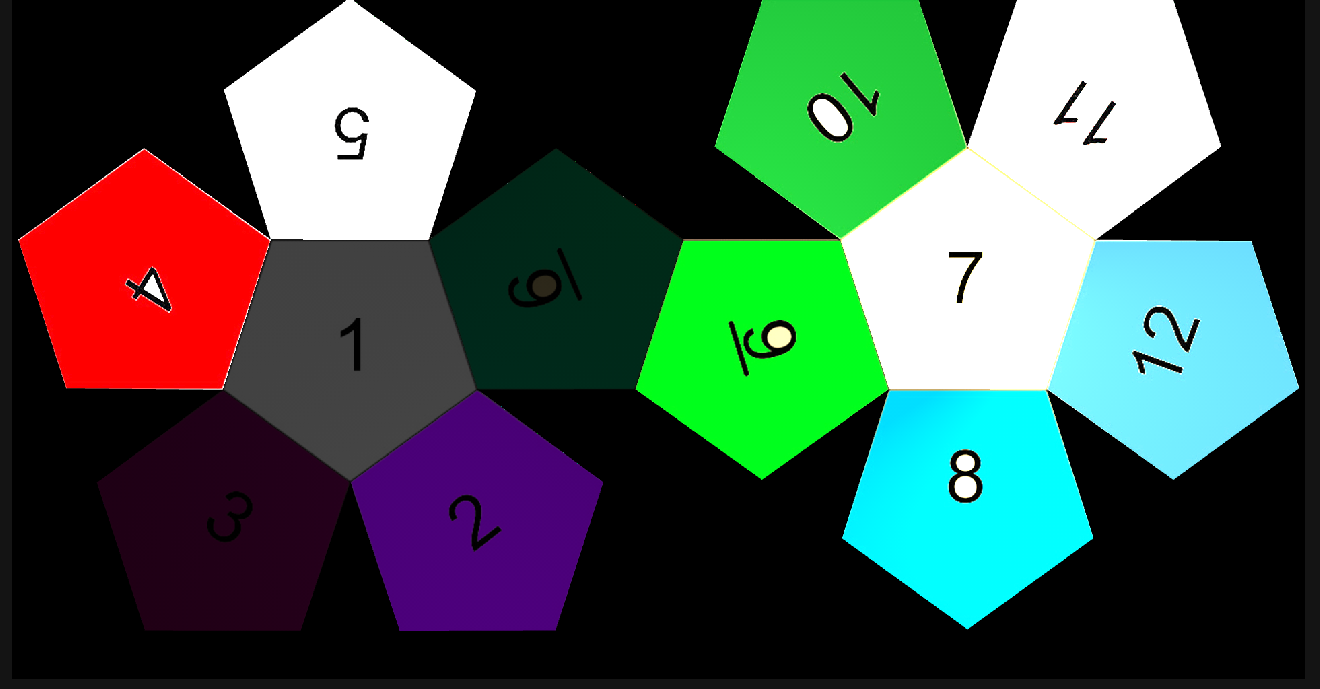
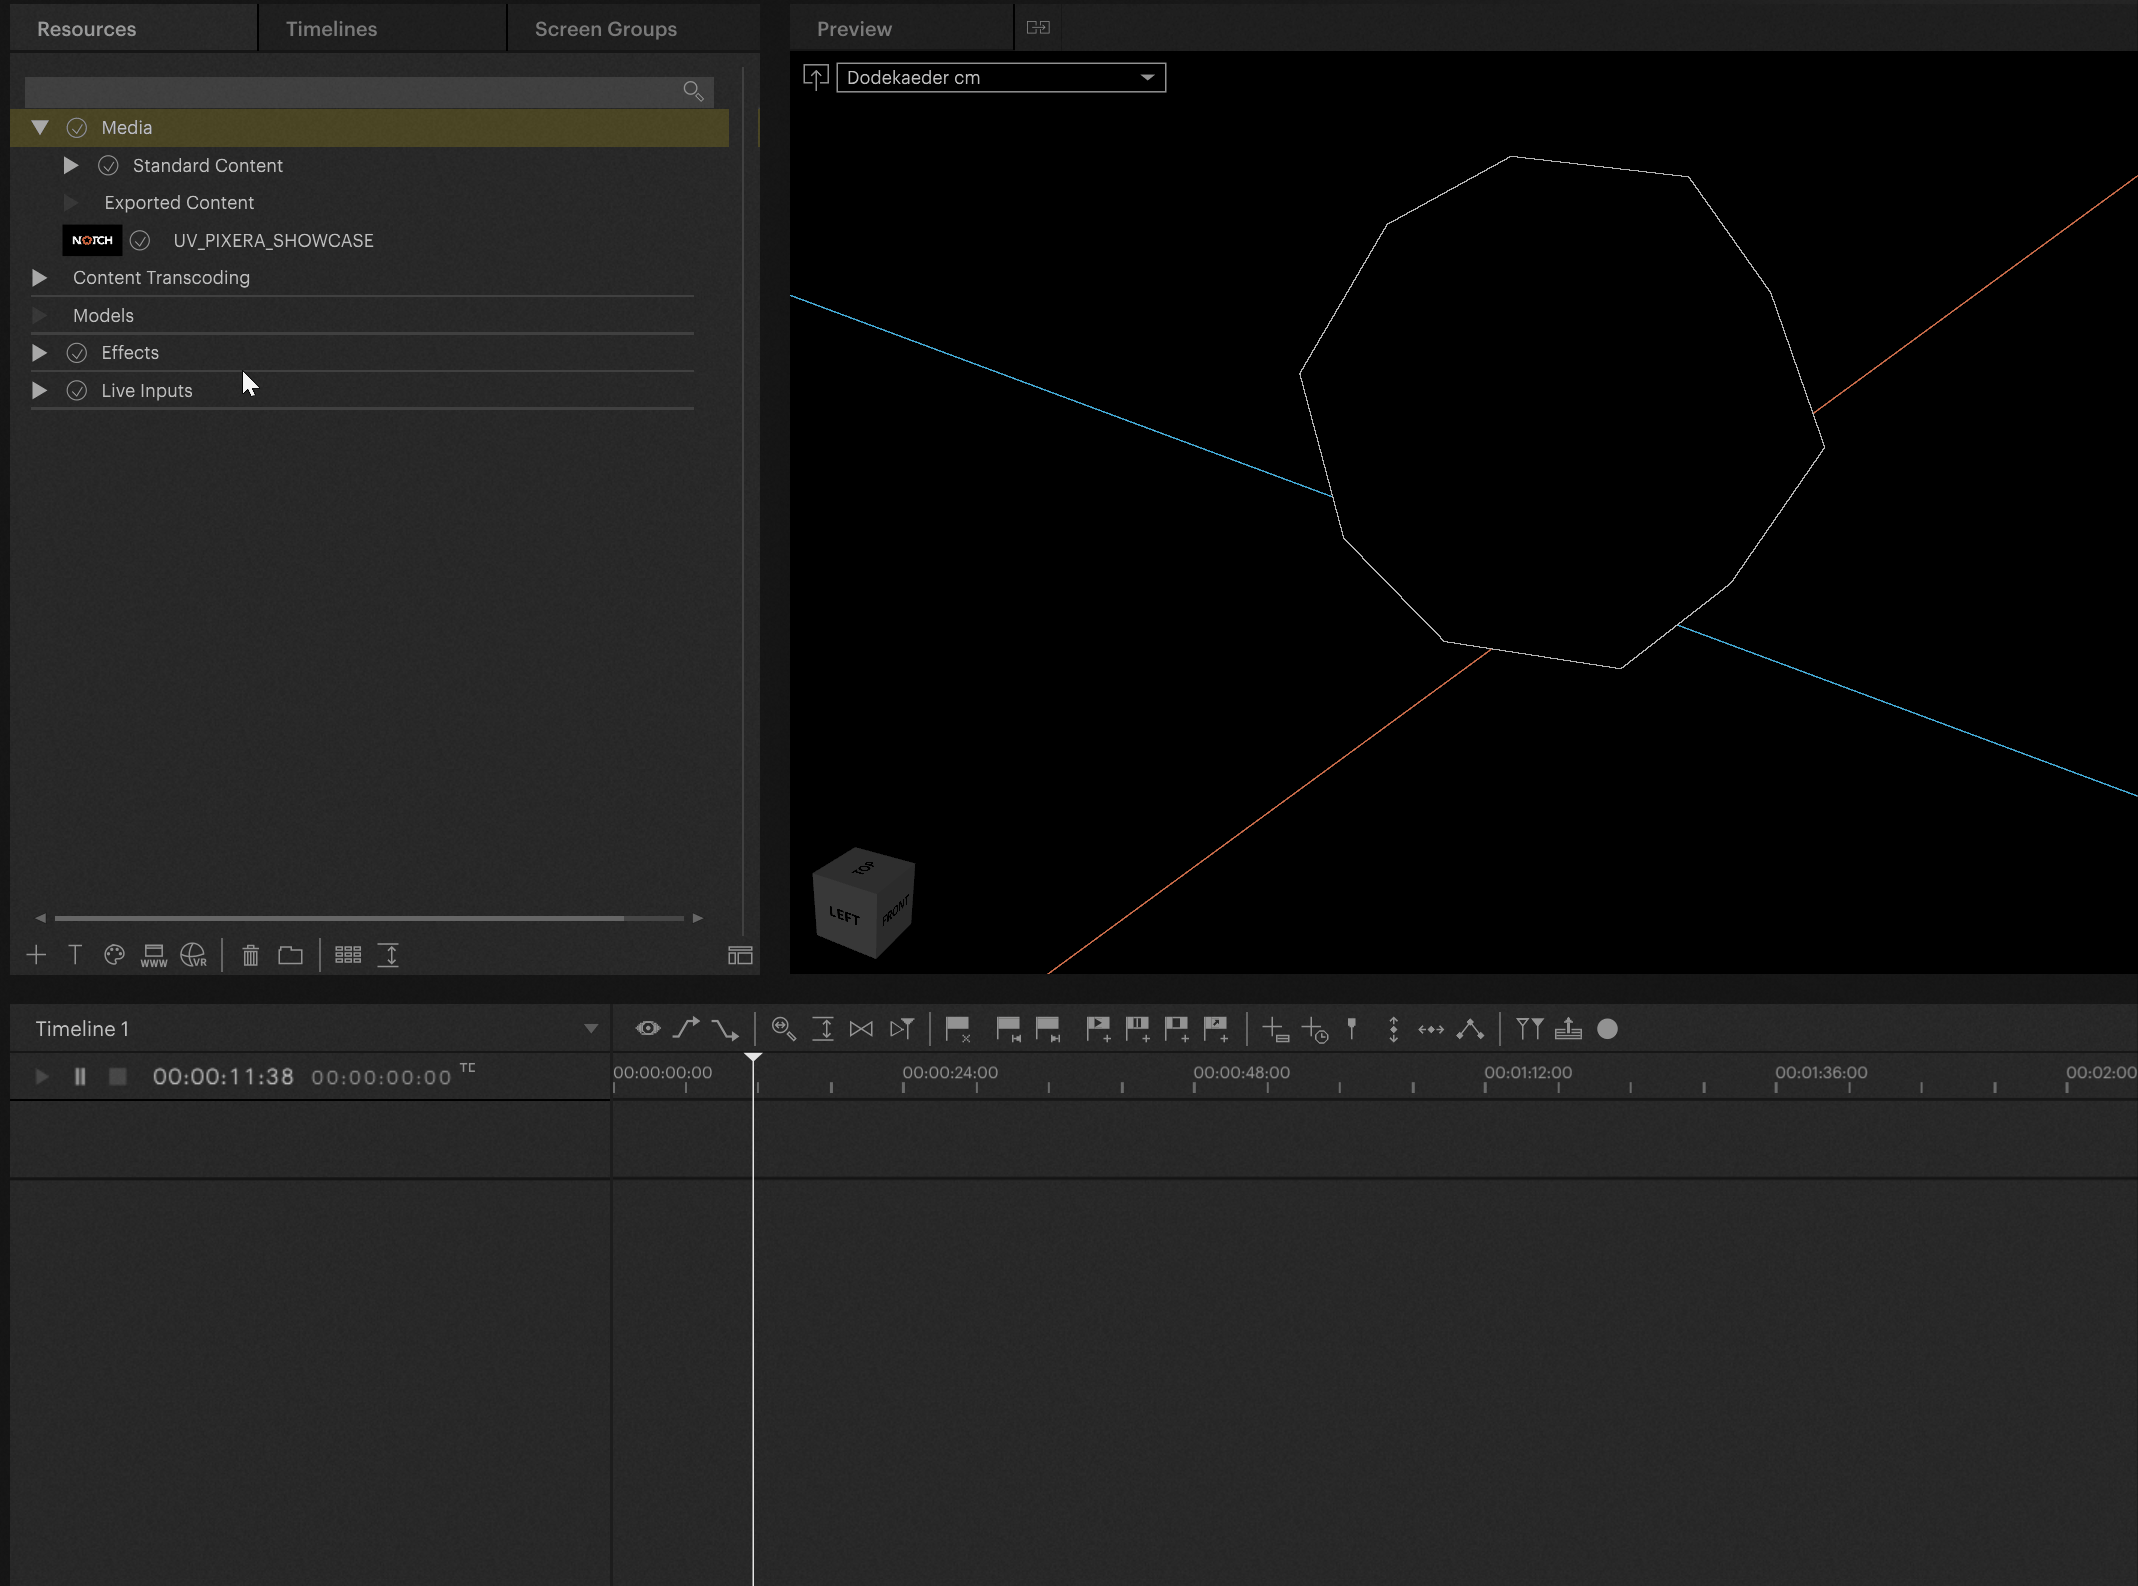
To export a scene for UV mapping we first need a 3D model with correct UVs. In this example, we use the Dodekaeder provided by Pixera.
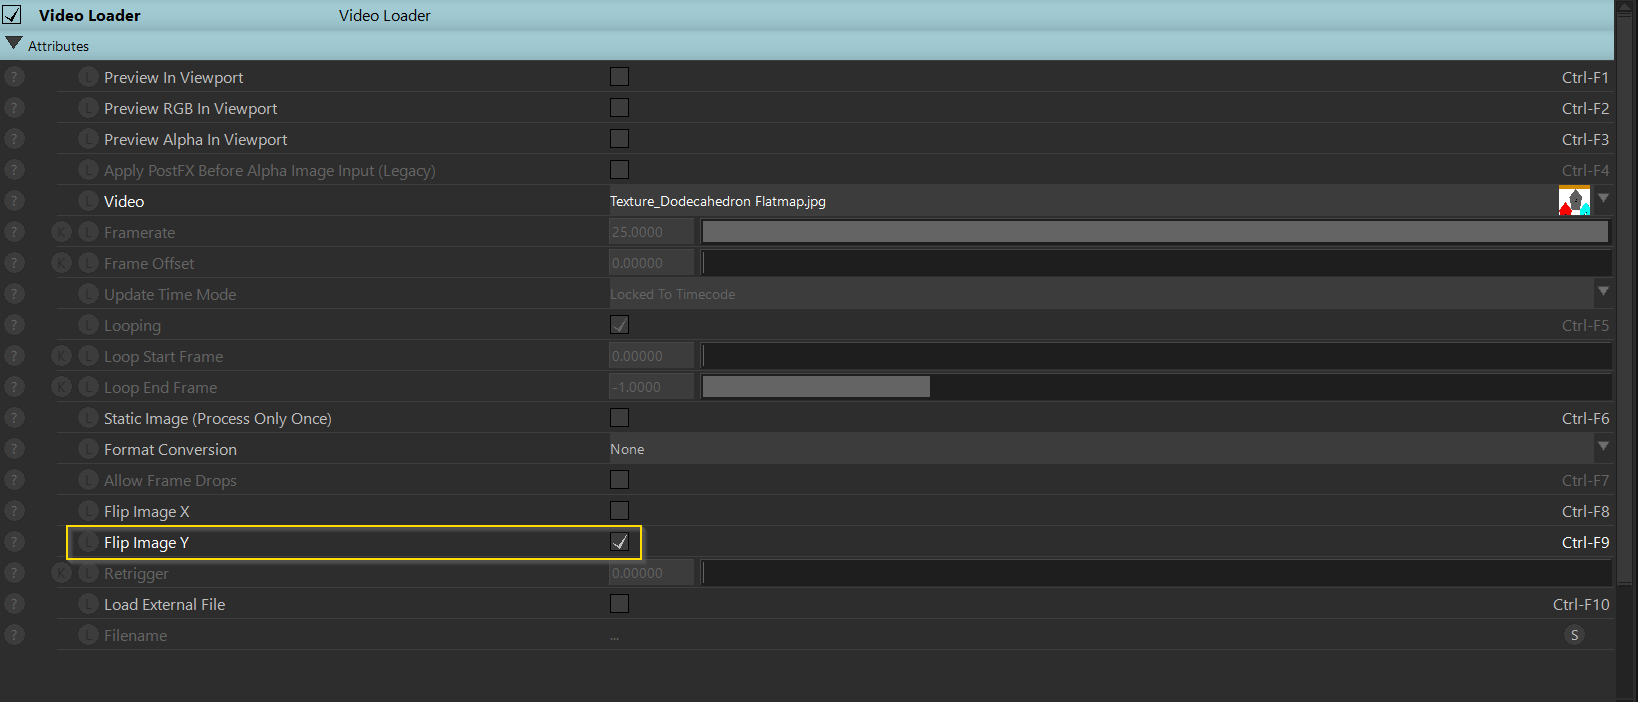
For this 3D File we need to flip the Y Axis of our texture in Notch but you might not need to depending on how your 3D model is prepared.
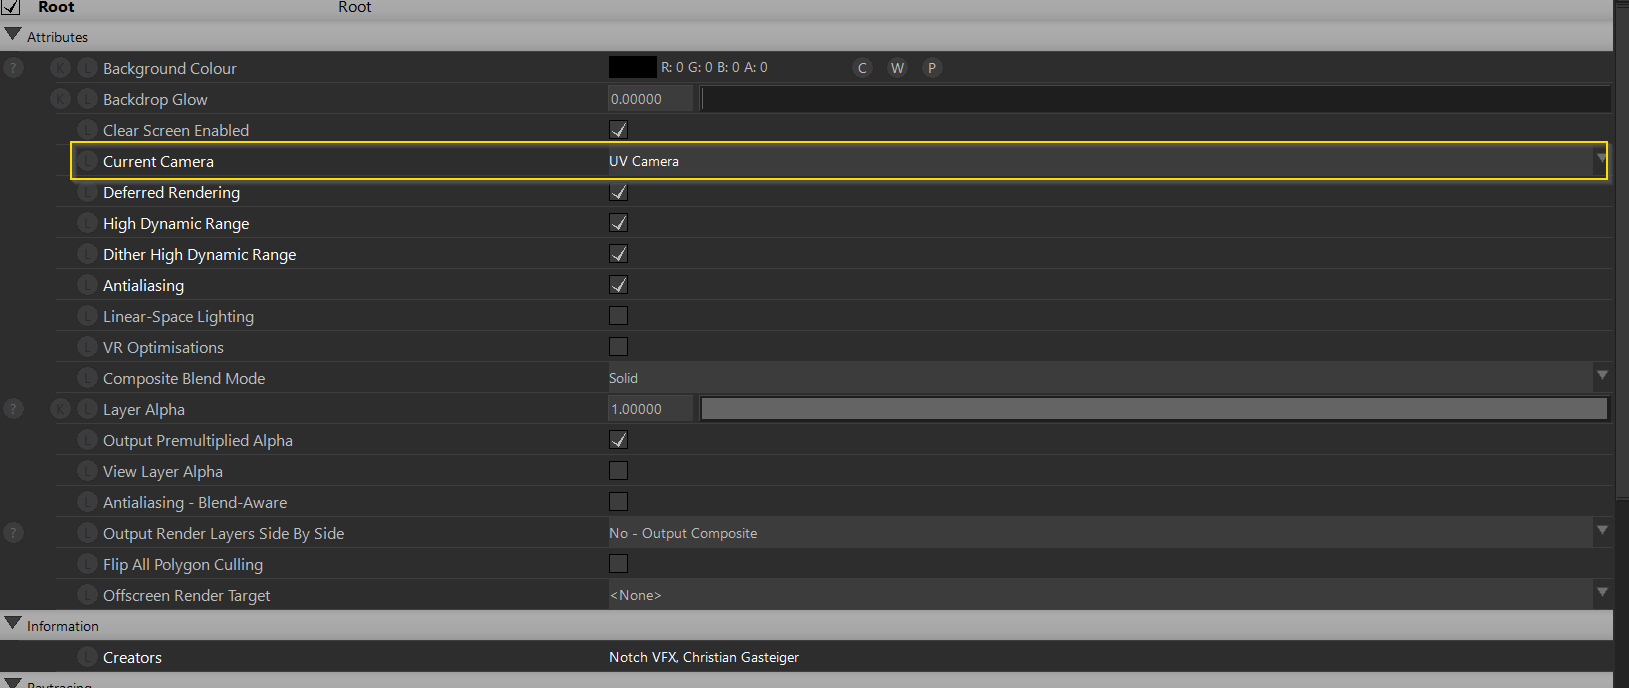
Now in our case the UV Camera Node displays our UV content correctly.
In order to output the scene, we need to select “UV Camera” as our current Camera in the Root node.
3.1 Control UV Notch Block in Pixera
In Pixera add your Model via the "Screens" Tab. At the very bottom left hit the “+” Symbol and select the Dodekaeder. Now in your Screens "Custom Tab" drag and drop the imported object into the scene.
Select the object and make it projectable - the option is on the right panel.

Next, we add a Projector to the scene via the "Mapping Live Tab". Select an output of your graphics card and drag and drop it to your scene.
By default, the Feed Areas are set to “None” that’s what we want so the projector only projects what it sees.
Now we can advance to the "Compositing" tab where you can drag and drop the “UV_Pixera_SHOWCASE” Notch Block onto the Dodekaeder. This will add our Notch UV Camera Feed back onto the Dodekaeder with the correct perspective.
4. Multiple Screens and Inner Compositing
By default, the Notch Block will be created as “Compositing Layer Screen Aligned”. This means the Notch Block texture will only be visible on a single screen. If you jump into Inner Compositing, then the Notch Block texture will take over the entire visual. This setting will also create the same visual as if the layer itself was set to “Screen Aligned”.
If you want the texture to show up on more than one screen, you must click the Notch Block in your library, and in the inspector, you will see a checkbox for "Create Compositing Layer Screen Aligned”. If you uncheck this option and re-drag the Notch Block onto the screen, in Inner Compositing the texture can now be resized like any other media loaded into Pixera.
5. Controlling the Notch Block
5.1 Effects on Notch Block Layers
Notch Block Layers can use any Pixera Effect, this can include basic effects like “AddColor” and more advanced Effects such as “Perspective Layer Mapping".
5.2 Muting Notch Block Layers
Muting a Notch Block Layer will unload the block even if “Load FX Permanently” is on. So, when the layer is unmuted, the notch block will not immediately appear, instead it is recommended to change the Opacity of the layer to make the Block appear and disappear if it will be needed on the fly.
5.3 Change Notch Parameters with Control
In the “Control” tab you are able to change the exposed parameters of a Notch Block using whatever control setup you see fit. Whether it be manually inputing values, using a built UI, or using an outside control system such as a Loupedeck.
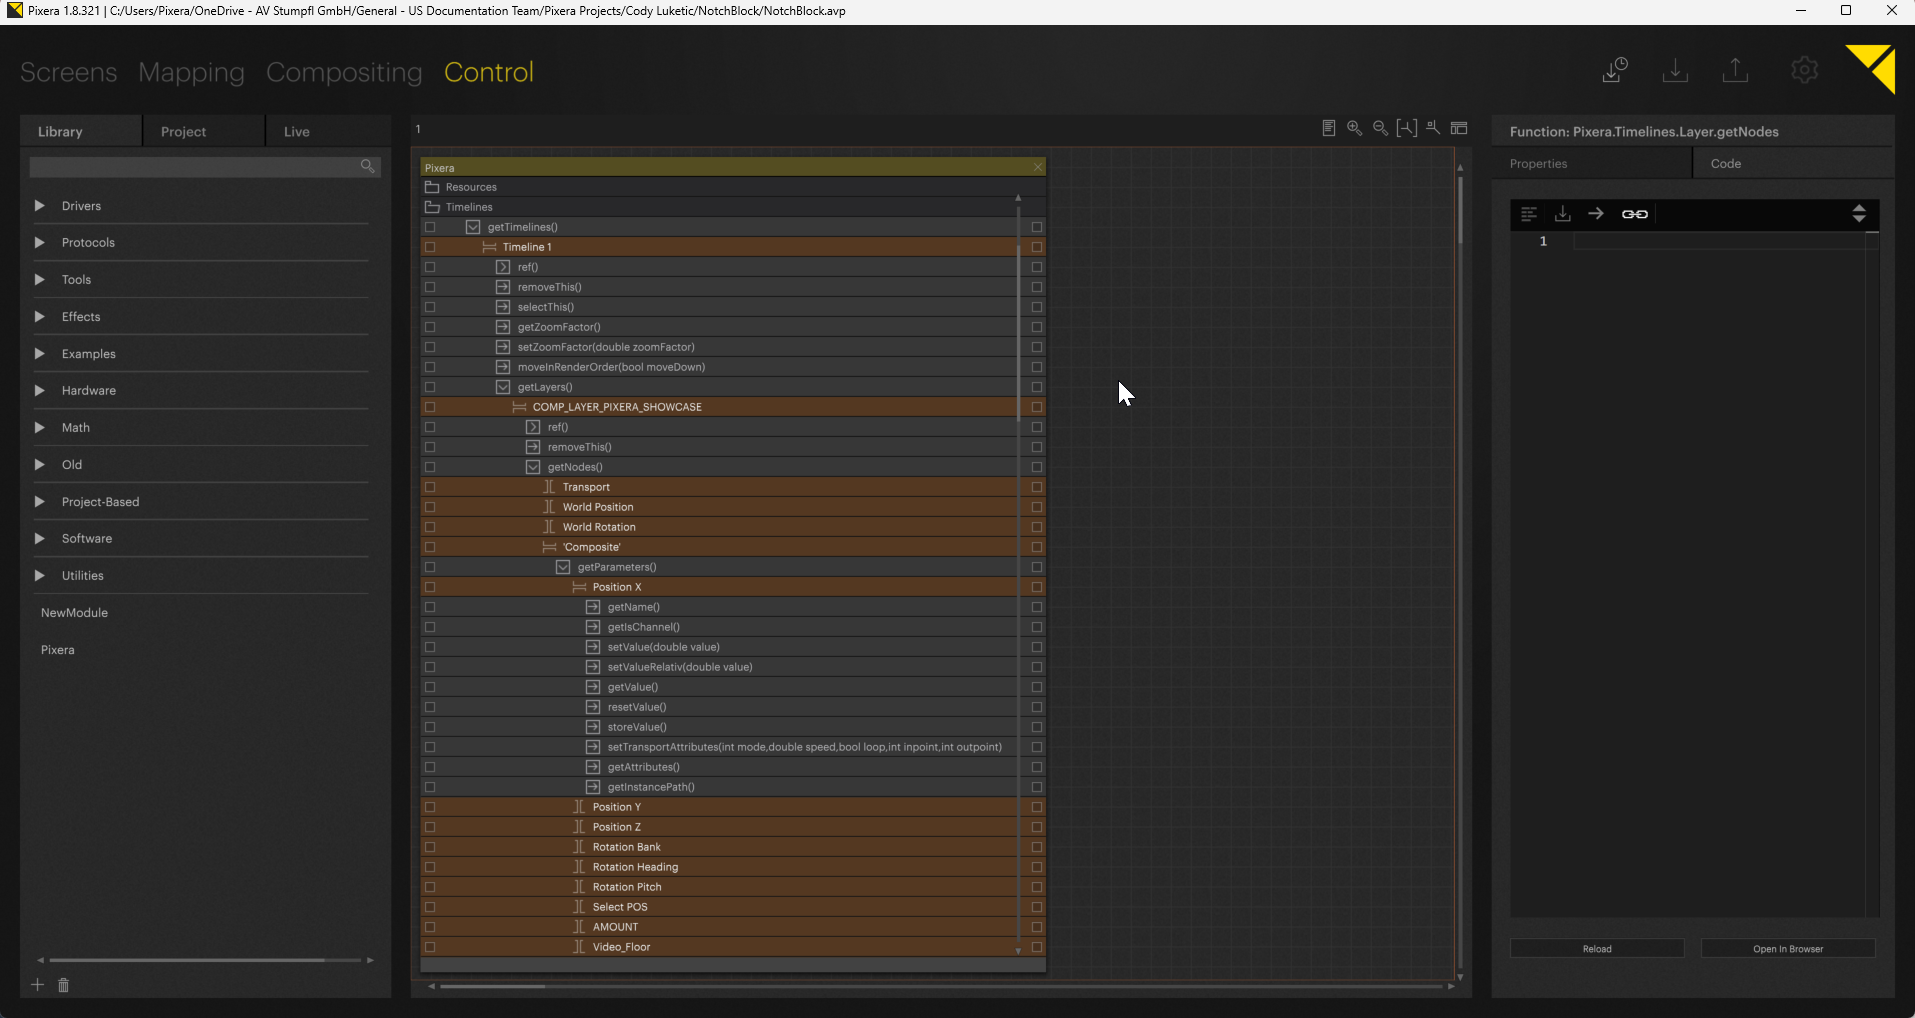
To change a Notch Block's exposed parameters, you must navigate in the Pixera module to:
Pixera.Timelines.Node.getInst()."[The Timeline name the Block is on].[The Layer name the Block is on].[Name of the Layer in Notch]".getParameters()
Opening this section will show all of the exposed parameters in the Notch Block, opening any of these parameters will allow you to get info about the parameter or set the values of the parameter.
5.4 DMX/Artnet Control Via Lighting Desk
You can patch the Notch Block parameters to DMX Artnet and sACN for control from a lighting desk. The article "Timeline Output Patching Artnet / sACN DMX" goes into how to accomplish this with Timeline parameters.
6. Known Issues and Limitations
There are a variety of known issues which are being worked on.
6.1 Changing the Notch Block on a Layer
You are unable to change the Notch Block being used on a Notch Block Layer. To use a new Notch Block, you must create a new Notch Block Layer and delete or mute the other Layer.
6.2 Performance
The best practice for Notch Blocks in Pixera is to include as much in a single Block as possible. This is due to a combination of the Opacity limitation as well as the performance needed to run multiple Notch Blocks at a time. It is especially recommended if the design can handle using nodes which will switch between visuals in the Notch Block itself.
An example of this would be exposing the Type parameter on the Fractal Noise node. This would allow you to change the type of noise created using the node. A less performant way to accomplish this would be to load a Notch Block for each noise type and attempt to switch between these Blocks.
If multiple Notch Blocks are unavoidable, then making sure only one is running on a Timeline at the same time will help performance and avoid opacity/loading complications.
6.3 Feature List
This Excel sheet gives a list of various features which are currently implemented in Pixera for Notch Blocks and what features are not implemented.
https://static.helpjuice.com/helpjuice_production/uploads/upload/image/9741/direct/1717179634399-Notch_Feature_List.xlsx
See Also
- Notch Manual
- Notch Learning Course
- Notch Youtube Channel
- Notch Resources
- Timeline Output Patching Artnet / sACN DMX
Pixera 2.0.65 | 07 July 2024