 Contact Us


For playback, PIXERA's render engine always requires the native media file. Thus, the content that is placed on the Timeline in the Compositing tab must be passed on to the Clients for their use.
To facilitate the workflow in PIXERA, the software offers automatic resource distribution.
By default, this automatically transfers the content used on the Timeline to all Clients in use. If this is not desired, the settings can be adjusted globally or individually per content piece.
In the following article, all settings concerning resource distribution are described.
Changing the Default Storage Drive
A D-drive is not always available on the Clients, so the location for the RX-Cache folder can be freely chosen.
The settings for the Default Storage Drive can be changed by selecting the Client in Mapping/Live and going to the Inspector.

Distribution Options on Individual Files
In PIXERA it is possible to set the distribution options on each file, and thus to define exactly to which Client the file should be distributed to. These options can be found in the Compositing/Resource tab, clicking on the Resource, and searching in the Assets tab for Resource Distribution.

Distribution Options on Folder Level
In PIXERA it is also possible to set the distribution options on the folder level, and thus to define exactly to which Client the files in this folder should be copied by the resource distribution. This options can be found in the Inspector.
Here, you are also able to define if these settings should be applied whenever you add new content to this folder.

- Apply to Existing Resources: This option applies the settings selected above to all the content in the project
- Apply to all contained Folders & Resources: This option applies the settings selected above to the content in this folder and all subfolders.
- Distribute Contained Resources: Triggers a transfer of all resources in this folder with the settings selected above.
Resource Distribution Options

Possible options to set:
- All Live Systems: Transfers the content to the Manager and all Clients used in this project.
- All Live Systems (Excluding Local): Transfers the content to all Clients used in this project, but not to the Manager.
- Selected Live Systems: Transfers the content to the selected Manager and Clients.
- Needed Live Systems: Transfers the content to all Clients that need it.
- Needed Live Systems (Including Backup): Transfers the content to all Clients that need it, including Backup. (Default)
Needed Live Systems (Including Backup)
This is the default setting.
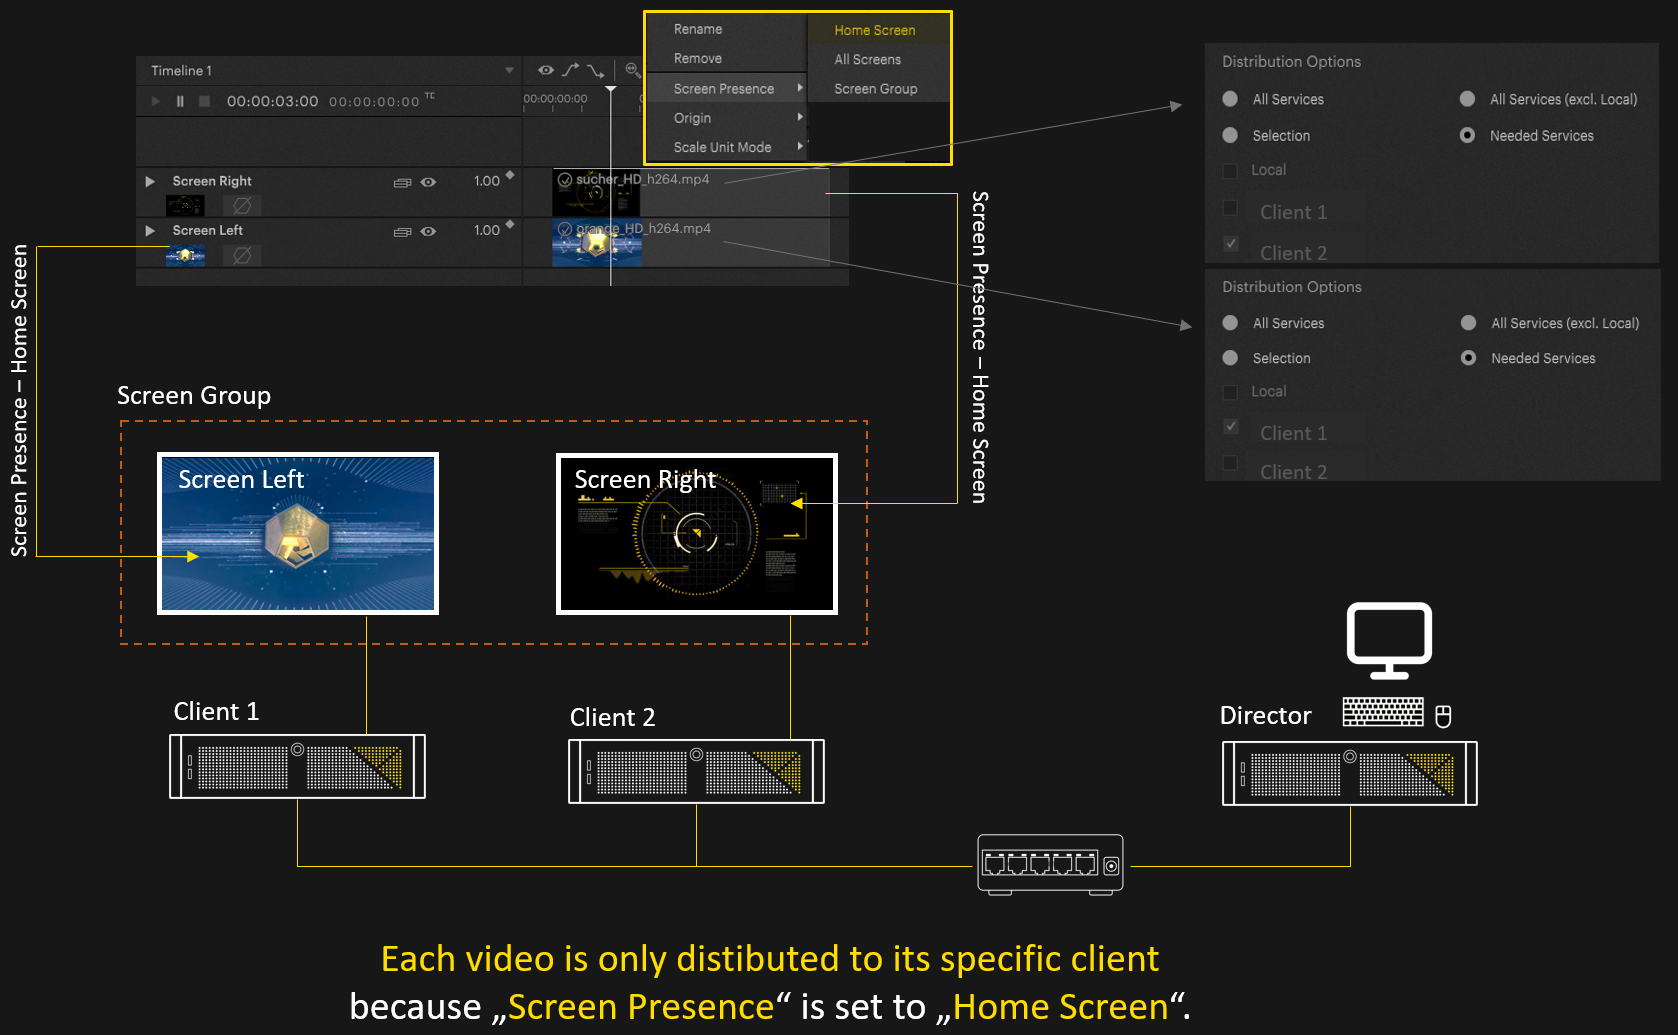
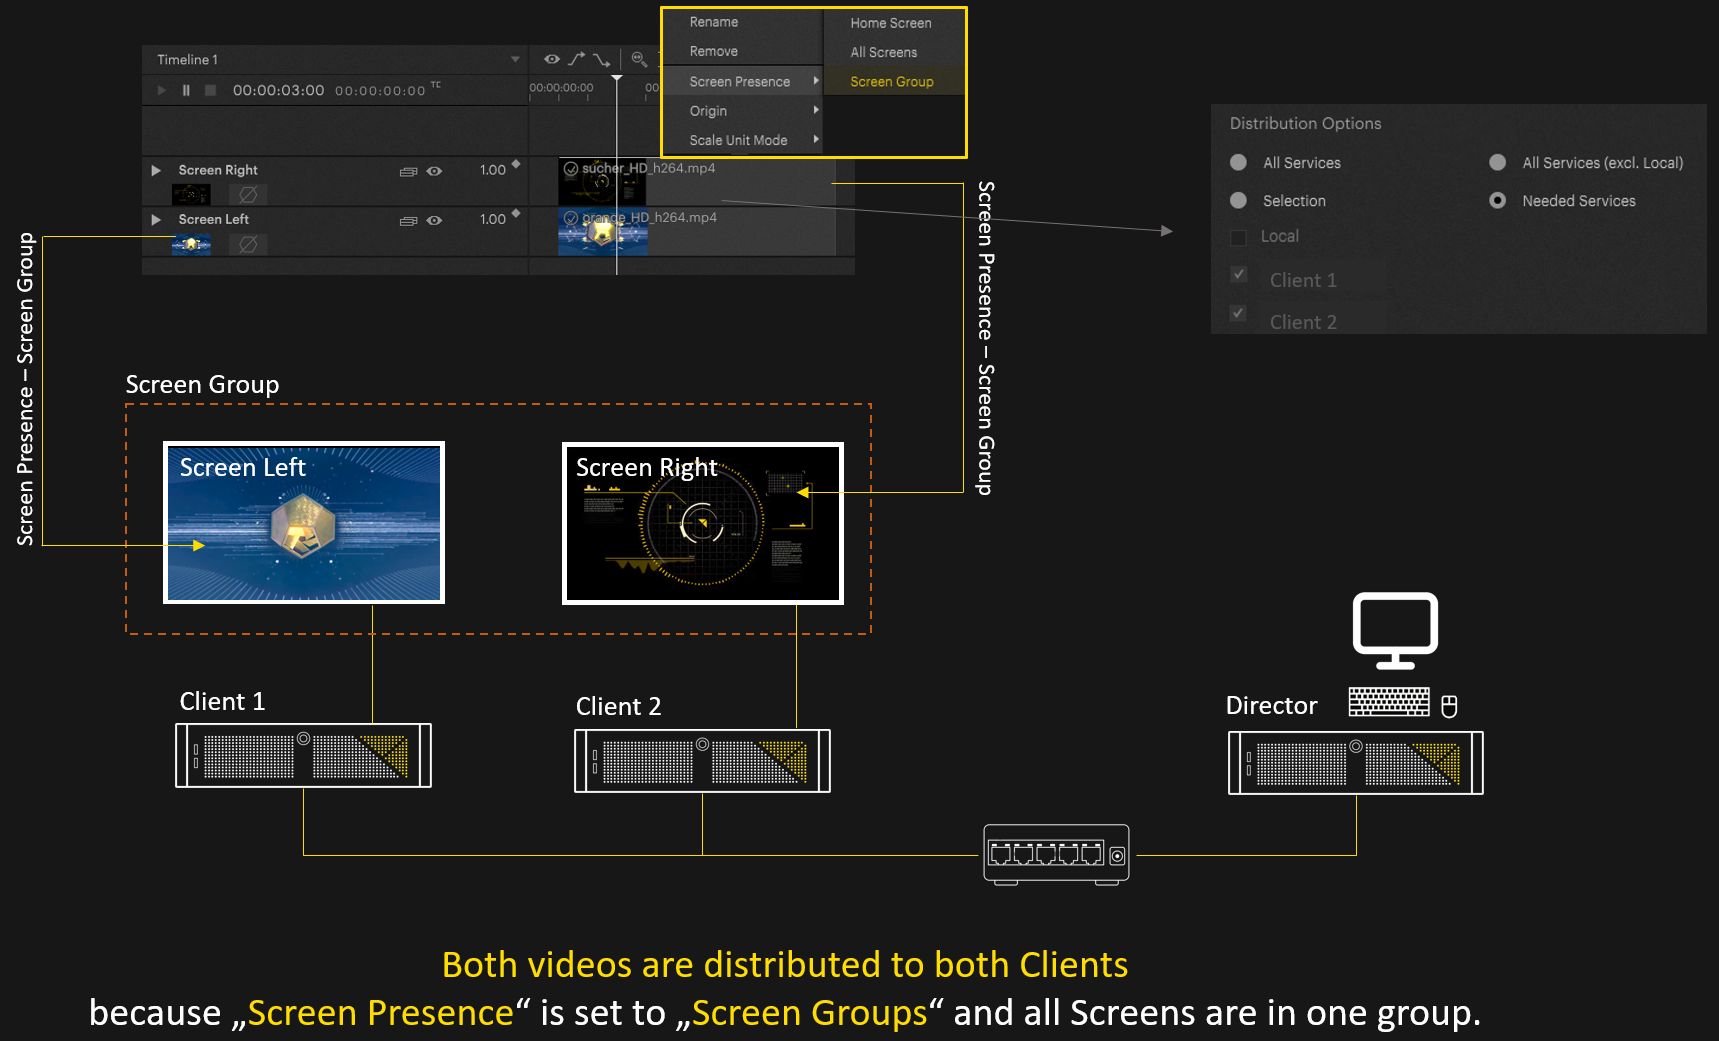
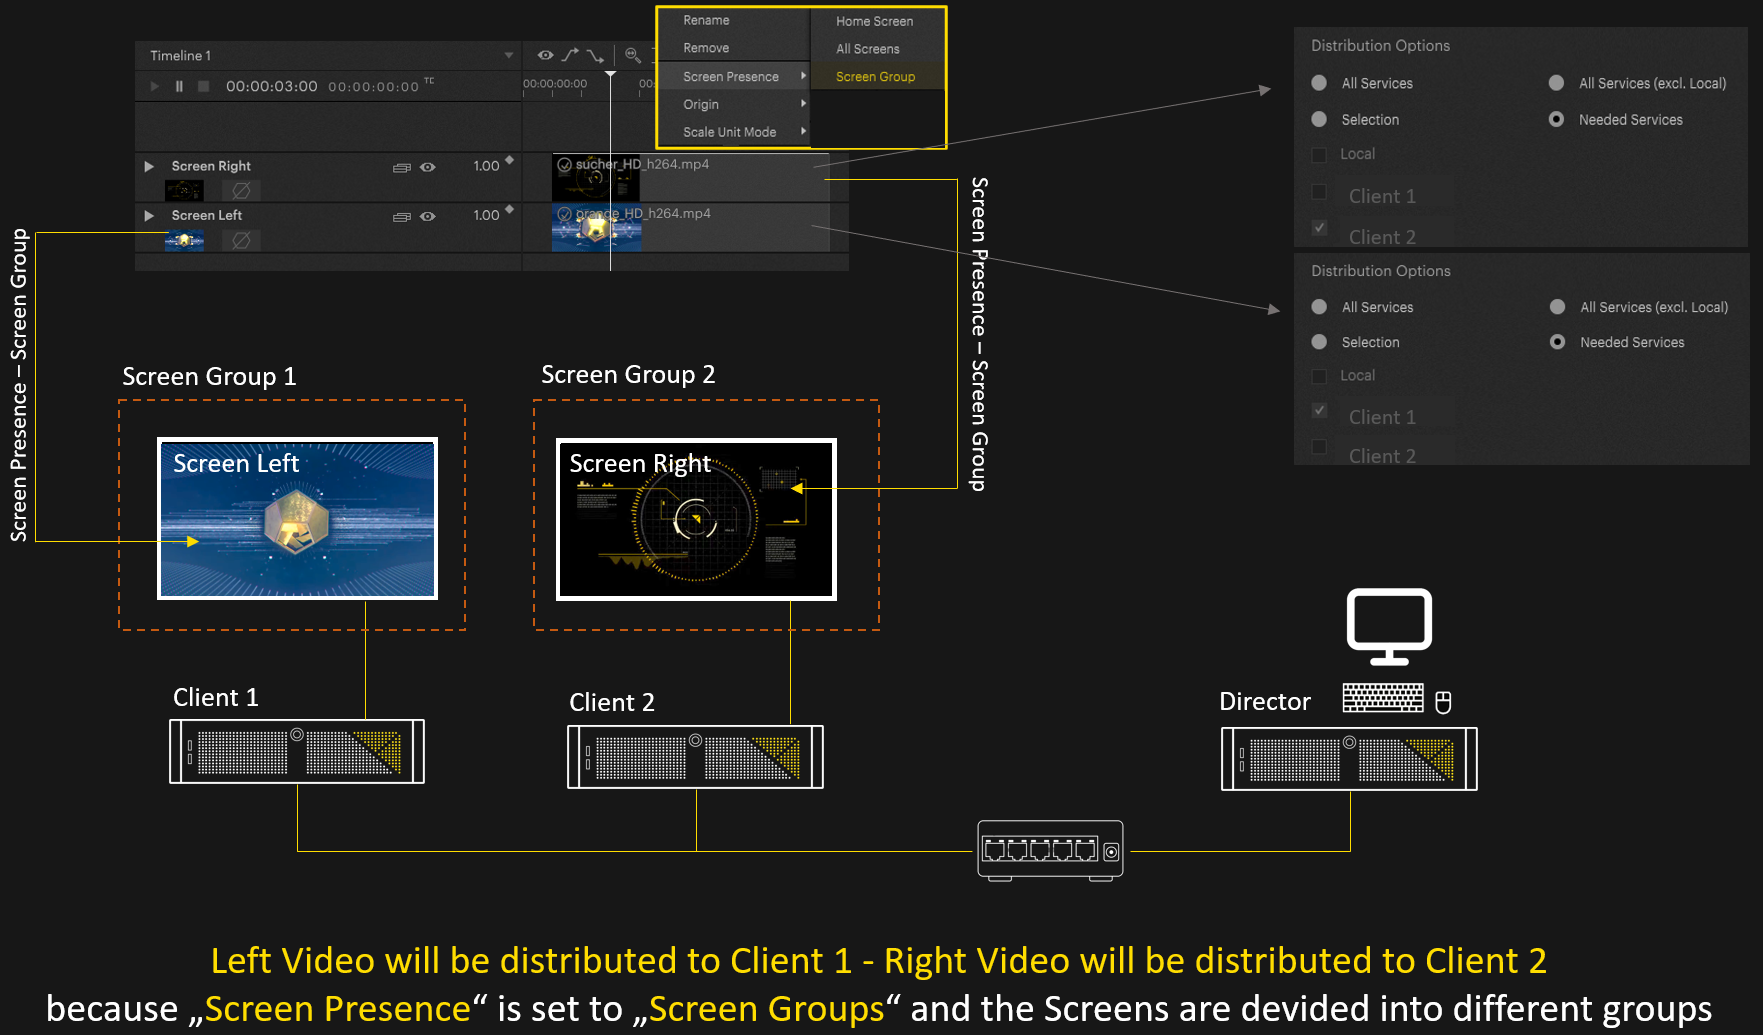
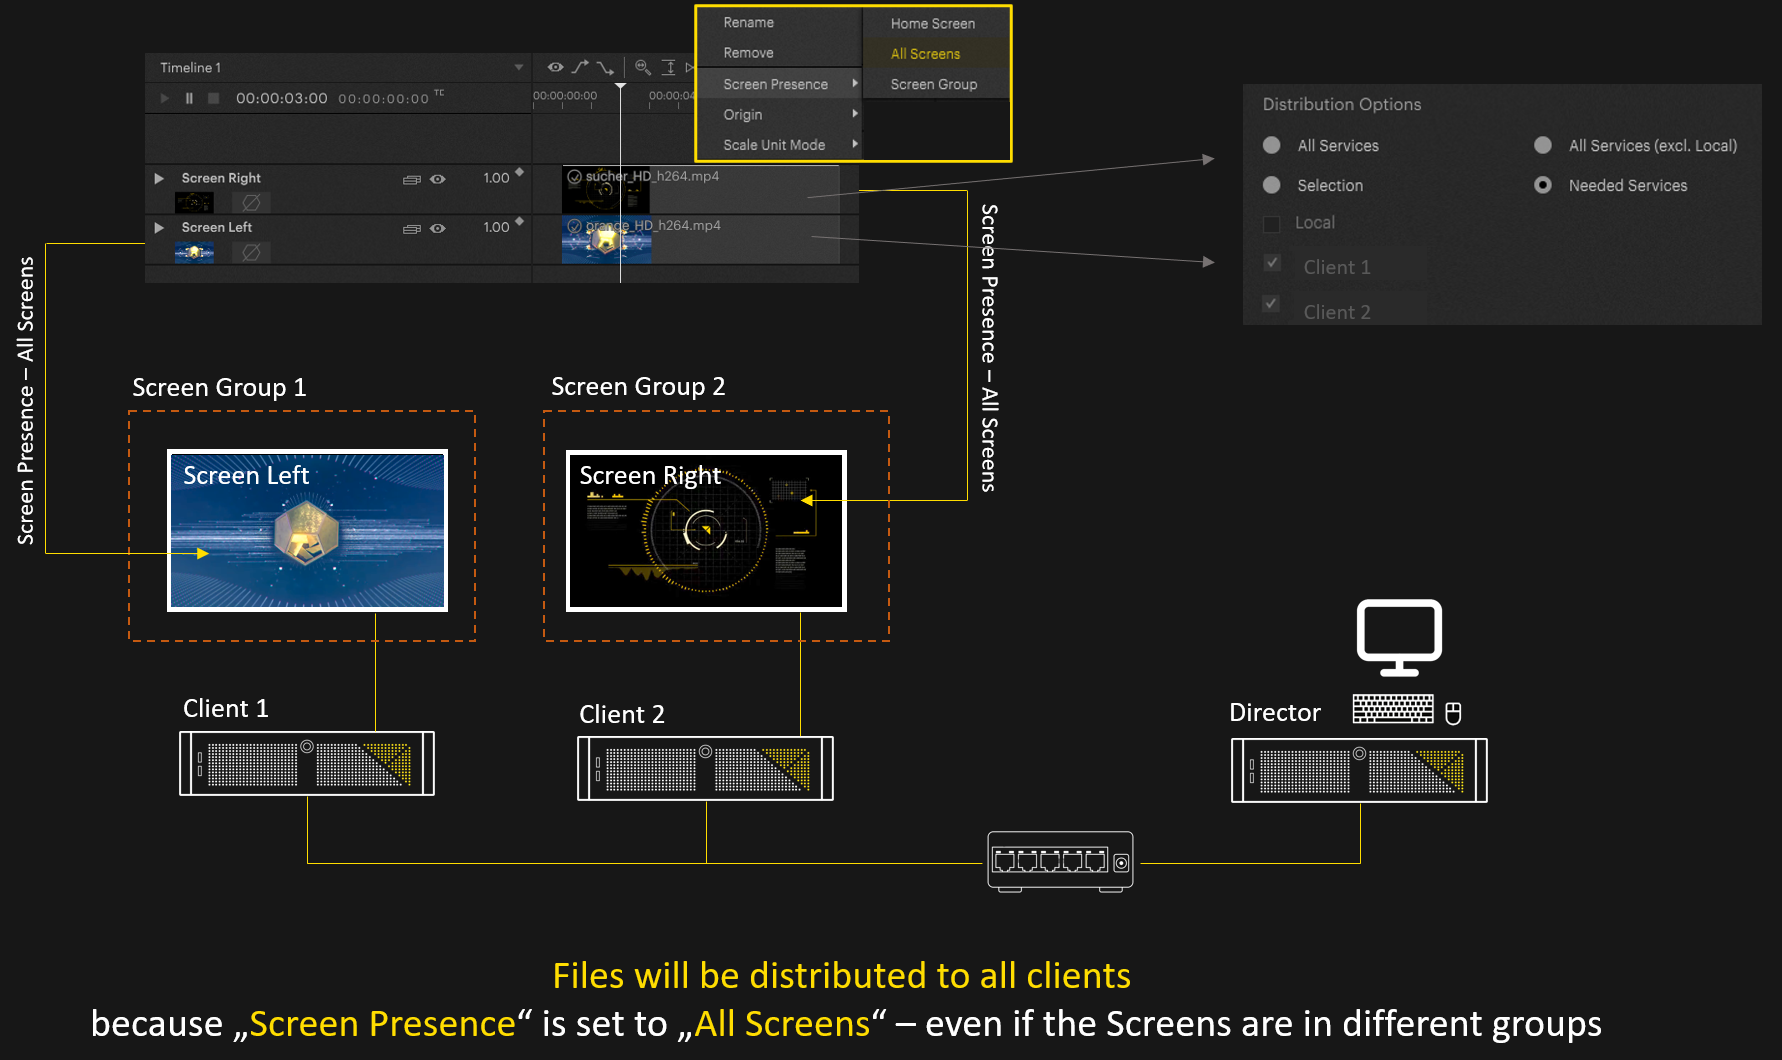
PIXERA automatically decides to which Clients/Live Systems the content must be distributed. The way this works is that PIXERA follows the path of the content, for example:
Resource →Layer→Assigned Screen→Screen Group→Assigned Output
For visual confirmation, you can check in the distribution options which systems are currently being distributed to:

Screen Groups
Normally, the entire screen group is always calculated so that all servers in the same screen group have to play the content. So if the screen groups are not separated, all servers will receive the entire content. Unless “Render only on Home Screen” is activated.
Tip
There is no performance or distribution overhead if you not separate Screens into Screen Groups and just use “Render Only on Home Screen”.
This is a possible workflow to completely ignore Screen Groups.
Use Case 1
Use Case 2
Use Case 3
Use Case 4
Screen Groups
Normally, the entire screen group is always calculated so that all servers in the same screen group have to play the content. So if the screen groups are not separated, all servers will receive the entire content. Unless “Render only on Home Screen” is activated.
Transfer Status of a Specific File
In the Assets tab of the Inspector, you can check the transfer status of media files:

Even if the content is not transferred to Clients, there are three entries here. As you can see in the picture below, in the file path, it only affects the content of the local machine.
- Local: Here it is indicated that the file is pointing to the original file on the hard disk.
- Local (In Cache): - If Manager caching is activated, it is shown here whether the file has already been copied to the RX Cache folder on the Manager.
- Preview: Shows the transfer state of the Preview file.
- Johannes-PXM-20980: Shows the transfer state on the target server.
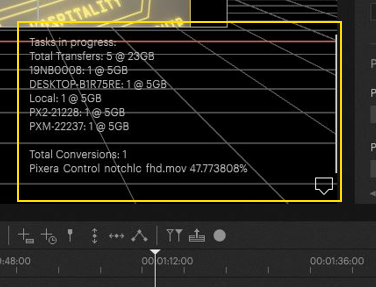
Overview of All Distribution Tasks
In the bottom right corner of the compositing workspace, the current status of the resource distribution can now be displayed. Beside the transfer tasks, the preview conversion tasks are also displayed.
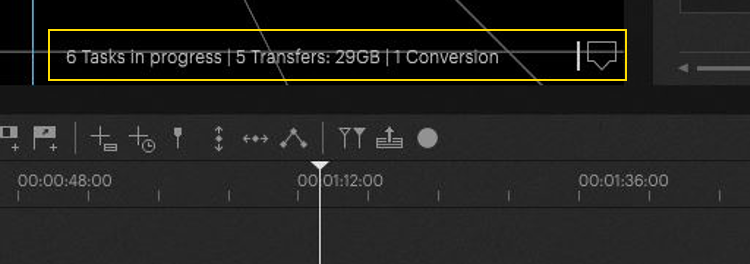
By clicking on the notification symbol, more detailed information can be displayed.
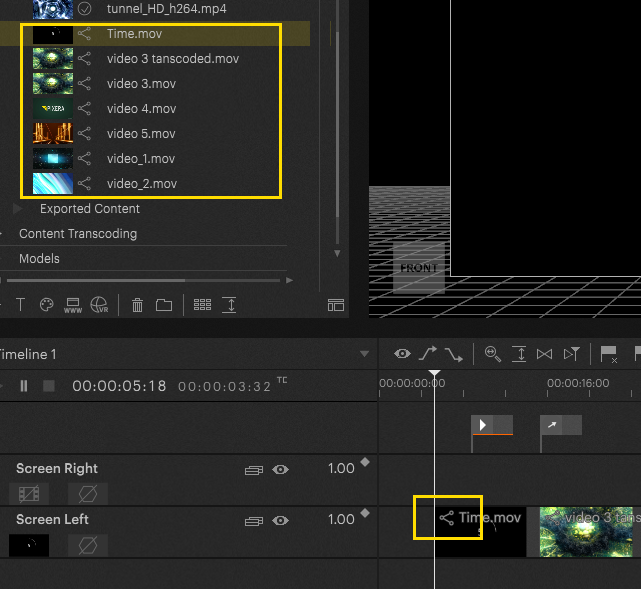
If a file is in the distribution, this is also displayed in the resources and on the Timeline by means of the distribution icon.
If you change to the menu File Distribution which can be found in the Settings of PIXERA, you will find a complete list of all files which are transferred at the current time in the lower area.
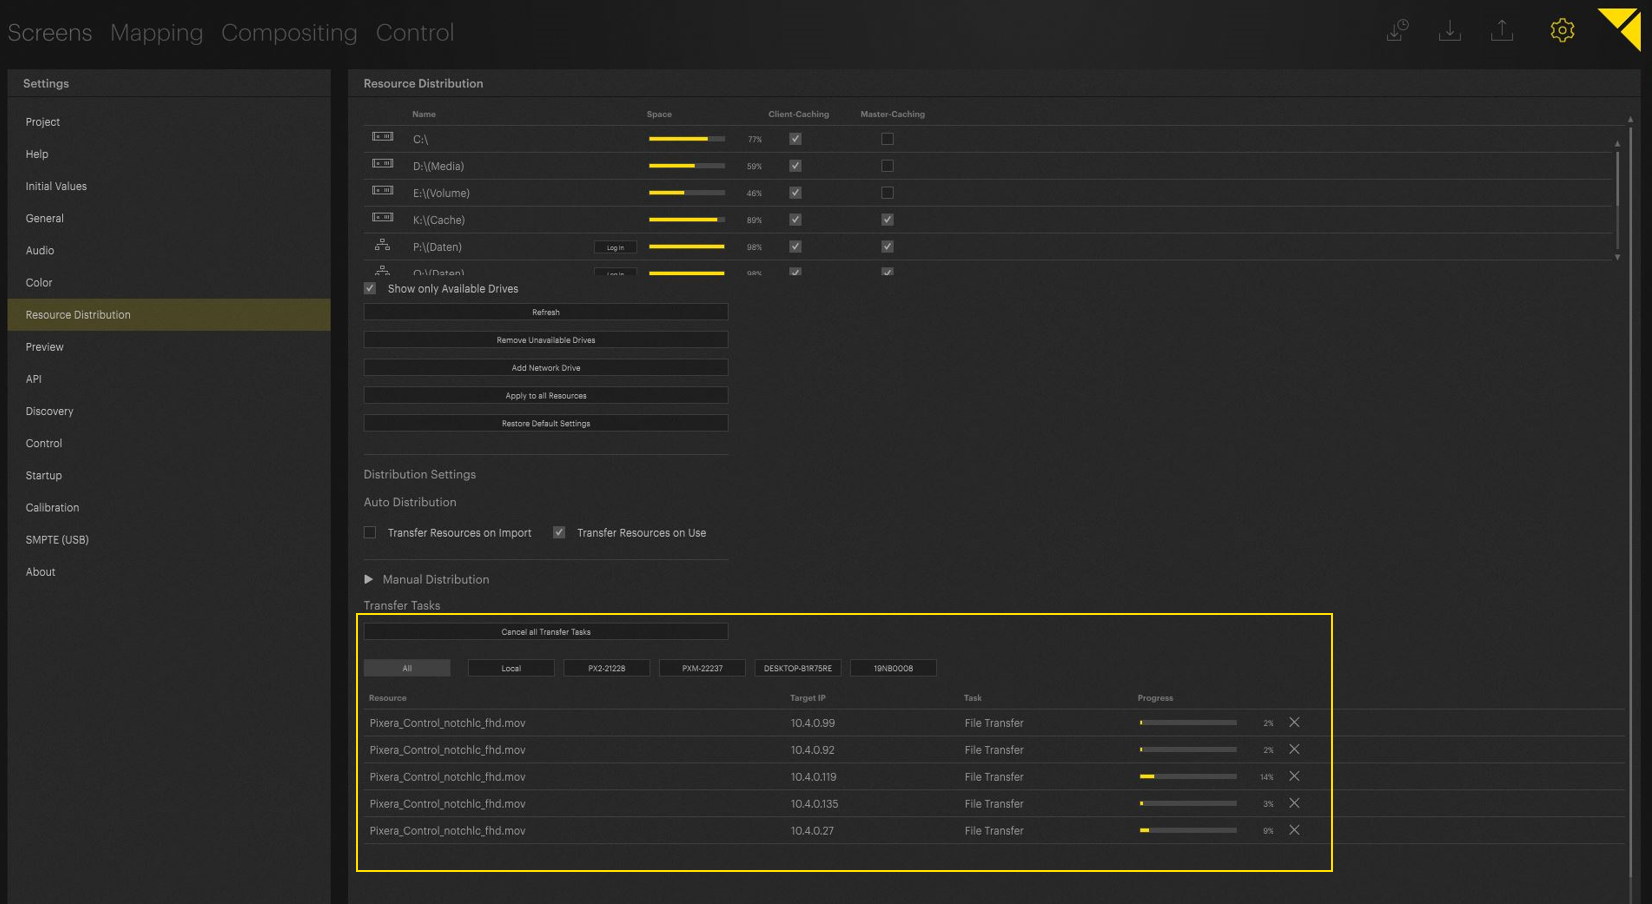
If you want to cancel one specific task, you can do this by clicking the X on the right side of each task.
With Cancel all Tasks, all running transfer tasks can be aborted.
If you only want to display the running tasks of a single Client, this can be done by selecting the respective Client above the list.
Custom Asset Root
Using a Custom Asset Root is particularly beneficial when working in a multi-user setup without a shared NAS. In such cases, the assets can exist locally on both System A and System B simultaneously.
If your setup already includes a NAS, then this configuration is unnecessary and should be avoided.
Read More: Custom Asset Root
Distribution Settings
By default, in the Settings/Resource Distribution tab, content is distributed when first used on a Timeline, the setting Auto Distribution Rule decides this by being set to On Use in Timeline by default.

Auto Distribution Rules
There are three different Auto Distribution Rules you can set, these will decide when the distribution process is triggered.
- No Auto Distribution: Do not start any transfer automatically.
- On Import: Start the transfer as soon as the resources get imported in PIXERA.
- On Use in Timeline: Start the transfer as soon as the resources is placed on a Timeline.
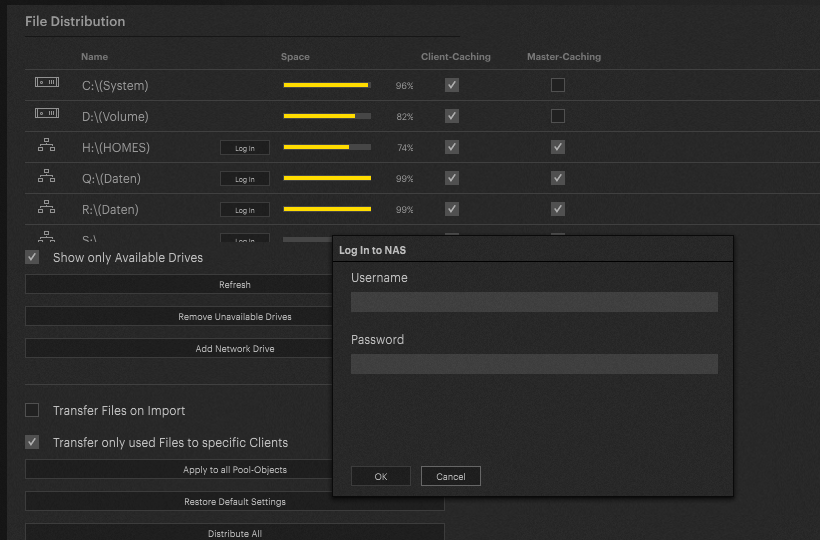
File Distribution Preferences
Client and Manager Caching
Enabling caching in general allows the Manager/Clients to access the drive and thus copy files from it.
In this specific example, enabling Client-Caching allows any Client on the network to access, for example, the Manager's D-drive to copy media files needed for playback. If a Client is not able to connect to i.e. the NAS directly, it tries to copy the files via the Manager.
If Manager-Caching is enabled, this means the Manager will also copy files which are needed for its playout.
In setups where standalone machines are used but the content is on a NAS, as is often the case in fix installations, the Manager would automatically copy the needed files from the NAS to its RX-Cache folder for playout. This option just enforces this at all times.
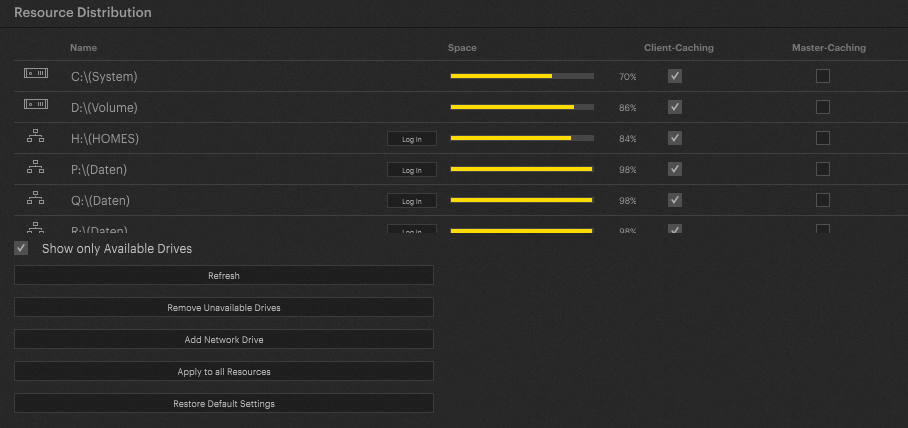
Resource Distribution
Refresh: Refreshes the view of local and network drives.
Remove Unavailable Drives: Removes unavailable local and network drives from the list.
Add Network Drives: Not listed network drives can be added manually.
Apply to all Resources: Updates the assigned services in the distribution options of each resource (e.g. it disables the checkbox for "local" if Manager-Caching is deactivated in here).
Restore Default Settings: Re-creates the original settings for Manager and Client Caching.
Defining Network Drives
In the upper part of this menu, you will find a list of all available drives. The list includes all local drives and network drives.
If you need login data to access a network drive, you can enter this data directly here. By pressing the button Log In, a window opens, in which you can enter the username and password for this drive.
This login data is automatically forwarded to the Client. Thus, a Client can directly access this drive to copy media files. It is not necessary to map the network drive to the Clients.
NOTE
If network drives on the Manager and the Clients are mapped in Windows explorer, it must be ensured that the drive is always created with the same letter. Furthermore it must be ensured that on every system restart, the network drives are mapped again with the correct letter (this usually has to be done via a script in autostart - please contact AV Stumpfl if that is needed)
NOTE
Generally, we recommend accessing a network drive via IP address instead of mapped network drives in windows - this ensures that the path is always resolved correctly on all engines.
This is also an important part of the NAS workflow and distributing directly over the NAS system.
You can delete network drives via the trash can icon.

Workflow for Importing Resources from external Source
With PIXERA, you can distribute your media files across different servers by connecting to a shared network drive, this can speed up the distribution process due to direct access to the NAS system instead of distribution over the Director.
Connect to the network drive and access the shared folder on the source server (e.g., NAS, PIXERA Server, etc.). This can be done using either:
- the IP address of the source server (e.g., \\10.31.9.104) or
- the domain name (e.g., \\PX2-20238).
Drag and drop or import the desired file directly into the Resources section of PIXERA. The file will be automatically added and ready to use.
Depending on how the network access was established, a new drive will appear in PIXERA’s settings:
- If accessed via IP address, the drive will be labeled with the IP.
- If accessed via domain name, the drive will show the domain name.

NOTE
There’s no functional difference between using the IP address or the domain name to access the source server—both methods work equally well. Just make sure to stick with one method throughout your setup to avoid conflicts.
Additionally, we advise not to use fixed drive letters or mapped network shortcuts (e.g., Z:\Media) when accessing shared resources. These mappings can vary between systems and users, leading to inconsistencies and potential issues in multi-client setups.
Content Locations for Resource Distribution
PIXERA's resource distribution allows data from the Manager's hard disk or network drive, such as a NAS system, to be copied to the Clients for playback.
The distribution system automatically saves these files in a special folder on the Clients. This folder is created by default on the D-disk of the Client (If one exists, otherwise the C-disk) and is called RX-Cache.
The file structure of where the original file on the Manager was located is mapped in this RX-Cache folder.
If content is now to be played, PIXERA only passes the path of the file to the Clients - if there is a file with this name and path in the RX-Cache folder, it can be played by the render engine.
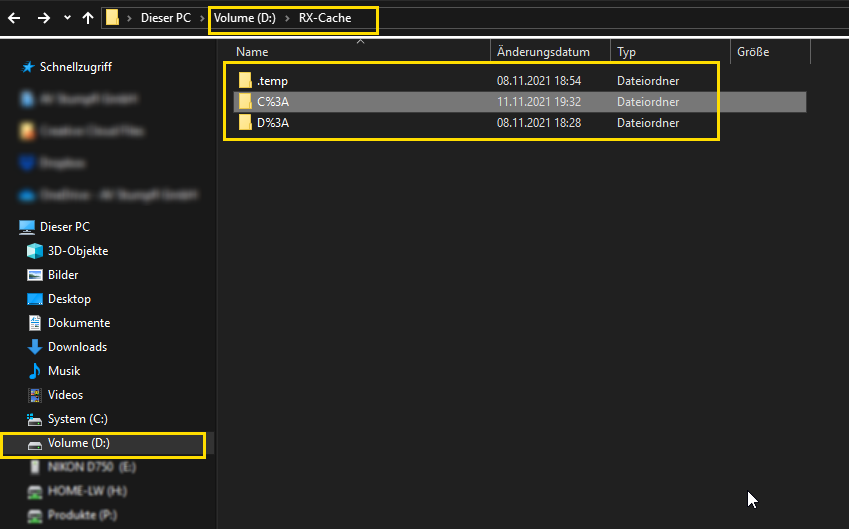
As displayed in the picture below you can see that the original path of the file is replicated in the RX-Cache folder, inside the D-drive named D%3A for unique naming.

Transfer Mechanism
Depending on whether the content comes directly from the Manager or from a NAS, a different transfer mechanism is used.
However, these two mechanisms result in a different error pattern if the content could not be transferred.
Manager to Clients
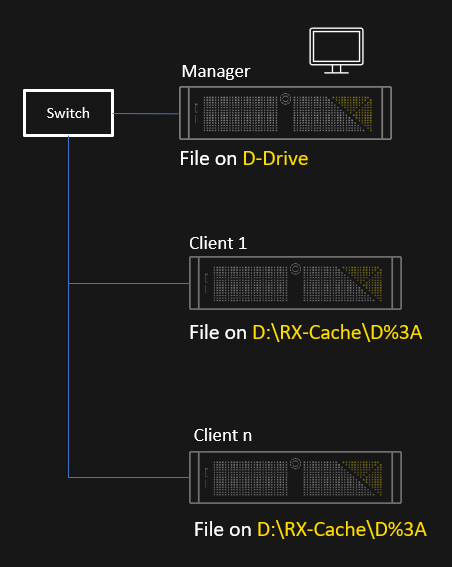
File from D-Drive of Manager gets pushed to the RX-Cache of each Client.
"D%3A" points to any remote D-drive in Network.
NOTE
If the file could not be copied by the Manager, playback on the Client is not possible. In this setup, no attempt is made to stream the file!
NAS to Manager/Clients
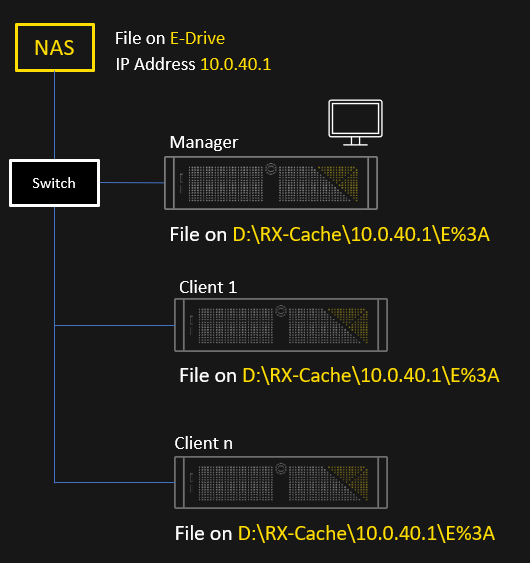
File from E-Drive of NAS gets pulled by the Manager to its RX-Cache if Manager Caching is activated.
File from E-Drive of NAS gets pulled by the Clients to their RX-Cache.
NOTE
It is not recommended to map the network drive in Windows Explorer – use IP addresses for access instead!!
NOTE
If the file was not copied from the NAS to the RX-Cache, the Client attempts to stream the file via the network - this is clearly recognizable by very jerky/slow playback.
PIXERA 25.1 RC 2 | 07. May 2025 | J.B. and C.L.