 Contact Us


Introduction
The traditional recording method in PIXERA unfortunately lacks performance, as all the updates are displayed in the UI.
To increase the number of possible incoming recorded values (for example multiple incoming ArtNet universes) a new value recording setting was introduced.
Use case:
Museum-Installation where a lot of DMX fixtures must be controlled. The amount on incoming DMX exceeds the possibilities of the regular value recording in PIXERA. To playback all the DMX Data, value recording can be used to record all the incoming data.
Record Values
To record incoming DMX values i.e. from a lighting desk, please set up and patch the timeline accordingly. For further information please read Control PIXERA via GrandMA.
But not only values from a lighting desk can be recorded - all values which are patched in way to control any value of a Layer can be recorded.
To access the new recording options, select a timeline and scroll down the inspector to the "Value Recording" options.
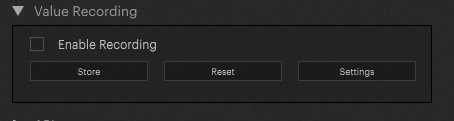
If the checkbox "Enable Recording" is active, values are being recorded onto the selected Timeline.
IMPORTANT
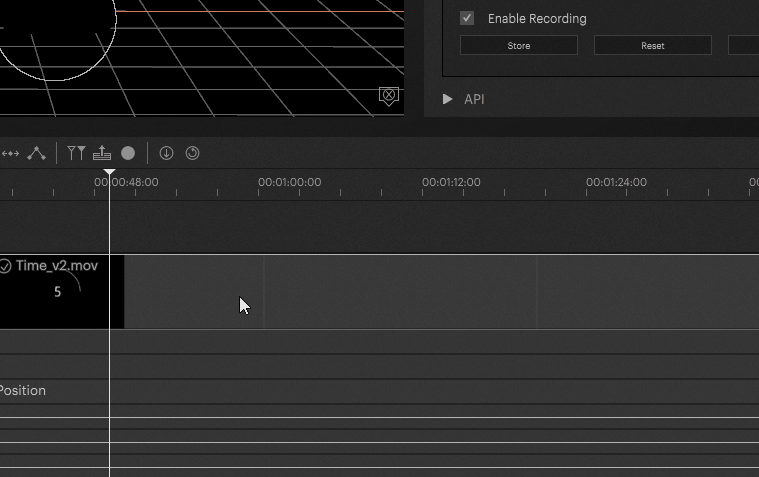
Currently there is no visible feedback if recording is set to active. There is low to none resource allocation needed for the background recording. Therefore it does not harm playback, in case you kept it on.
To start recording, Pause / Stop the timeline and enable recording. PIXERA will record the incoming data (all incoming timeline data) if enable recording is activated. As soon as the recording is finished, hit store. PIXERA will write all the recorded data on the timeline and build all the necessary parts as recorded.
Store Values
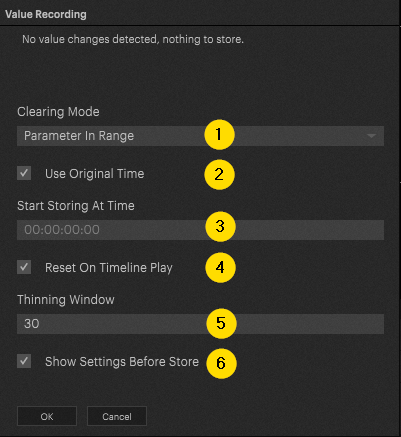
1: The clearing mode defines the area where the incoming values will be stored
2: Record at the current given time
3: Start storing values at selected starting time
4: The incoming data is mapped to an internal reference time.
This time can be reset with the timeline playback by activating this option.
Note: Reset can be triggered in the inspector as well.
5: Thinning window classified in frames. Thins the incoming data. The lower the value, the more key frames are created.
6: deactivate settings - pop up after hitting store button
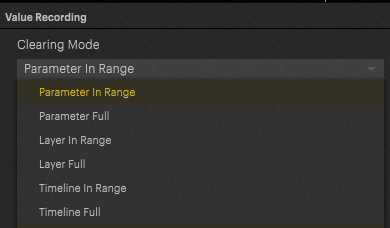
Clearing mode types can be chosen with the dropdown menu. You can choose from Parameters, Layers and Timeline. The value recording can be set in range or full.
Example:
The incoming values range from 0-254, Opacity has a value from 0-1. Depending on the setting (Full, Range) the values will be written differently.
PIXERA 1.9.144 | 29. September 2023