 Contact Us


Marker Calibration Workflow
When working with 3D mappings, a useful workflow is Marker Calibration. This feature differentiates quite heavily from normal mapping and warping workflows.
PIXERA calculates the Projectors placement in the 3D space by comparing user - created Markers in the 3D preview with Markers being projected on the 3D model. Through alignment of the Markers the Projector's position is calculated.
As soon as the Projector and 3D model positions align perfectly there is no need for further warping. Of course, this implies that the 3D model is accurate. Without an accurate 3D model and accurate Projector settings (no keyframes, throw ratio, etc.) a proper Marker Calibration wont the possible.
3D Model & UV Map
To start, we import our 3D model into the Screens tab: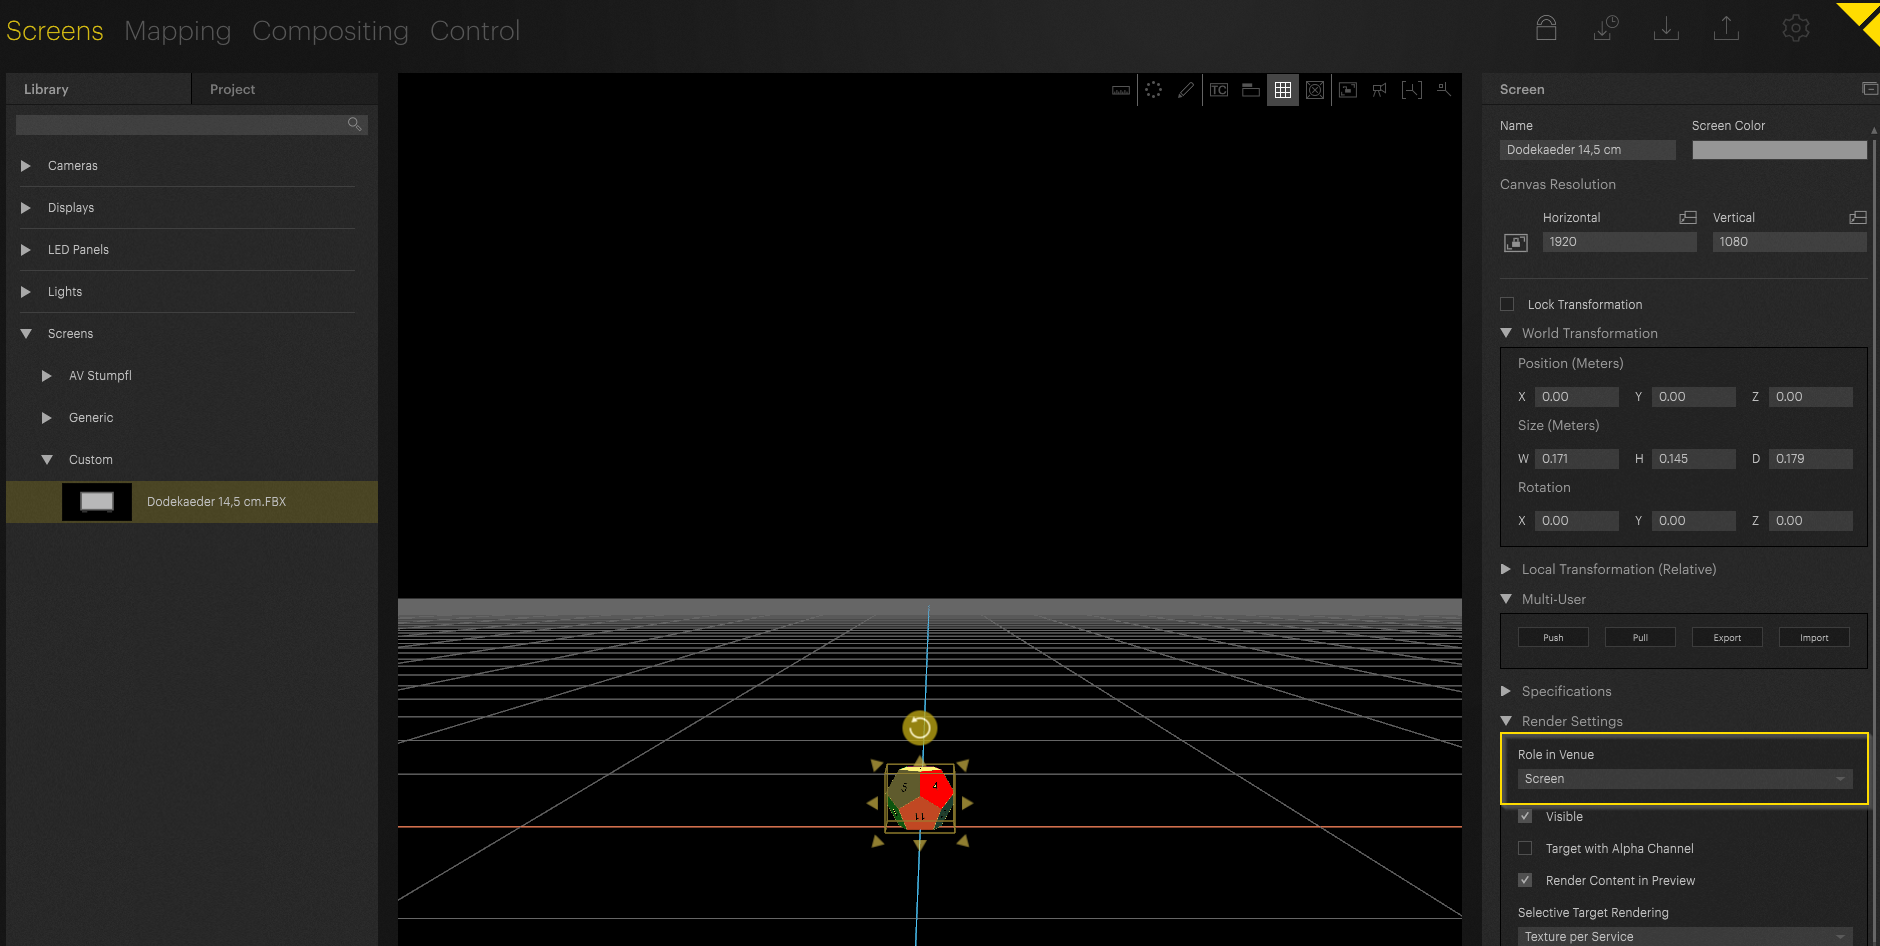
Set the Role in Venue to Screen. Otherwise, we won't be able to project onto it. Now we want to import the correct UV map.
NOTE
For general 3D Workflow overviews look at this article: 3D Workflows - PIXERA
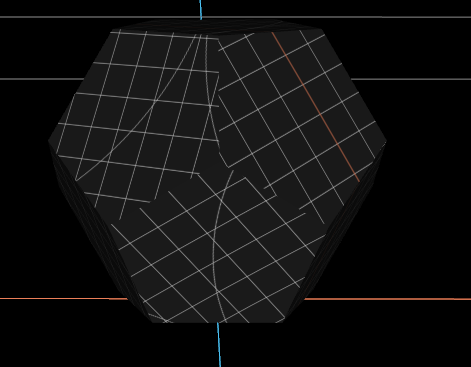
In this case we are not able to use the PIXERA internal test pattern as it won't fit the UV coordinates:
Due to this, we will next import the correct UV texture into the Compositing Tab and apply it to the 3D model:
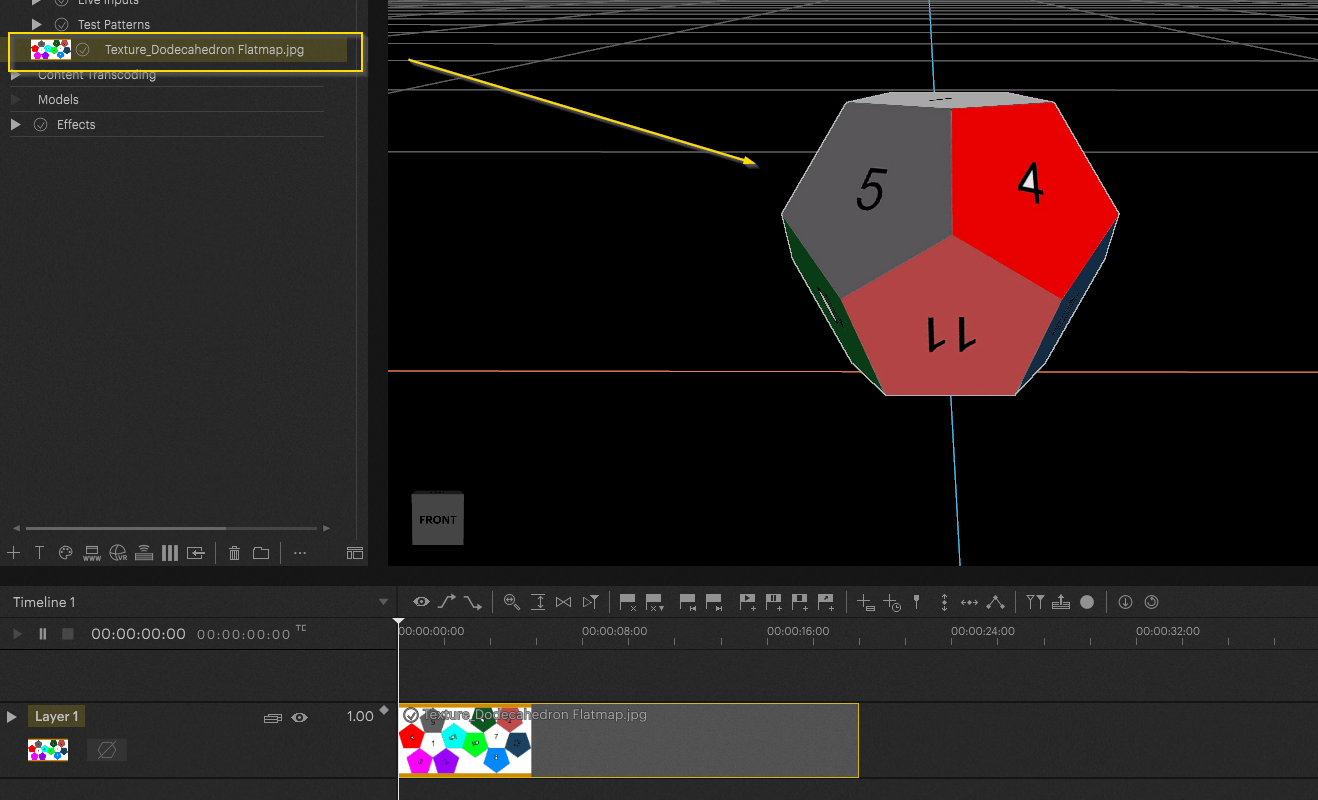
Now we have a Texture fitting the UV coordinates of the model and can start with the Marker Calibration in the next step.
Marker Calibration Steps
Important
Marker Calibration can only be executed with a connected Output. First assign an Output before doing the Marker Calibration.
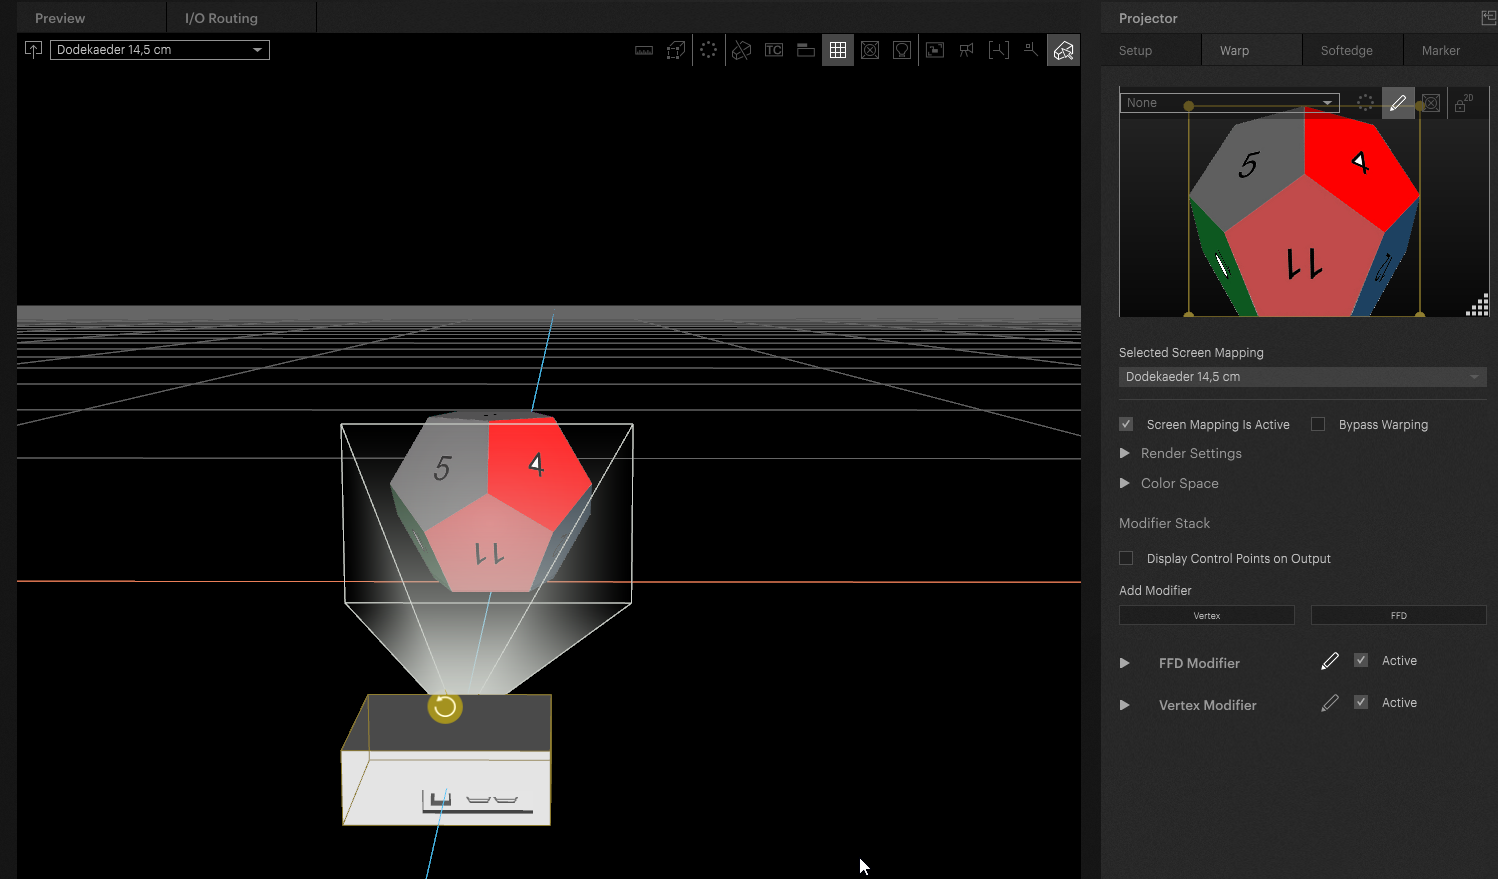
Add a Projector to the setup. For this article i will use the Optoma ML750e, the same Projector we use in our in-person demos. The Projector was placed via the Alignment Tool (ctrl+alt+a):
First, switch to the Marker option in the Inspector, then activate the Marker mode in the workspace:
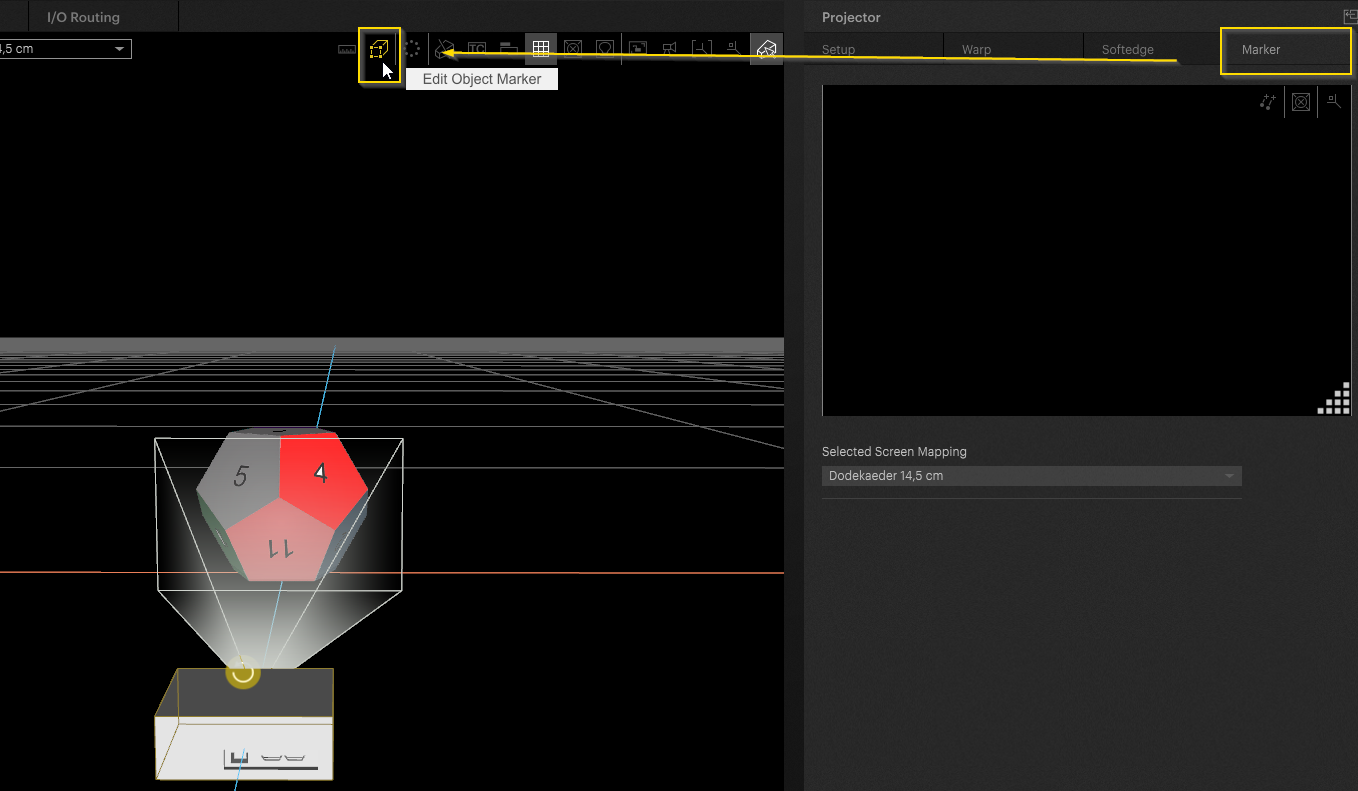
Now Markers can be added directly on the 3D model in the Workspace. Double click on the 3D model to add the Markers: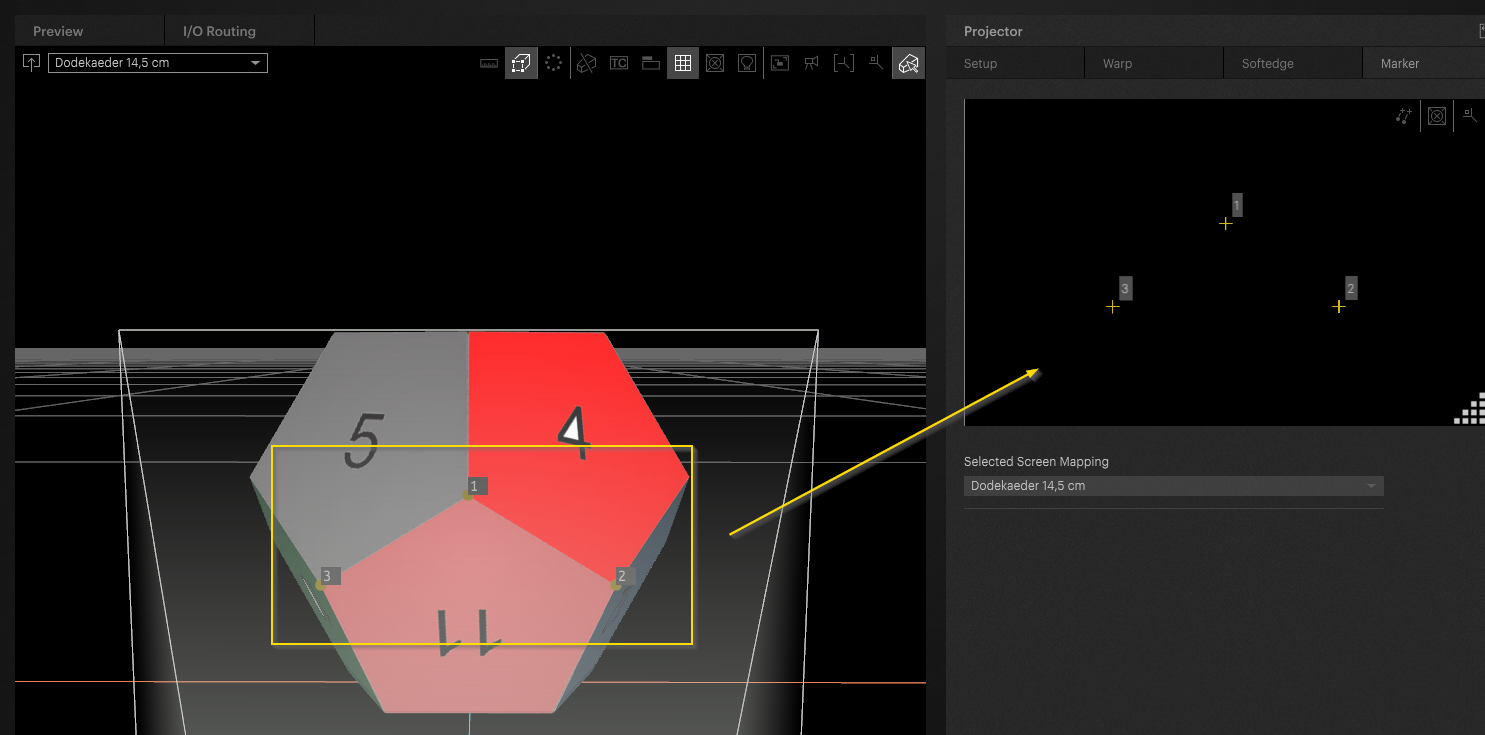
In the “Marker Tab” in the Inspector, the Markers created on the model can be grabbed and moved. When you activate the Output, you will see that the Markers are now projected onto real world model.
The goal is to place the Marker on the Output at the exact same location it is placed in the PIXERA Workspace. By doing so PIXERA will calculate the Projectors' position by taking in the offsets of the Marker's positions.
It is advised to add a minimum of five Markers, although having more and then using a later setting may help improve accuracy.
Tip
The best approach when placing Markers is to position them as far out on the Output as possible, ideally in all corners of the output, in order to achieve the best result.
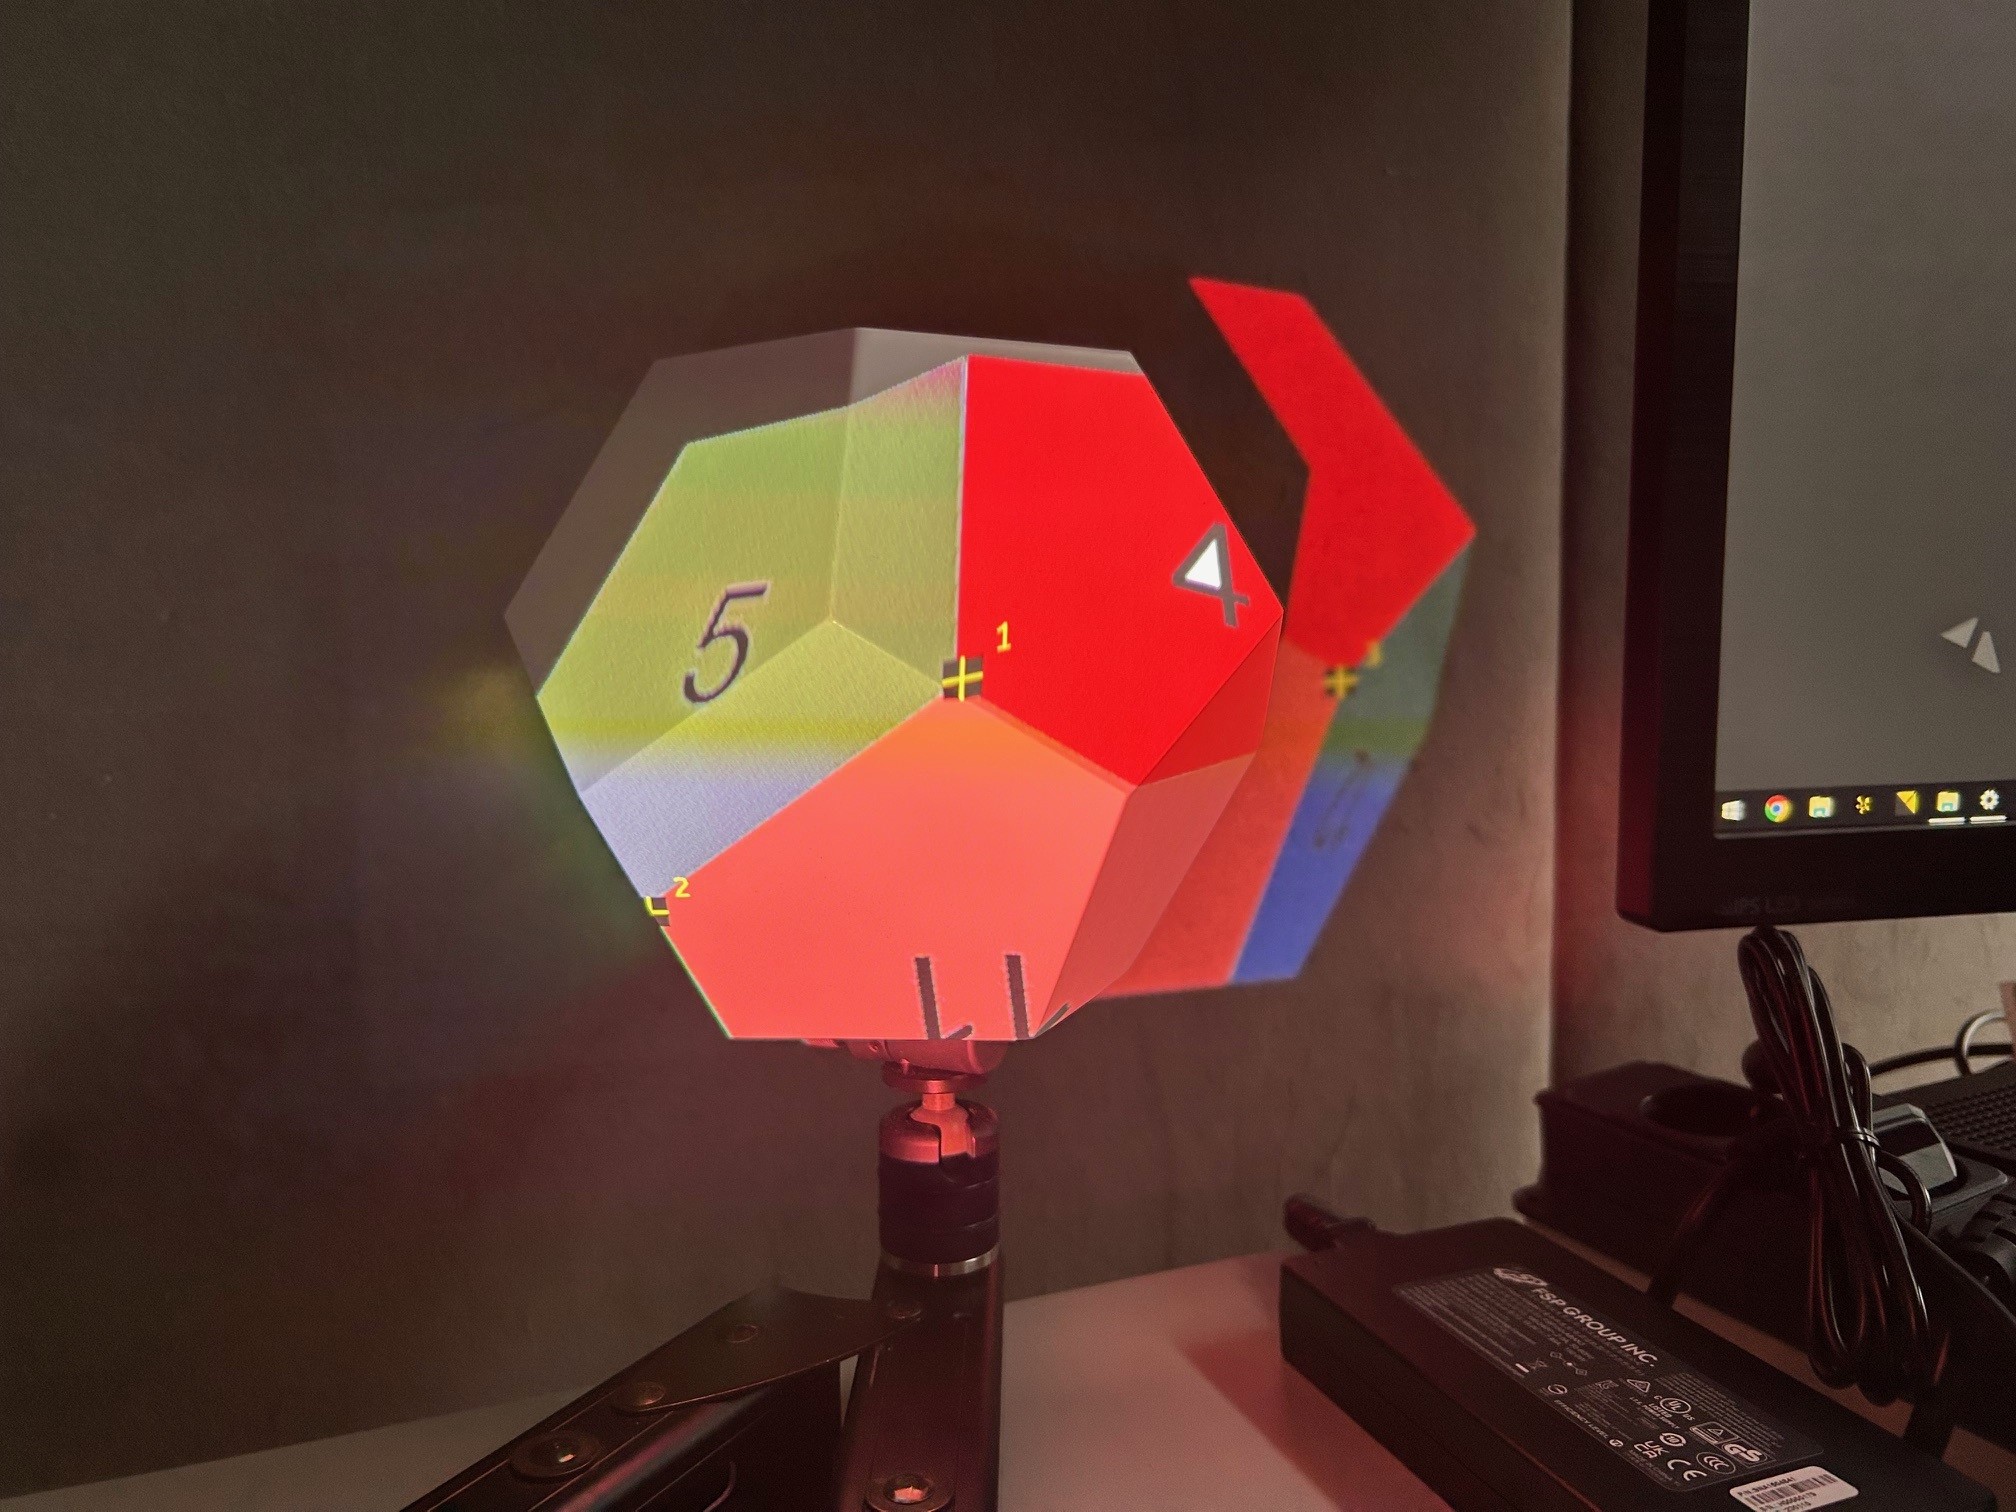
As seen in the images below, the Markers are currently not on their intended target. The goal is to place them at the same position seen within the GUI, which is shown step by step next:
Select the Markers in the Marker tab and move them either by mouse or keyboard arrow keys: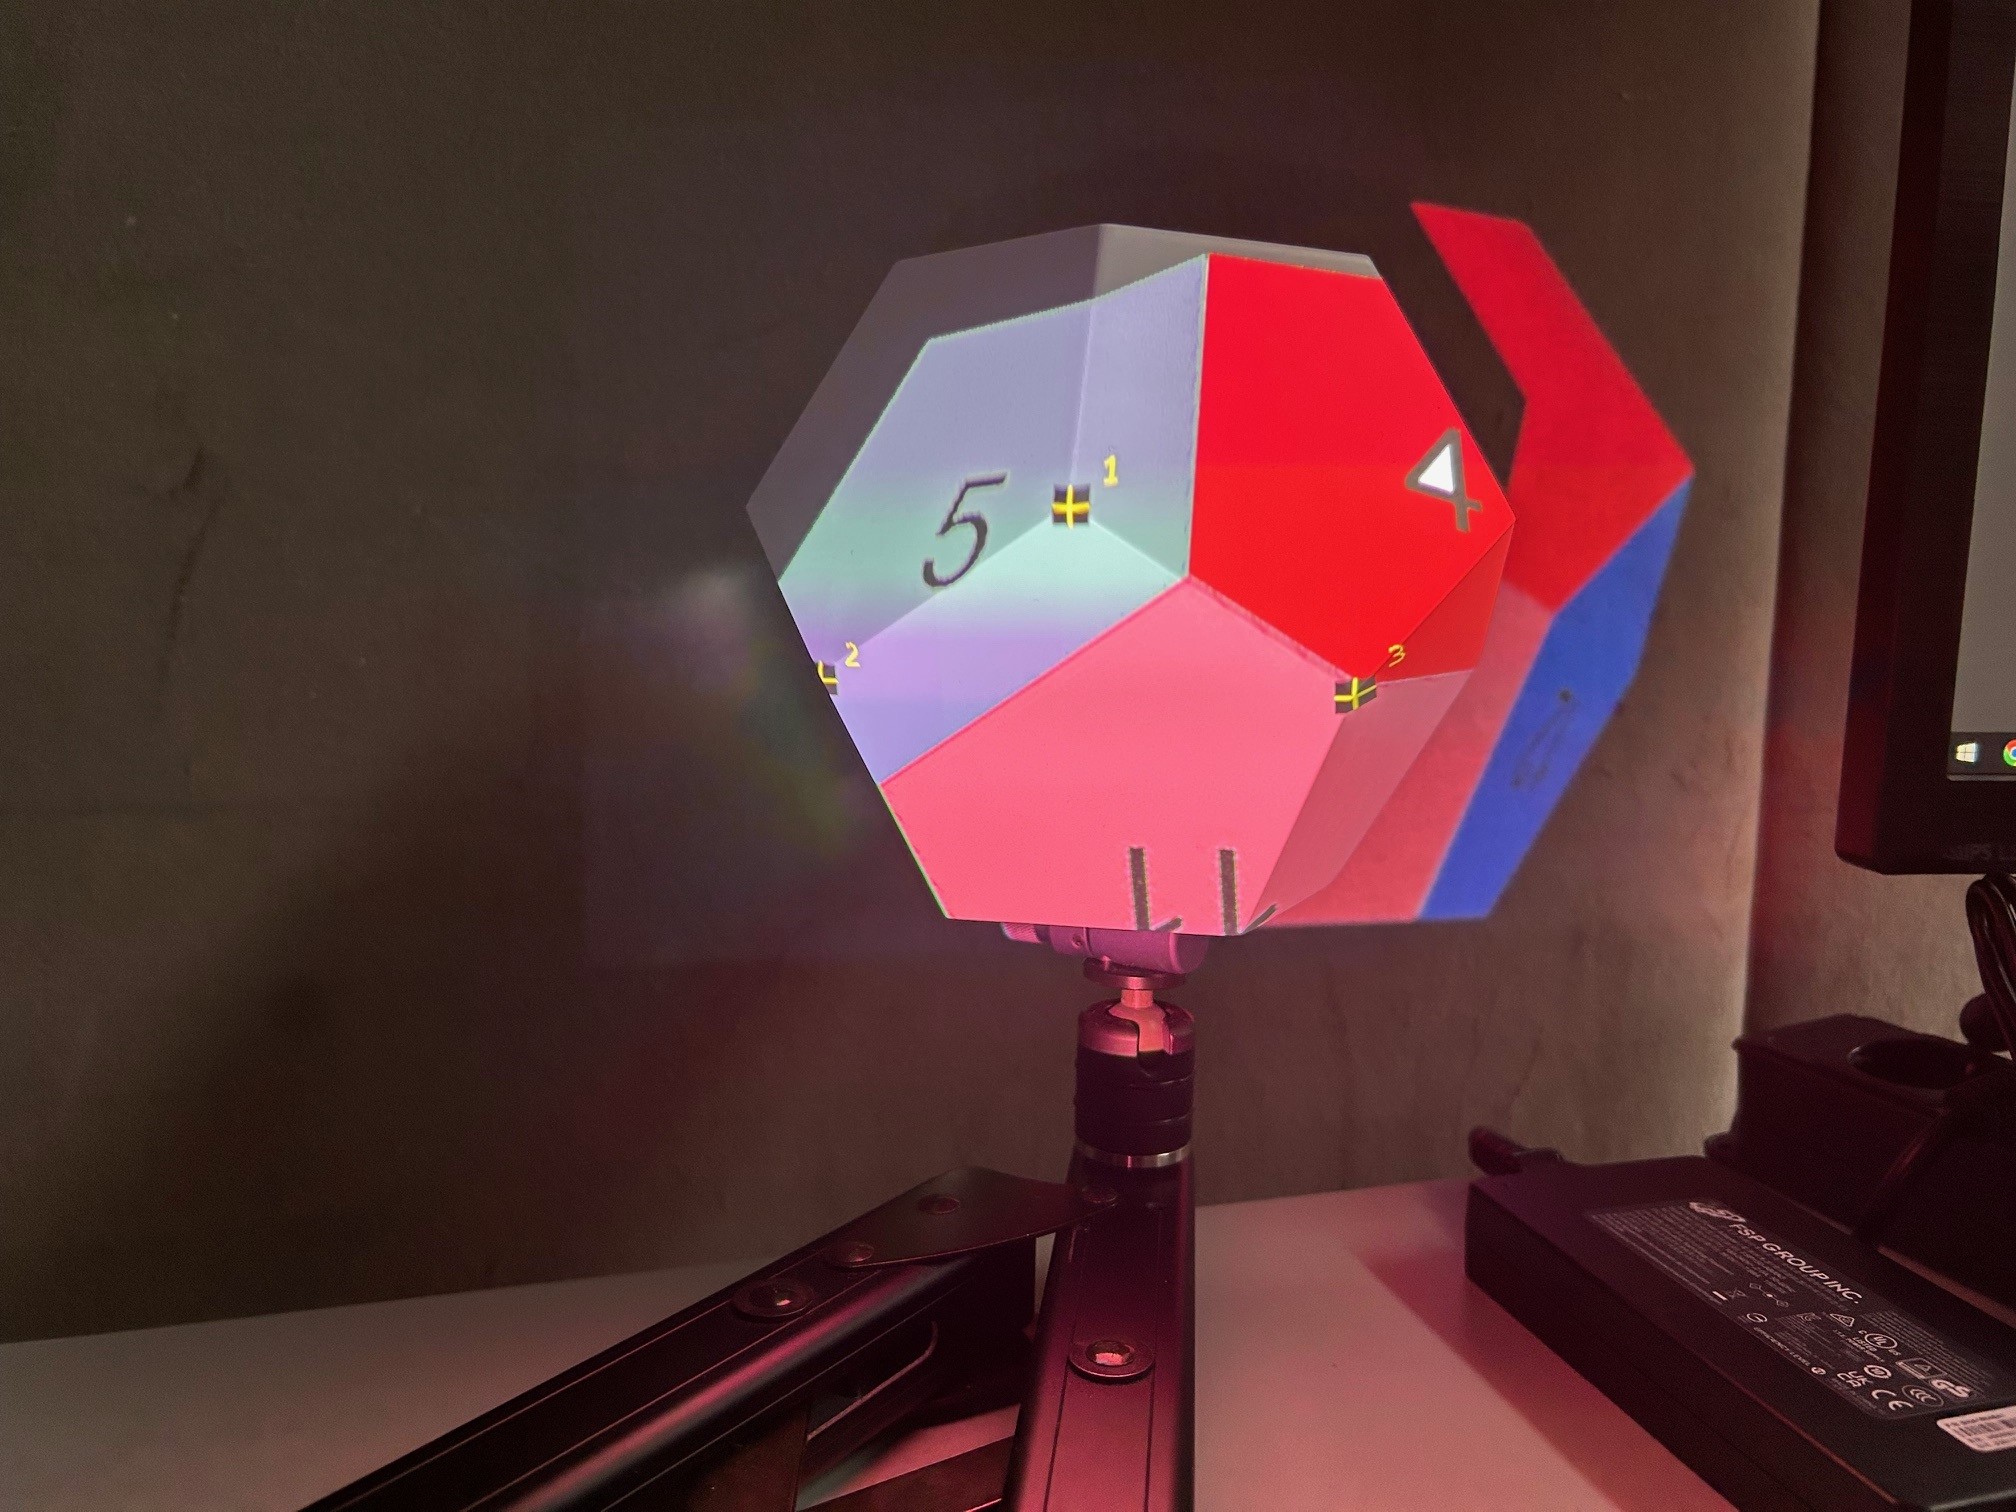
Comparing them to the Marker's placement within the GUI they now look ok:
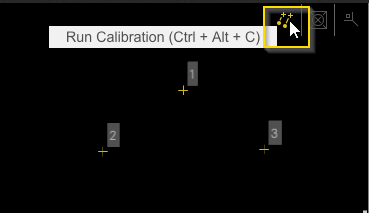
The mapping will not automatically update initially, you need to still activate the calibration by hitting the below button in the GUI.
This button is a toggle button. If working on additional Markers the mapping will adjust in real-time if toggle is kept on:
YouTube Video showing the workflow:
2.04 Mapping Tutorial Marker Calibration Basics - YouTube
Marker Calibration Settings
Initial Setup Settings
Alongside settings under the Marker Calibration tab, initial settings on the Projector under the Setup tab are key to set correctly for the Marker Calibration to work as accurately as possible:
-
World Transformation
- To make sure the calculations are as accurate as possible it is best to place the Projector and Screens as close to their real world positions as possible. It is okay if the Screen stays at a preferred location for Previz, but then in that case making sure to place the Projectors at the expected height, side and angle is key.
- To make sure the calculations are as accurate as possible it is best to place the Projector and Screens as close to their real world positions as possible. It is okay if the Screen stays at a preferred location for Previz, but then in that case making sure to place the Projectors at the expected height, side and angle is key.
-
Lens Properties
- Along with its transformation, a Projector's Lens, Fov/Throw, and Lens-Shift are important for more accurate calculations, so it is recommended to ensure these are correct to the Projector being used.
Selected Screen Mapping
A Projector may be pointing to multiple Screens. The Selected Screen Mapping dropdown lets you select which one to work with in the Marker Tab.

There is also an option named External Marker from API allowing API calls to set the position of Markers, this will apply to the top Mapping in the list.
The benefit of this workflow is mainly to allow Tracked Screens to use Marker Calibration, as many Tracking systems could send the individual Marker positions to PIXERA for having this update in real time.
The API call that accomplishes this is setMarkerPositions(Double[] positions, int32[] MarkerIds), more info on this call can be found in the Control/Project tab and via the API Documentation.
Calculate Screen Pose
By default, the Marker Calibration workflow moves the Projector in the Workspace so that its resulting position and rotation match that of the real world equivalent.
However, if you want to keep your Projector at a set location, and instead want the Screen to shift its position and rotation to create the same projection angles, then you can turn on Calculate Screen Pose.

Warning
Only one Projector Marker Calibration can affect a Screen at a time. Whichever was last used will be the one that sets the Screen's position and rotation, overriding any of the others.
If wanting to have the Screen move, but requiring multiple Projectors, you will have to create multiple duplicates of the Screen with each Projector only using one.
Re-Projection Error
Each Marker has a error that is calculated, this is how off the algorithm (Discussed Later) believes the placed Marker is from the one found in the Output.
The Re-Projection Error field displays an average of all the active Marker's errors. This can give you an idea of how accurate the final projection may be. 0 means a perfect projection should occur, as the value increases, it is more likely that the final Output is not as closely aligned as expected.

Activate Markers with Minimal Error
When adding a Marker, by default that Marker is set to active and will be used for the next calculation. However, depending on how the Markers are placed and their internal error value, it may be more accurate for the final result if some Markers are not used.
The button Activate Markers with Minimal Error will look through the currently placed Markers, and decide based on their Error values which are more likely to be accurate when used together, while turning off the rest.
It is recommended to always test with this button, as it may improve the result. If it does not, then the calculation is incorrect, and it is better to manually change what Markers are active.

Marker Table
The table of Markers will display a variety of info about each Marker. This includes:
-
Active: Is the Marker to be used for the next calculation.
-
Id: The order of the Marker in the list (Based on creation time).
-
Position 3D: The Position of the Marker in the Workspace on the 3D Object, zeroed to the center of the Workspace.
-
Position 2D: Position of the Marker in the Output, zeroed to the top left.
-
Trash Icon: Will delete the currently selected Marker.
- Clear All Points: Button to delete all currently placed Markers.

Marker Appearance
By default, the Markers are displayed with a variety of settings on the Output. They highlight on selection, each is 48 pixels in size, 2 pixels in thickness, and are yellow in color.
All of the above options can be changed inside the Marker Appearance section.

Multiple Marker Sets
Most of the time the Marker Calibration will be set and used on a static object, so it only has one view from the Projector.
However if the Object or Projector moves slightly/is purposely moving (such as through a rotation) it may be necessary to create multiple sets of Markers. These sets will then be averaged and a final mapping made from them.
To create these sets, you will perform the normal Marker Calibration Workflow, and then create a new set using New From Current. To modify any, use Save To Selected after selecting a set. You can also remove sets.
These sets can be set to focus on if the Projector Pose is being changed, or the Object Pose is being changed, depending on what Calculate Screen Pose toggle is being used.

Solve Algorithm
The Marker Calibration workflows uses mathematical algorithms to calculate how the projected texture should be mapped. This involves both the Workspace Markers, as well as the Output Markers, in how they are placed in relation to each other.
These calculations can be done in a variety of ways, but in the end they all are focused on achieving as close to accurate results as possible, to which PIXERA then uses these for creating the mapping.
By default, the Iterative | Levenberg-Marquardt optimization algorithm is used. It is recommended to keep this setting at Iterative unless understanding as a projectionist how the algorithms work and why one would be used over the other.
Warning
The PIXERA team cannot make recommendations on which of the below algorithms should be used when. These are very complex mathematical formula that may or may not apply to specific conditions, we have offered these here for users who are knowledgeable of these formulas, but so far no concrete usage between them has been found.
If wanting to experiment with the options, and/or you are finding issues with the Marker Calibration, you can test switching the Algorithm to see if it improves the final projection for your project's specific use case.
You can also find the information for each algorithm using the titled paper names in the selection.

Calculated Parameters
Different algorithms calculate various final results. The default Iterative only calculates for the Pose of the Projector, so it is important to have the Fov, Horizontal Lens Offset, and Vertical Lens Offset set on the Projector correctly.
If using a different algorithm, such as the bottom Estimate... option, this allows you to have the algorithm set all of these settings. If wanting to have the algorithm not set a value, you can uncheck the setting and the calculation will not be applied.
As it is recommended to keep the Solve Algorithm setting to Iterative, it is also recommended to keep Calculated Parameters set to default, which would be to keep Pose on as this tells PIXERA to move the Projector based on the calculation.
The Only apply Results in Lens Parameter Ranges adds a min and max cap to what calculations will be replied based on the mentioned Len's ranges.

RANSAC and Extrinsic Guess
RANSAC is an estimation method used in Camera Calibration pipelines allowing outliers to have an impactful use on the calculations without just adding a large error. It is recommended to turn this setting on if you have many points that are turned off due to not having a minimal error, while still not receiving a correct mapping.
Extrinsic Guess is on by default. This allows the algorithms to be given some optional pre-assumed information that PIXERA has, such as a Projector being on the left, center, or right side of an object. The assumed info helps to reduce the amount of iterations needed in the calculations. It can be turned off if wanting purely the calculations to be ran and using its own values only.

Lock Parameters
Some workflows have a known constant in the Projector's/Object's position, or a user may want to just know the best location of a calibration on one axis.
The Lock Parameters settings allows the user to stop the calculations from changing the Pose of the Projector or Object being affected. This includes on the X, Y, or Z Axis for Position and Rotation.
Once unlocked, the next calibration ran will then modify these axis, and the originally locked value will be overwritten.

Dynamic Softedge
In the case of Marker Calibration and projection onto a 3D object, the Dynamic Softedge option can be used. This is not displayed in Mapping->Softedge because it is applied directly on the engine side.
Read more in this article: Dynamic Screen Workflow.
PIXERA 25.2 R 3 | C.L. | 24. November 2025