 Contact Us


In this article, we will be going over a PIXERA project which uses a custom-made Unreal project to show off the Unreal workflow inside PIXERA with multiple examples.
These examples include:
- Importing an Unreal Project into PIXERA using the Unreal Editor: Unreal Engine PIXERA Setup
- Importing an Unreal Executable into PIXERA: Unreal Engine PIXERA Setup
- Texture Sharing Between PIXERA and Unreal: PIXERA Texture Sharing to Unreal
- PIXERA Connect Plugin Usage: PIXERA Connect, an Unreal Plugin - General Usage
- Level Streaming in Unreal: PIXERA Connect, an Unreal Plugin - Unreal Level Streaming and Loading In PIXERA
- Sending Variable Data from PIXERA to Unreal: PIXERA Connect, an Unreal Plugin - Send Variable Data from PIXERA to Unreal
- Sending Variable Data from Unreal to PIXERA: PIXERA Connect, an Unreal Plugin - Send Variable Data from Unreal to PIXERA
- A Custom Unreal Module: UnrealControl Module
Project Files
You can download the Bundled PIXERA project and Unreal Projects described in this article here.
Unreal Projects
There are two Unreal resources being used in PIXERA. The first is an Unreal .uproject file, which opens into the Unreal 5.2.1 Editor. The second is an Unreal .exe file which opens up as its own process.
Inside both projects, there are a variety of Unreal and PIXERA Connect plugin features implemented, including:
- nDisplay Plugin Enabled
- PIXERA Connect Plugin Enabled
- Multiuser Plugin Enabled
- Multiple Levels
- Level with Level Streaming being used
- Render Target attached to a plane
- Niagara Particle System
- Level Blueprint usage, including:
- Event setting
- Texture Sharing
- Variable reading
- Variable sending
The main section requiring explanation is the Level Blueprints, as these contain the nodes allowing the mentioned workflows to work while Unreal is opened inside PIXERA. Here is a visual of the Main level's Level Blueprint:

Inside there are four main sections of nodes.
Register Event
This section of code uses the PIXERA Connect added “Register Event” node, allowing blueprint code to be run in PIXERA from a Control API call.

Setup Input Texture
This section of code uses the PIXERA Interop added “Setup Input Texture” node, allowing a PIXERA Unreal Output's texture to appear on an object inside the Unreal level via the Render Target mentioned earlier.

Send Data
This section of code uses the PIXERA Connect added “Send Data” node, allowing Unreal to send data into PIXERA onto a Layer. The “Send Data” nodes allow a variety of different types to be sent such as floats, colors, arrays, etc.

Register Event Data Received
This section of code uses the PIXERA Connect added “Register Event Data Received” node, allowing PIXERA to send data into Unreal through this blueprint. The “Register Event Data Received” nodes allow a variety of different types to be received such as floats, colors, arrays, etc.

PIXERA Project
The PIXERA Project uses these Unreal resources to show off a variety of different features spread across these three main Timelines:

Compositing Layer Screen Aligned

The “Compositing Layer Screen Aligned” Timeline is the most involved Timeline, as it holds three features inside.
The first feature involves adding an Unreal resource as a compositing screen aligned layer, this can be changed as a checkbox on the Unreal resource. When added, the Unreal texture is rendered to take over the PIXERA workspace and output visual. This means it will appear over all other layers. The “Hidden Layer” layer at number 4 will be shown before the Unreal resource is run, however once ran Unreal will take over and unless muted or killed the “Hidden Layer” will never appear.
The second feature involves the number 5 shown in the image. This section was created using an “Unreal Variable Data" layer with the names of the corresponding values inside the discussed Level Blueprint. These values can now be manually set or key framed and will be sent into the Unreal Level Blueprint.
The third feature involves the number 6 shown in the image. This section was created using a Pdtf layer formatted with the name of the level and the variable names being sent from the Unreal Level Blueprint. These values being received into PIXERA will then appear on the layer and can then be used in PIXERA.

Not Screen Aligned

The “Not Screen Aligned” Timeline is the opposite of the “Compositing Layer Screen Aligned” Timeline, as it allows media to play over it as well as behind it. To accomplish this, the resource had the option “Compositing Layer Screen Aligned” off and the command line argument “r.PostProcessing.PropagateAlpha=2” when being added to the Timeline.
These setting allow media to appear above the layer (number 2) and below the layer (number 5), respectively.

Texture Sharing

The “Texture Sharing” Timeline is set up to show how a texture on a PIXERA layer and screen can be inputted into Unreal.
The number 2 layer is the layer attached to a separate screen at the same resolution as the Render Target used in the Unreal Project. The clip being played on this layer will be the texture that is sent into Unreal.
The number 5 is the Plane with the texture playing on it as a layer on the timeline. This is to move the plane around into position and allow the user to move the plane's position using the Connect plugin.

Here is a visual of the Unreal Output, which is attached to the separate screen, making the final connection between PIXERA and Unreal. Each Unreal Output needs an index that was set in the Unreal Level Blueprint. It also needs the GPU being used, and the resolution set in the Render Target inside Unreal.

PIXERA Control
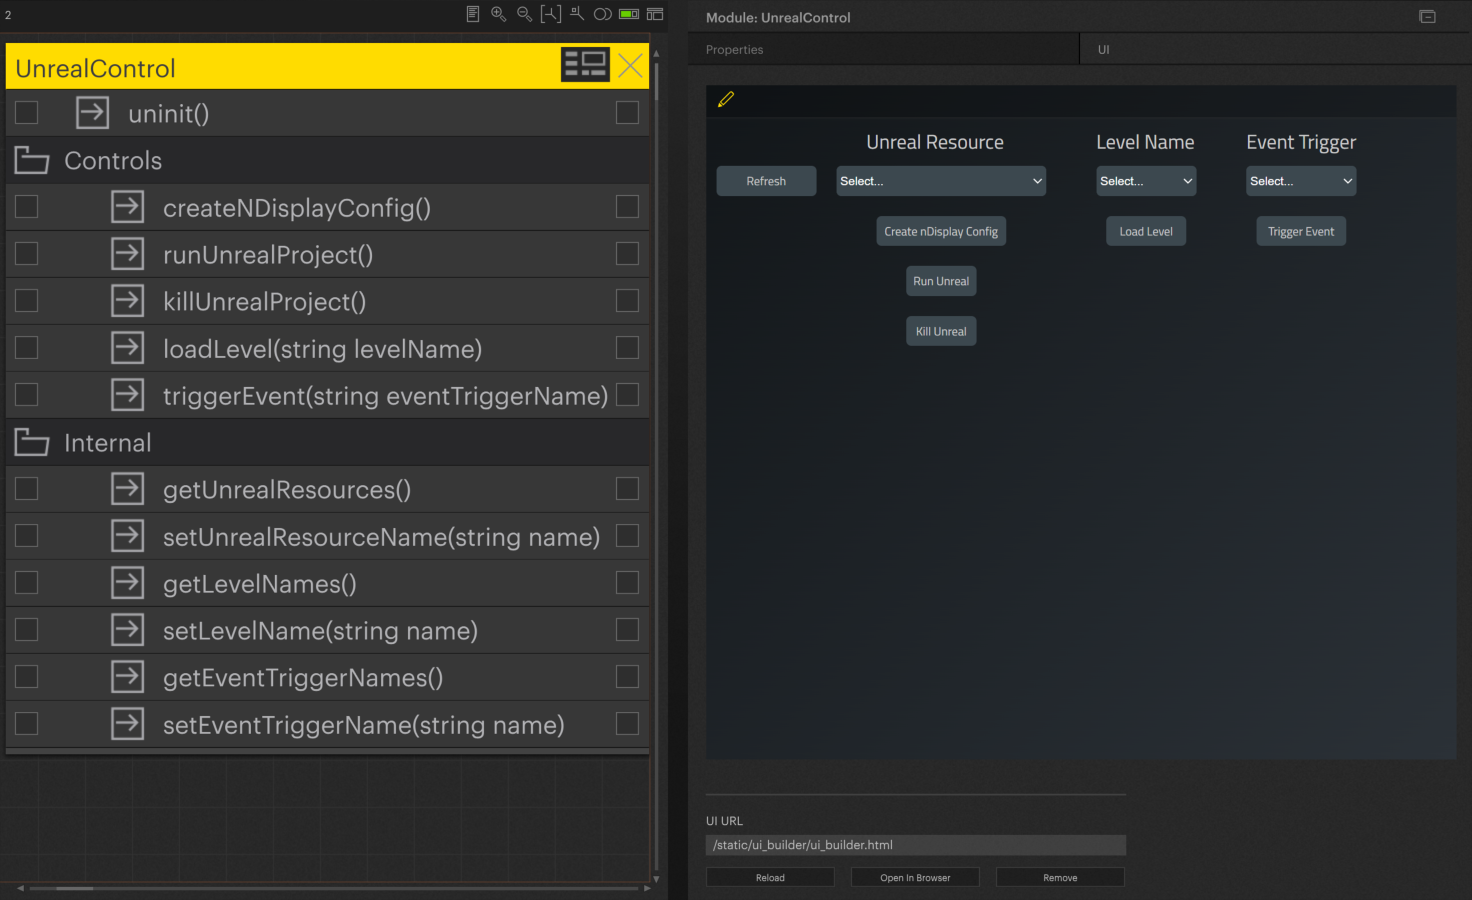
The PIXERA Project contains one module in Control to help execute the project switching, nDisplay creating, running, killing, level streaming, and Event playing features mentioned previously. This module is called “UnrealControl”, and it is written in custom LUA code with an accompanying UI allowing the user to select from a dropdown and Unreal resource and from there press buttons or use other dropdowns to activate multiple features from one location.
PIXERA 2.0.65 | 24 July 2024 | CL