 Contact Us


NDI Workflow I How to Prepare and Set Up NDI
NDI allows you to transmit high-definition video over a computer network with low latency and can be subscribed to and displayed in PIXERA like any other form of content.
You can find more information about NDI on the official documentation: https://docs.ndi.video/
Prerequirements
For NDI to work, you need a switch that is multicast-capable.
Prepare your network settings, making sure that all your machines are in the same IP range.
Download the latest version of NDI Tools: https://ndi.video/
By default, NDI advertises the presence of an NDI source on a local network in broadcast mode using mDNS; i.e., if there is any NDI Stream in your network, you will see it if you have set up your network correctly.
Any time you receive a single stream, NDI creates a unicast stream for you, which leads to a lot of data being transmitted over the network.
For example, if you receive a 1080p Stream via PIXERA for your Output, you will have a downstream of about 140Mbit/s. If you activate the preview in PIXERA for this NDI stream, NDI has to create a new stream, as the output engine and the preview engine run separately from one another. So now you have a bandwidth load of about 280 Mbit/s. If you do this on three machines, you will then have a bandwidth load of about 800 Mbit /s because of all the unicast streams.
Info
PIXERA is capable of processing NDI HX (compressed) inputs.
Bandwidth Requirements per Resolution
NDI is not a codec per se, so the data rate depends on the codec used for the NDI stream. This could be H.264, H.265, or SpeedHQ. For H.264 60p video, we get the following data rates (±10%):
720p: 80Mbit/s
1080p:130Mbit/s
1440p:180Mbit/s
2160p 300Mbit/s
Setting up Multicast from scratch
We recommend using Multicast for NDI, in order to reduce the network load. That means that NDI or PIXERA creates more than one stream, and the multicast-capable switches handle the rest for you. They duplicate the streams to the ports where you like to receive the NDI signal. Find further information about multicast in this article: How to Multicast
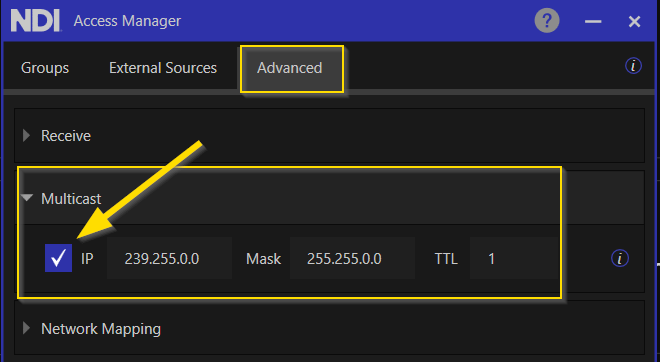
To set up multicast, first, open up the NDI Tools and go to the Access Manager.

Go to the “Advanced” tab, expand the multicast menu, and check the IP box. Your NDI is then set up to multicast.
The IP address range is a standard multicast range. If you do more multicast streams from different machines, make sure that you change the IP address. 239.255.0.10 as example.
If you have PIXERA already running, restart it so your changes are applied.
Network configurations that prevent NDI discovery
By default, NDI uses mDNS. If your network is configured to disallow mDNS, e.g. if you set your network location to “Public” on a Windows machine, you may encounter issues with automatic discovery and registration of NDI.
Set up the Output Stream in PIXERA
Go to Mapping → Live and expand your local machine.
Here you will then find NDI.
To add a new stream, either right-click → “Add Output Stream” or select NDI and press the button in the Inspector.
You can add multiple NDI Output Streams in the same way.

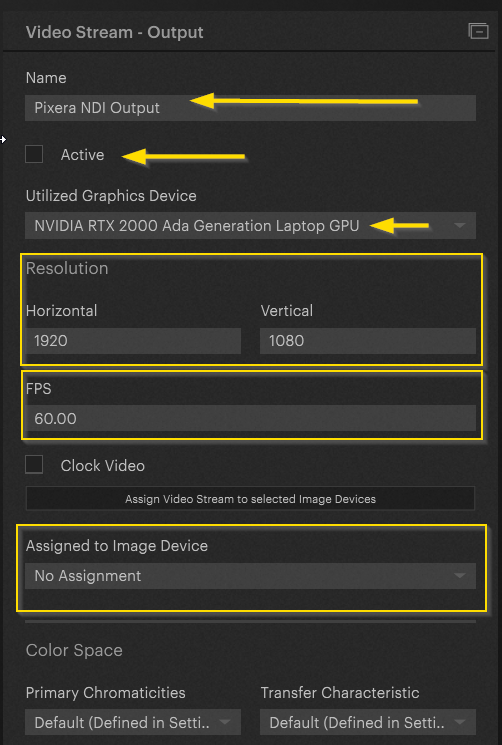
Once you have added the NDI Output Stream, select it and find some options in the Inspector:
Note
PIXERA does not support audio output via NDI.
NDI input | How to Receive an NDI Stream
An NDI Input stream is to be handled like a typical Live Input Camera.
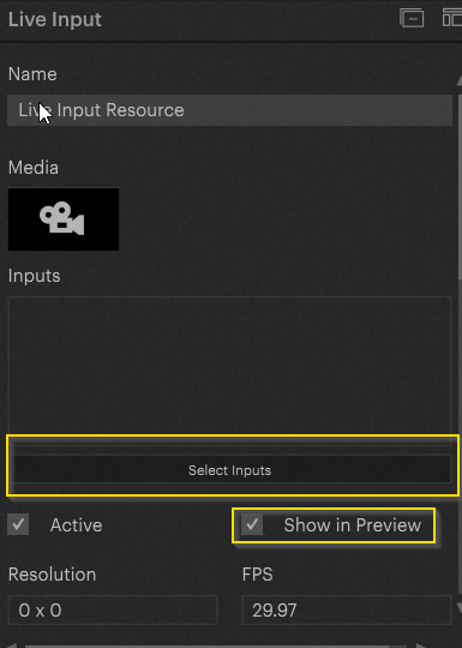
You will find the Live Input Resource in Compositing / Resources / Live Input.

For “Inputs”, choose your Live Input Resource in the Inspector and go to the NDI Stream
If you like to see your NDI Stream in the Preview, make sure you check "Show in Preview", as shown below.

NDI with Alpha
PIXERA supports NDI with alpha for input and output.
PIXERA NDI Input
To test this feature, you can use a custom test pattern with an alpha channel, available in the NDI Tools under Test Patterns.

PIXERA NDI Output
To activate the alpha channel on the PIXERA output, you need to activate “Target with Alpha Channel” in the Screen settings.

Further information about the use of transparency on screens: Target with Alpha Channel
To check this, you can use the NDI Studio monitor and activate “Show Checkerboard” to see the alpha channel.

PIXERA 2.0.65 | 27. June 2024 | R.W. | J.B,