In this article, we will go over how to use Level Streaming in Unreal, allowing you to load different levels from PIXERA directly. We will also go over how to load levels manually using the Blueprint system and Registered Events.
Warning
The PIXERA Connect Plugin is required for the following features in this article to work. Follow this article to install and learn about the Connect Plugin: PIXERA Connect (Unreal Engine Plugin).
Level Streaming
Level Streaming allows you to have multiple “presets” of Actors, which will be hidden when not needed. When switching to a new streamed level, the current streamed level will be hidden.
This feature is normally used to create different visuals for one general scene, such as different seasons for an outdoor scene. You can also use this feature to have multiple whole groups of content ready to be switched between quicker than by loading a new scene.
Warning
Level Streaming may cause increase performance drain on the system, and in turn can cause playout issues if overloading the system. NOTE that it is usually best to load different levels or load an entirely different project at times to save performance.
Creating Levels
To accomplish Level Streaming, you will first need to create multiple levels in the Unreal Project, each with their own content. Again, this can be a main scene with different complementary scenes or completely separate scenes.
Warning
Level Streaming uses a “Persistent” level with Actors which will always be loaded. So, if using this feature to load completely different levels, make sure to create one Level which is completely empty/holds Actors you will want in every other scene.
Adding Levels
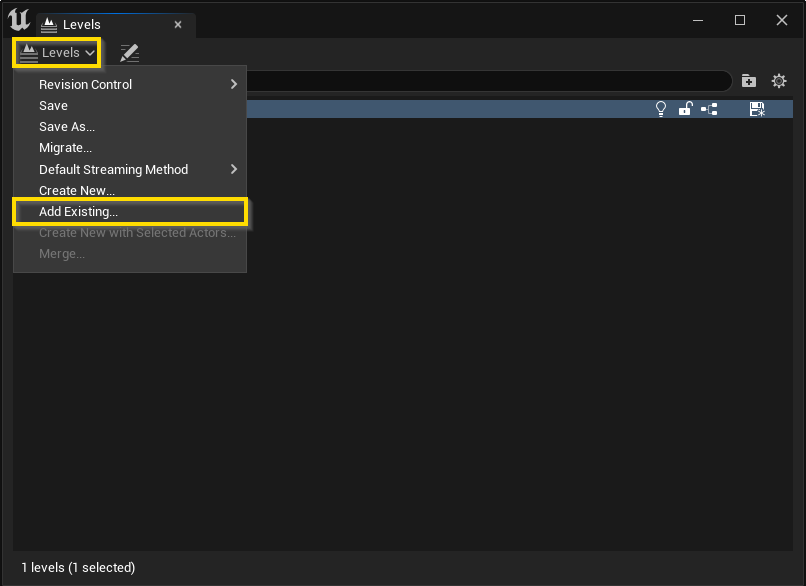
After creating your levels, open the Levels tab by going to “Window/Levels”.

The “Persistent Level” is the currently loaded level and will be the level always loaded, so make sure to do these steps on the level you plan to always exist in the Scene. Clicking the dropdown in the top left will allow you to add an existing level inside the project to become a Sub-Level of the Persistent Level.

After loading a level, make sure to hide the level by clicking the eye on the left side of the level's name to closed.
Streaming Inside PIXERA
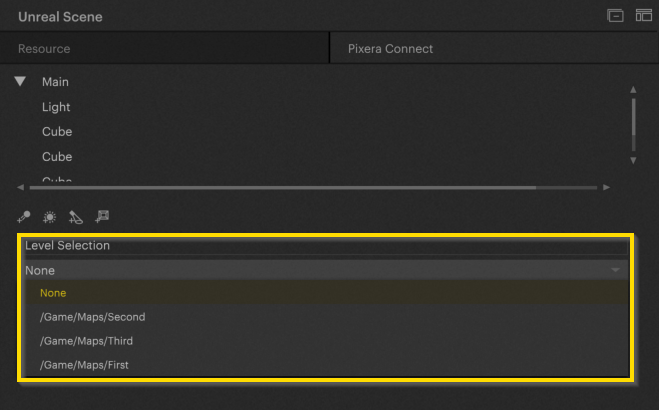
After running the Unreal Project inside PIXERA as described here, the PIXERA Connect Plugin on the Unreal Resource will populate a dropdown if any Sub-Levels are found for Level Streaming.
From here you are able to manually select levels to stream which will automatically appear, or you can use the “loadLevel(string levelName)” call in the API to load one of the Sub-Levels by name.


Events to Load a Level
The other way to go between different visuals or levels in an Unreal project from PIXERA is to use Events with PIXERA's Connect plugin Blueprint Actions.
To learn more about Events in Unreal and how to run them in PIXERA, refer to this article: Trigger Events in Unreal from PIXERA.
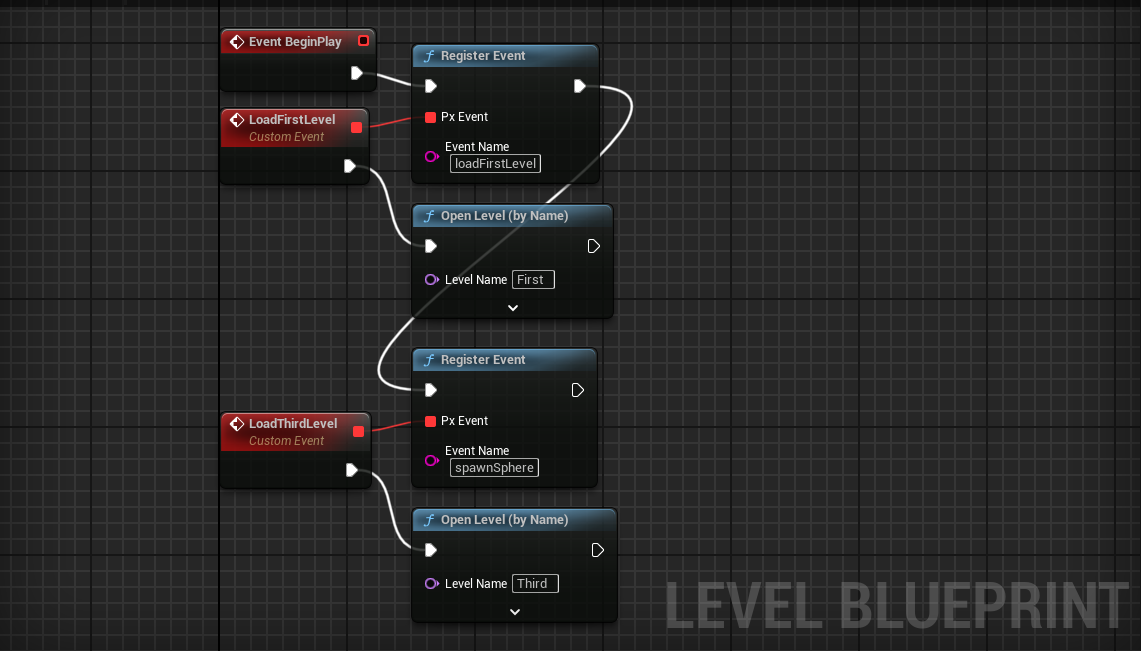
As for Unreal, you will want to set up your Level Blueprint to use the “Event BeginPlay” and “Open Level (by Name)” Actions native to Unreal with the “Register Event” Action provided by the PIXERA Connect Plugin, as shown below. When activating the event, Unreal will then load the specified level.

Continue With PIXERA Connect
The PIXERA Connect Plugin allows a variety of workflows with an opened Unreal Project. Follow the links below to learn more:
PIXERA Connect, an Unreal Plugin - General Usage
PIXERA Connect, an Unreal Plugin - Trigger Events in Unreal from PIXERA
PIXERA Connect, an Unreal Plugin - Unreal Level Streaming and Loading In Pixera
PIXERA Connect, an Unreal Plugin - Send Variable Data from PIXERA to Unreal
PIXERA Connect, an Unreal Plugin - Send Variable Data from Unreal to PIXERA
PIXERA 2.0.65 | 09. July 2024 | CL
 Contact Us


