 Contact Us


Step 0: Explanation
Shadertoy GLSL
Shadertoy is a website allowing users to create and share GLSL shaders with unique quality-of-life additions, such as Channels for media and built-in timers. Due to this, Shadertoy allows its own slightly altered GLSL format to run code depending on the shader being built or imported. Even so, the platform holds a large variety of unique and useful effects that PIXERA users may find desirable to use in their projects.
PIXERA GLSL
PIXERA's use of effects also involves GLSL code. However, just like Shadertoy, PIXERA requires a specific format for the code to run. Due to the software's many uses, several specific lines of code must be precise for the shader to run correctly.
Shadertoy to PIXERA
This article will include step-by-step instructions on how to convert most Shadertoy shaders into a PIXERA effect. Some steps are optional and are mainly for bug fixing or organization of the code. We will be going over Benjamin ‘BeRo’ Rosseaux's Color Temperature shader.
Creative Commons Copyright Information
// Color temperature (sRGB) stuff
// Copyright (C) 2014 by Benjamin 'BeRo' Rosseaux
// Because the german law knows no public domain in the usual sense,
// this code is licensed under the CC0 license
// http://creativecommons.org/publicdomain/zero/1.0/
Step 1: IDE
GPUpad IDE
Using an Integrated Development Environment (IDE) with tools for GLSL programming will aid the user in making sure their code works correctly before bringing it into PIXERA. GPUpad is the recommended IDE due to a custom project being available, emulating how PIXERA will use the file in the software. If the effect works on the test image given in GPUpad, it is almost certain to work in PIXERA.
Installation and Setup
Download and install the GPUpad Windows 64-bit .exe file from GitHub linked here:
Also, download this starter code file and unzip it into a place of your choosing (It is recommended to change the main folder name to GPUpad for consistency):
Once it is installed and the starter code is unzipped, open GPUpad and navigate to the top left corner to select “File/Open…” or press “Ctrl + O”.
Navigate to the GPUpad Starter Code folder and in the "gpupad" folder select the “effects.gpjs” file.
A new UI will appear, which includes a visual space to the left as well as two opened files, one named “textured.fs” and another named “attributeless.vs”, which should look like this:
On the left is the visual feed, which will show how the effect is changing an already given image. To see this image, press the play button in the top bar. On the right side is some code. The two sections the user must focus on are the #include "../BoxBlur.glsl" and the BoxBlur(uTexture, 1, 1, 1920, 1080) in the void main() method. These two lines of code will need to be changed to whatever format is needed for the selected effect to change the image.
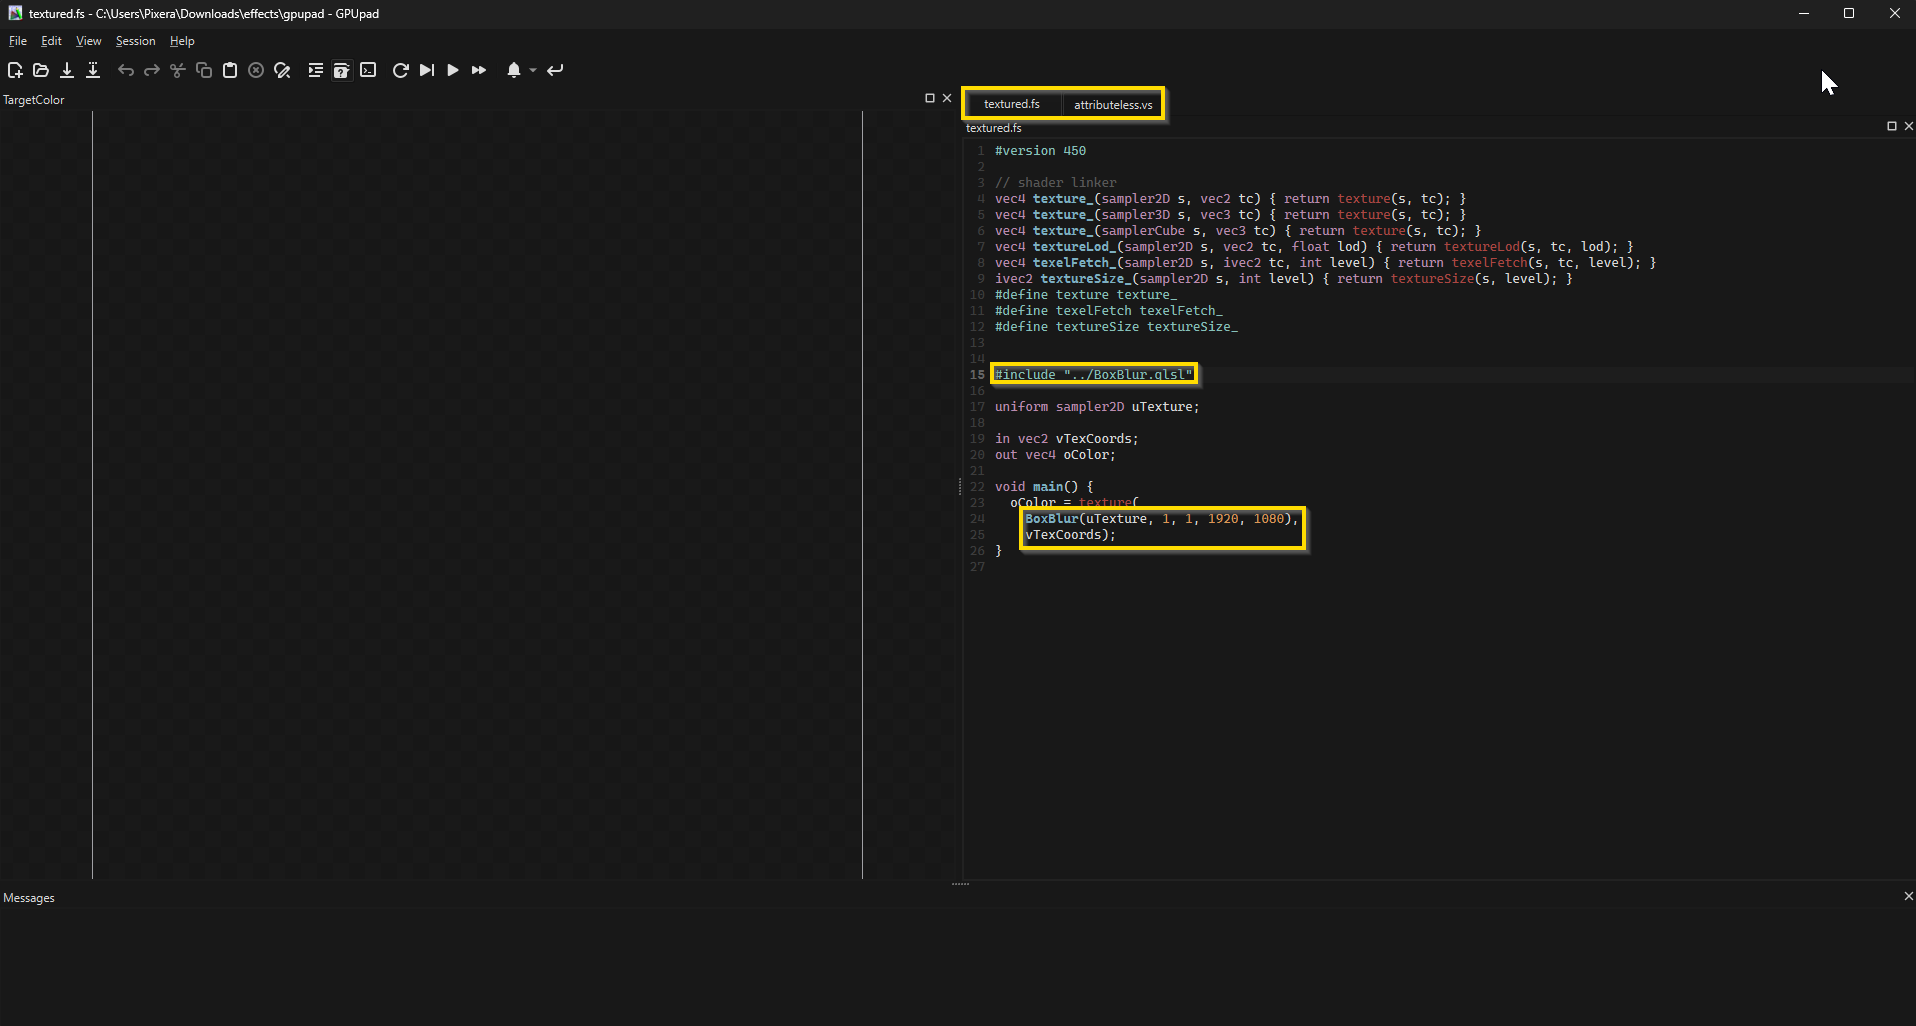
The #include line just requires the user to change the directory in which the file can be located. In this case, the code is pointing to the “BoxBlur.glsl” file, which is one directory back from the “effects.gpjs” file. As an example, another effect available in the starter code is the “AddColor.glsl”, which can be added by placing this directory in the quotation marks: “../AddColor.glsl”.
As for the code in void main(), the name of the function being run must be changed to the new effect's name, in this case, AddColor(uTexture, 1, 1, 1920, 1080). The parameters in the parentheses describe the values the user wants the effect to use based on its built-in struct, which will be discussed later in this tutorial. For now, know that most effects will use the uTexture variable and a value of 1 in the first two parameter spaces. The other parameters will have to be decided after opening the GLSL file in GPUpad (using “File/Open…”).
For example, the “AddColor.glsl” when opened will look like this:
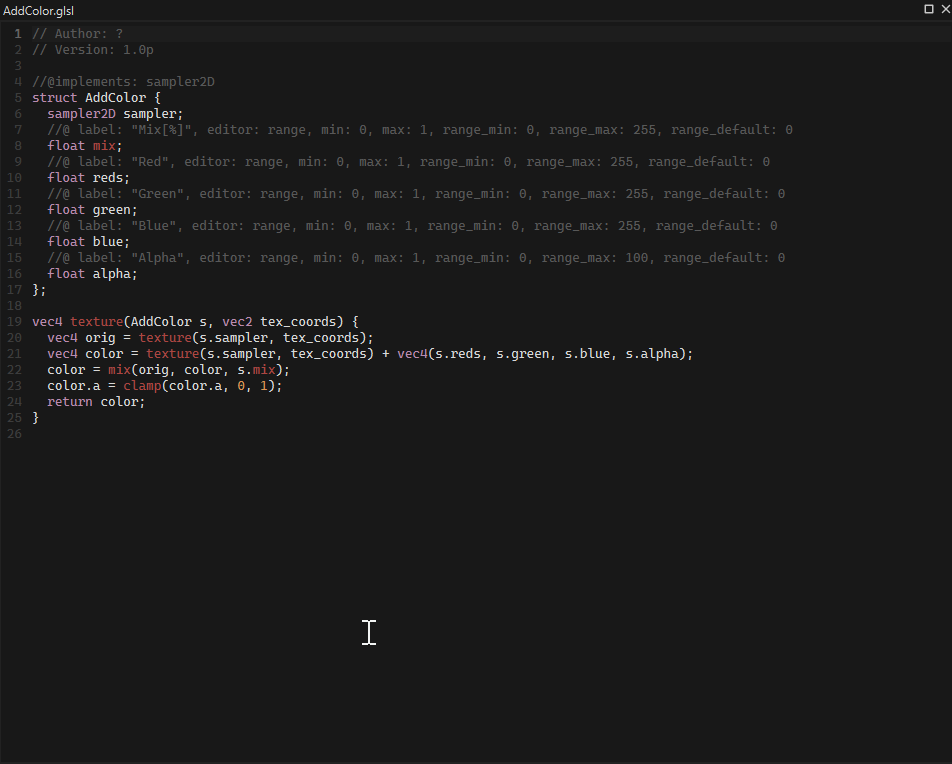
The uTexture uniform (reference to the duck image) in the “textured.fs” fragment shader, and the parameter with value 1 mentioned previously represent the sampler and mix variables in struct AddColor. This effect also includes four more values that the user can change: reds, green, blue, and alpha. Looking at the min and max values, these floats can be set to as high as 1 and as low as 0.
Going back to the "textured.fs" file, you can now replace the values inside the parentheses with the respective struct variable values you would like to be used. Here is an example:
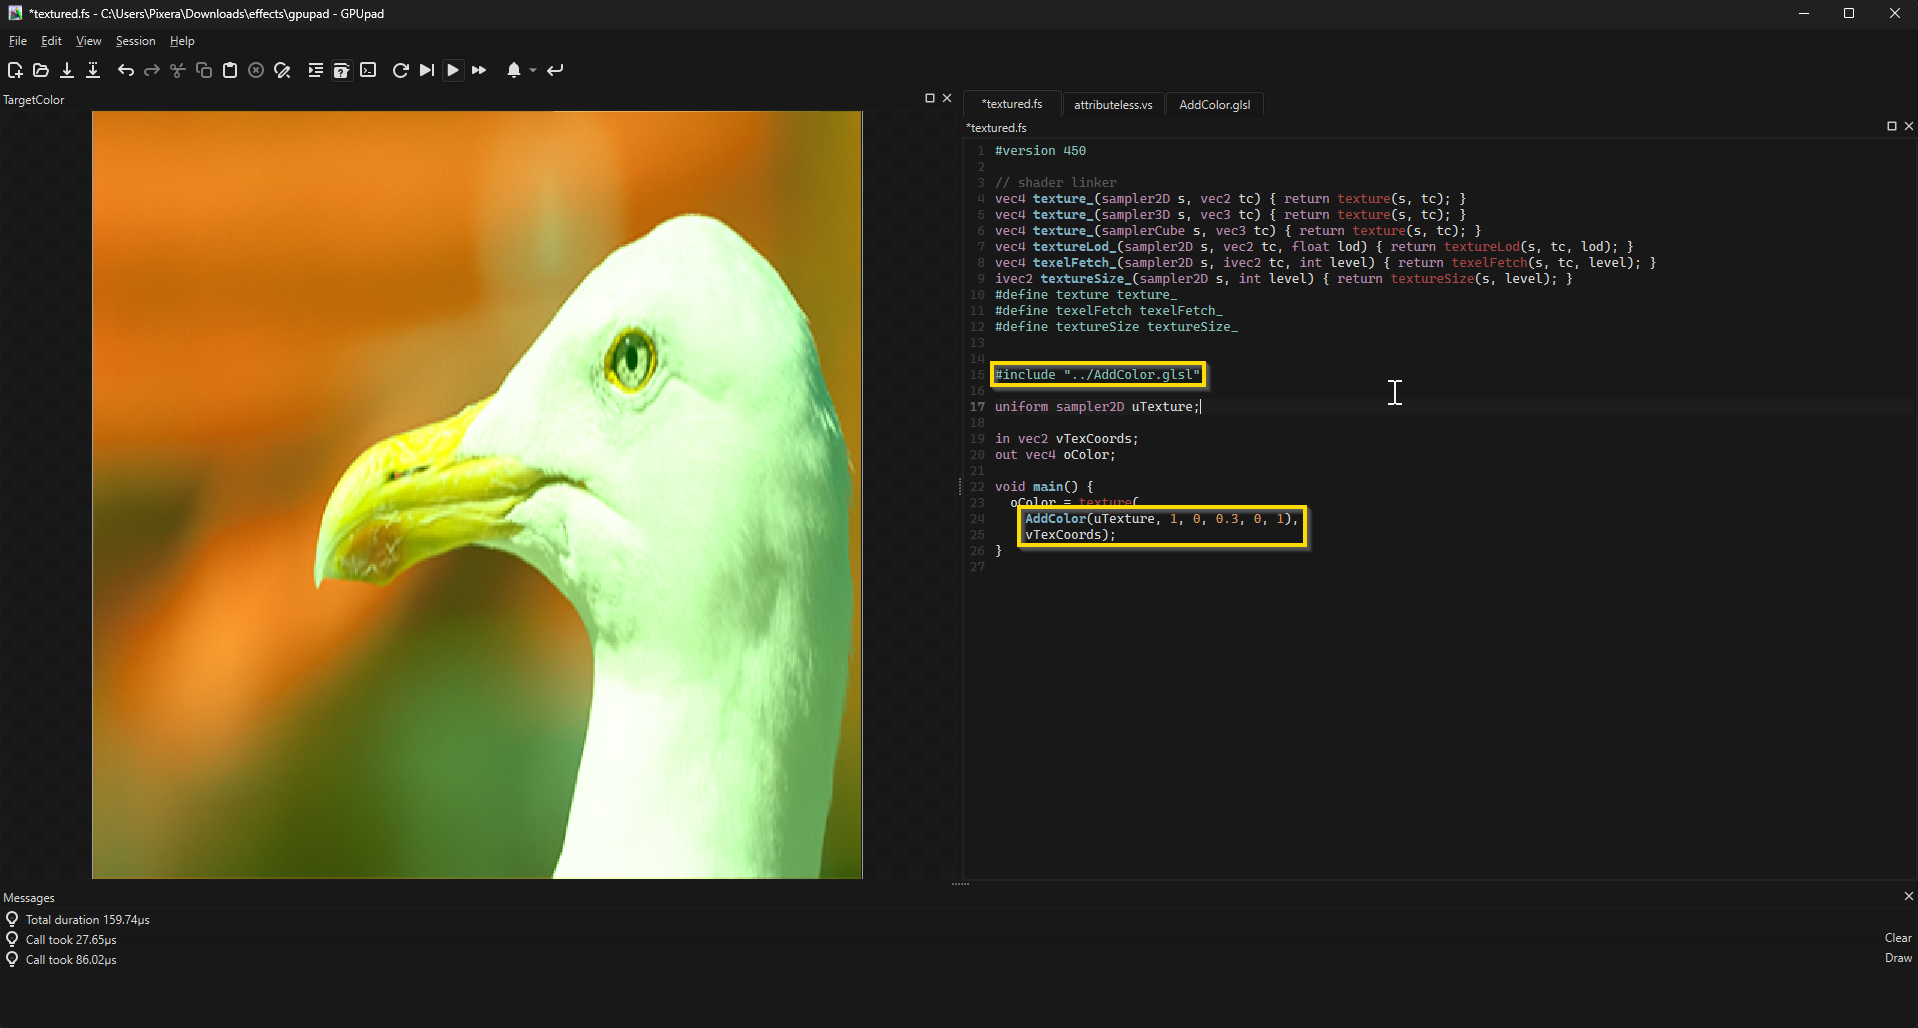
Here the line AddColor(uTexture, 1, 0, 0.3, 0, 1) is used. Again, the function name must be the name of the effect, the first two parameters will usually be uTexture and a 1. The third value represents the reds parameter, which is set to 0. The fourth value is the green parameter, which is set to 0.3. The fifth value represents the blue parameter, which is set to 0. Lastly, the sixth value represents the alpha parameter, which is set to 1. This combination of values creates a green tint to the image as only the green channel is being used to mix with the uTexture. Here is another example using the “Tiling.glsl” effect:
In all, GPUpad will make creating the shader simpler with its visual of the effect and ability to log errors quickly for debugging.
Step 2: Setup
Beginning and End Comparison
To start, here are two different samples of code. The first is from Shadertoy, and the second is the code fully translated into a PIXERA effect and organized for efficient use within the timeline. For now, copy the Shadertoy code to a new GLSL file named “ColorTemperature.glsl”. After following this article, any user should have a working ColorTemperature effect in PIXERA.
Shadertoy
// Color temperature (sRGB) stuff
// Copyright (C) 2014 by Benjamin 'BeRo' Rosseaux
// Because the german law knows no public domain in the usual sense,
// this code is licensed under the CC0 license
// http://creativecommons.org/publicdomain/zero/1.0/
#define WithQuickAndDirtyLuminancePreservation
const float LuminancePreservationFactor = 1.0;
const float PI2 = 6.2831853071;
// Valid from 1000 to 40000 K (and additionally 0 for pure full white)
vec3 colorTemperatureToRGB(const in float temperature){
 // Values from: http://blenderartists.org/forum/showthread.php?270332-OSL-Goodness&p=2268693&viewfull=1#post2268693
 mat3 m = (temperature <= 6500.0) ? mat3(vec3(0.0, -2902.1955373783176, -8257.7997278925690),
                                          vec3(0.0, 1669.5803561666639, 2575.2827530017594),
                                          vec3(1.0, 1.3302673723350029, 1.8993753891711275)) :
                                      mat3(vec3(1745.0425298314172, 1216.6168361476490, -8257.7997278925690),
                                            vec3(-2666.3474220535695, -2173.1012343082230, 2575.2827530017594),
                                          vec3(0.55995389139931482, 0.70381203140554553, 1.8993753891711275));
 return mix(clamp(vec3(m[0] / (vec3(clamp(temperature, 1000.0, 40000.0)) + m[1]) + m[2]), vec3(0.0), vec3(1.0)), vec3(1.0), smoothstep(1000.0, 0.0, temperature));
}
void mainImage( out vec4 fragColor, in vec2 fragCoord )
{
    vec2 uv = fragCoord.xy / iResolution.xy;
 float temperature = (iMouse.z > 0.0) ? mix(1000.0, 40000.0, iMouse.x / iResolution.x) : 6550.0; // mix(1000.0, 15000.0, (sin(iTime * (PI2 / 10.0)) * 0.5) + 0.5);
 float temperatureStrength = (iMouse.z > 0.0) ? (1.0 - clamp((iMouse.y / iResolution.y) * (1.0 / 0.9), 0.0, 1.0)) : 1.0;
 if(uv.y > 0.1){
   vec3 inColor = texture(iChannel0, uv).xyz;
   vec3 outColor = mix(inColor, inColor * colorTemperatureToRGB(temperature), temperatureStrength);
   #ifdef WithQuickAndDirtyLuminancePreservation
     outColor *= mix(1.0, dot(inColor, vec3(0.2126, 0.7152, 0.0722)) / max(dot(outColor, vec3(0.2126, 0.7152, 0.0722)), 1e-5), LuminancePreservationFactor);
   #endif
     fragColor = vec4(outColor, 1.0);
 }else{
   vec2 f = vec2(1.5) / iResolution.xy;
      fragColor = vec4(mix(colorTemperatureToRGB(mix(1000.0, 40000.0, uv.x)), vec3(0.0), min(min(smoothstep(uv.x - f.x, uv.x, (temperature - 1000.0) / 39000.0),
                                                                                                smoothstep(uv.x + f.x, uv.x, (temperature - 1000.0) / 39000.0)),
                                                                                            1.0 - min(smoothstep(0.04 - f.y, 0.04, uv.y),
                                                                                                      smoothstep(0.06 + f.y, 0.06, uv.y)))),
                                                                                        1.0);
 }
}
PIXERA
// Author: Cody Luketic

// Color temperature (sRGB) stuff
// Copyright (C) 2014 by Benjamin 'BeRo' Rosseaux
// Because the german law knows no public domain in the usual sense,
// this code is licensed under the CC0 license
// http://creativecommons.org/publicdomain/zero/1.0/
const float LuminancePreservationFactor = 1.0;
const float PI2 = 6.2831853071;
// Valid from 1000 to 40000 K (and additionally 0 for pure full white)
vec3 colorTemperatureToRGB(const in float temperature){
 // Values from: http://blenderartists.org/forum/showthread.php?270332-OSL-Goodness&p=2268693&viewfull=1#post2268693
 mat3 m = (temperature <= 6500.0) ? mat3(vec3(0.0, -2902.1955373783176, -8257.7997278925690),
      vec3(0.0, 1669.5803561666639, 2575.2827530017594),
      vec3(1.0, 1.3302673723350029, 1.8993753891711275)) :
         mat3(vec3(1745.0425298314172, 1216.6168361476490, -8257.7997278925690),
      vec3(-2666.3474220535695, -2173.1012343082230, 2575.2827530017594),
      vec3(0.55995389139931482, 0.70381203140554553, 1.8993753891711275));
 return mix(clamp(vec3(m[0] / (vec3(clamp(temperature, 1000.0, 40000.0)) + m[1]) + m[2]), vec3(0.0), vec3(1.0)), vec3(1.0), smoothstep(1000.0, 0.0, temperature));
}

//@implements: sampler2D
struct ColorTemperature {
 sampler2D sampler;
 //@ label: "Mix[%]", editor: range, min: 0, max: 1, range_min: 0, range_max: 1, range_default: 0.5
 float mix;
 //@ label: "Kelvin Preset", editor: enum, enum_default: 0, values: "No_Preset, Candle_1800K, Sunrise_Sunset_2500K, Tungsten_3000K, Morning_3500K, Moonlight_4000K, Midday_5500K, Cloudy_6500K, Shade_7000K, Clear_Sky_10000K"
    int idKelvinPreset;

 //@ label: "Kelvin", editor: range, min: 1000, max: 10000, range_min: 1000, range_max: 10000, range_default: 1000
 float kelvin;
 //@ label: "Brightness[%]", editor: range, min: 0, max: 1, range_min: 0, range_max: 1, range_default: 1
 float luminancePreservationFactor;
};
vec4 texture(ColorTemperature s, vec2 tex_coords) {
 vec3 inColor = texture(s.sampler, tex_coords).xyz;
 vec3 outColor = mix(inColor, inColor * colorTemperatureToRGB(s.kelvin), s.mix);
 switch(s.idKelvinPreset) {
 case 0:
   break;
 case 1:
   outColor = mix(inColor, inColor * colorTemperatureToRGB(1800.0), s.mix);
   break;
 case 2:
   outColor = mix(inColor, inColor * colorTemperatureToRGB(2500.0), s.mix);
   break;
 case 3:
   outColor = mix(inColor, inColor * colorTemperatureToRGB(3000.0), s.mix);
   break;
 case 4:
   outColor = mix(inColor, inColor * colorTemperatureToRGB(3500.0), s.mix);
   break;
 case 5:
   outColor = mix(inColor, inColor * colorTemperatureToRGB(4000.0), s.mix);
   break;
 case 6:
   outColor = mix(inColor, inColor * colorTemperatureToRGB(5500.0), s.mix);
   break;
 case 7:
   outColor = mix(inColor, inColor * colorTemperatureToRGB(6500.0), s.mix);
   break;
 case 8:
   outColor = mix(inColor, inColor * colorTemperatureToRGB(7000.0), s.mix);
   break;
 case 9:
   outColor = mix(inColor, inColor * colorTemperatureToRGB(10000.0), s.mix);
   break;
 default:
   outColor = vec3(1.0);
   break;
 }
 outColor *= mix(1.0, dot(inColor, vec3(0.2126, 0.7152, 0.0722)) / max(dot(outColor, vec3(0.2126, 0.7152, 0.0722)), 1e-5), s.luminancePreservationFactor);
 return vec4(outColor, 1.0);
}
Basic Replacement
Every Shadertoy project holds these lines of code, which must be changed to their equivalent listed:
Texture Method
Shadertoy |
PIXERA |
|
|
PIXERA works with a texture() method that returns a vec4 instead of the typical void method. This texture takes a struct which should be named the same as the GLSL file. It also takes a vec2 tex_coords which is equivalent to a normalized UV. Due to this, tex_coords takes the place of uv in Shadertoy code, allowing you to delete the following line completely:
vec2 uv = fragCoord.xy / iResolution.xy;fragColor and Return Statement
Shadertoy |
PIXERA |
|
|
Due to the texture method returning a vec4, the final line setting fragColor in most Shadertoy code must be changed to just return a vec4.
iResolution
Shadertoy |
PIXERA |
|
|
Many Shadertoy projects contain the iResolution variable, which is native to the software. iResolution contains the display's dimensions in pixels. For PIXERA, the user must create their own iResolution variable using the width and height variables set on the timeline.
From here, all instances of fragColor, fragCoord, and uv must be removed or replaced by the parts explained previously.
After these changes, the code should look like this:
// Color temperature (sRGB) stuff
// Copyright (C) 2014 by Benjamin 'BeRo' Rosseaux
// Because the german law knows no public domain in the usual sense,
// this code is licensed under the CC0 license
// http://creativecommons.org/publicdomain/zero/1.0/
#define WithQuickAndDirtyLuminancePreservation
const float LuminancePreservationFactor = 1.0;
const float PI2 = 6.2831853071;
// Valid from 1000 to 40000 K (and additionally 0 for pure full white)
vec3 colorTemperatureToRGB(const in float temperature){
 // Values from: http://blenderartists.org/forum/showthread.php?270332-OSL-Goodness&p=2268693&viewfull=1#post2268693
 mat3 m = (temperature <= 6500.0) ? mat3(vec3(0.0, -2902.1955373783176, -8257.7997278925690),
                                          vec3(0.0, 1669.5803561666639, 2575.2827530017594),
                                          vec3(1.0, 1.3302673723350029, 1.8993753891711275)) :
                                      mat3(vec3(1745.0425298314172, 1216.6168361476490, -8257.7997278925690),
                                            vec3(-2666.3474220535695, -2173.1012343082230, 2575.2827530017594),
                                          vec3(0.55995389139931482, 0.70381203140554553, 1.8993753891711275));
 return mix(clamp(vec3(m[0] / (vec3(clamp(temperature, 1000.0, 40000.0)) + m[1]) + m[2]), vec3(0.0), vec3(1.0)), vec3(1.0), smoothstep(1000.0, 0.0, temperature));
}
vec4 texture(ColorTemperature s, vec2 tex_coords)
{
 vec2 iResolution = vec2(s.width, s.height);
 float temperature = (iMouse.z > 0.0) ? mix(1000.0, 40000.0, iMouse.x / iResolution.x) : 6550.0; // mix(1000.0, 15000.0, (sin(iTime * (PI2 / 10.0)) * 0.5) + 0.5);
 float temperatureStrength = (iMouse.z > 0.0) ? (1.0 - clamp((iMouse.y / iResolution.y) * (1.0 / 0.9), 0.0, 1.0)) : 1.0;
 if(tex_coords.y > 0.1){
   vec3 inColor = texture(iChannel0, tex_coords).xyz;
   vec3 outColor = mix(inColor, inColor * colorTemperatureToRGB(temperature), temperatureStrength);
   #ifdef WithQuickAndDirtyLuminancePreservation
     outColor *= mix(1.0, dot(inColor, vec3(0.2126, 0.7152, 0.0722)) / max(dot(outColor, vec3(0.2126, 0.7152, 0.0722)), 1e-5), LuminancePreservationFactor);
   #endif
   return vec4(outColor, 1.0);
 }else{
   vec2 f = vec2(1.5) / iResolution.xy;
      fragColor = vec4(mix(colorTemperatureToRGB(mix(1000.0, 40000.0, tex_coords.x)), vec3(0.0), min(min(smoothstep(tex_coords.x - f.x, tex_coords.x, (temperature - 1000.0) / 39000.0),
                                                                                                smoothstep(tex_coords.x + f.x, tex_coords.x, (temperature - 1000.0) / 39000.0)),
                                                                                            1.0 - min(smoothstep(0.04 - f.y, 0.04, tex_coords.y),
                                                                                                      smoothstep(0.06 + f.y, 0.06, tex_coords.y)))),
                                                                                        1.0);
 }
}
Creating the Struct
Every PIXERA effect includes a struct that must be named the same as the file's name. In this case, let's create the struct like this:
//@implements: sampler2D
struct ColorTemperature {
 sampler2D sampler;
 //@ label: "Mix[%]", editor: range, min: 0, max: 1, range_min: 0, range_max: 1, range_default: 0.5
 float mix;
 //@ label: "Kelvin Preset", editor: enum, enum_default: 0, values: "No_Preset, Candle_1800K, Sunrise_Sunset_2500K, Tungsten_3000K, Morning_3500K, Moonlight_4000K, Midday_5500K, Cloudy_6500K, Shade_7000K, Clear_Sky_10000K"
    int idKelvinPreset;

 //@ label: "Kelvin", editor: range, min: 1000, max: 10000, range_min: 1000, range_max: 10000, range_default: 1000
 float kelvin;
 //@ label: "Brightness[%]", editor: range, min: 0, max: 1, range_min: 0, range_max: 1, range_default: 1
 float luminancePreservationFactor;
};
sampler2D
sampler2D is used to hold data about media being used in GLSL. In PIXERA's case, the code around the struct involving sampler2D references the current media playing on the layer. This also includes any effects already being applied to the layer. sampler2D allows effects to be layered together onto whatever media the user is playing.
Timeline Variables
The variables shown here, including mix, luminancePreservationFactor, and kelvin, will become timeline variables that can be changed in PIXERA depending on the specified data given in their above comments. There are a variety of types that can be given for the struct variables. Here is a list of possibilities:
Slider
//@ label: "Name", editor: range, min: 0, max: 1, range_min: 0, range_max: 1, range_default: 0.5Creates a slider going from min to max, which starts at range_default.
Sampler
//@ label: “Sampler”, editor: sampler
sampler2D samplerMask
Creates a parameter allowing the user to drag media into the space, which can be used in the GLSL code.
Boolean/Switch
//@ label: "Border is Smooth", editor: bool, bool_default: true
bool isSmooth;
Creates a dropdown allowing the user to select true or false for simple on-and-off or switching mechanisms in the code.
Discrete/Uneditable
//@ label: "Number of Frames", editor: discrete, discrete_min: 0, discrete_max: 3, discrete_default: 1
int ctFrames;
Creates a visual of the value to allow information to be easily seen in the timeline.
Enum/Prebuilt Options
//@ label: "Frame Color", editor: enum, enum_default: 1, values: “White, Black, Red, Green, Blue, Yellow”
int idColorFrame;
Creates a dropdown of the listed options, which the user can select. These options are stored as IDs starting from 0. Can be used to change paths through code using if or switch statements.
mix
The mix variable is commonly used in PIXERA Effects as it allows the user to fade the effect in and out by using the mix method inherent with GLSL. Here is an example:
return mix(colorIn, colorOut, s.mix);
Depending on the value of mix set in the timeline, the effect can either be fully hidden or take over the media completely. The parameter s relates back to the parameter of the vec4 texture(ColorTemperature s, vec2 tex_Coords) since s is an instance of the ColorTemperature struct. To use any variable in the struct, just add s.<VariableName> where necessary.
After adding the struct and replacing the original variables with the structs, the code should look like this:
// Color temperature (sRGB) stuff
// Copyright (C) 2014 by Benjamin 'BeRo' Rosseaux
// Because the german law knows no public domain in the usual sense,
// this code is licensed under the CC0 license
// http://creativecommons.org/publicdomain/zero/1.0/
#define WithQuickAndDirtyLuminancePreservation
const float LuminancePreservationFactor = 1.0;
const float PI2 = 6.2831853071;
// Valid from 1000 to 40000 K (and additionally 0 for pure full white)
vec3 colorTemperatureToRGB(const in float temperature){
 // Values from: http://blenderartists.org/forum/showthread.php?270332-OSL-Goodness&p=2268693&viewfull=1#post2268693
 mat3 m = (temperature <= 6500.0) ? mat3(vec3(0.0, -2902.1955373783176, -8257.7997278925690),
                                          vec3(0.0, 1669.5803561666639, 2575.2827530017594),
                                          vec3(1.0, 1.3302673723350029, 1.8993753891711275)) :
                                      mat3(vec3(1745.0425298314172, 1216.6168361476490, -8257.7997278925690),
                                            vec3(-2666.3474220535695, -2173.1012343082230, 2575.2827530017594),
                                          vec3(0.55995389139931482, 0.70381203140554553, 1.8993753891711275));
 return mix(clamp(vec3(m[0] / (vec3(clamp(temperature, 1000.0, 40000.0)) + m[1]) + m[2]), vec3(0.0), vec3(1.0)), vec3(1.0), smoothstep(1000.0, 0.0, temperature));
}
//@implements: sampler2D
struct ColorTemperature {
 sampler2D sampler;
 //@ label: "Mix[%]", editor: range, min: 0, max: 1, range_min: 0, range_max: 1, range_default: 0.5
 float mix;
 //@ label: "Kelvin Preset", editor: enum, enum_default: 0, values: "No_Preset, Candle_1800K, Sunrise_Sunset_2500K, Tungsten_3000K, Morning_3500K, Moonlight_4000K, Midday_5500K, Cloudy_6500K, Shade_7000K, Clear_Sky_10000K"
    int idKelvinPreset;

 //@ label: "Kelvin", editor: range, min: 1000, max: 10000, range_min: 1000, range_max: 10000, range_default: 1000
 float kelvin;
 //@ label: "Brightness[%]", editor: range, min: 0, max: 1, range_min: 0, range_max: 1, range_default: 1
 float luminancePreservationFactor;
};
vec4 texture(ColorTemperature s, vec2 tex_coords)
{
 vec2 iResolution = vec2(s.width, s.height);
 float temperature = (iMouse.z > 0.0) ? mix(1000.0, 40000.0, iMouse.x / iResolution.x) : 6550.0; // mix(1000.0, 15000.0, (sin(iTime * (PI2 / 10.0)) * 0.5) + 0.5);
 float temperatureStrength = (iMouse.z > 0.0) ? (1.0 - clamp((iMouse.y / iResolution.y) * (1.0 / 0.9), 0.0, 1.0)) : 1.0;
 if(tex_coords.y > 0.1){
   vec3 inColor = texture(iChannel0, tex_coords).xyz;
   vec3 outColor = mix(inColor, inColor * colorTemperatureToRGB(temperature), temperatureStrength);
   #ifdef WithQuickAndDirtyLuminancePreservation
     outColor *= mix(1.0, dot(inColor, vec3(0.2126, 0.7152, 0.0722)) / max(dot(outColor, vec3(0.2126, 0.7152, 0.0722)), 1e-5), s.luminancePreservationFactor);
   #endif
   return vec4(outColor, 1.0);
 }else{
   vec2 f = vec2(1.5) / iResolution.xy;
      fragColor = vec4(mix(colorTemperatureToRGB(mix(1000.0, 40000.0, tex_coords.x)), vec3(0.0), min(min(smoothstep(tex_coords.x - f.x, tex_coords.x, (temperature - 1000.0) / 39000.0),
                                                                                                smoothstep(tex_coords.x + f.x, tex_coords.x, (temperature - 1000.0) / 39000.0)),
                                                                                            1.0 - min(smoothstep(0.04 - f.y, 0.04, tex_coords.y),
                                                                                                      smoothstep(0.06 + f.y, 0.06, tex_coords.y)))),
                                                                                        1.0);
 }
}
Step 3: Adding Variables and Specific Changes
Other Possible Native Shadertoy Variables
There are a few more Shadertoy variables native to the software which either should be deleted or transformed into variables inside the struct.
#define, #ifdef, #endif
These C definitions, although functional with PIXERA, should be adapted as variables in the struct for better organization and usage in PIXERA. Many times these statements are easily replaced with their respective type or/and if statements. Here is an example of a replacement:
Shadertoy |
PIXERA |
|
|
Here, the #define is replaced with a bool variable added to the struct. Looking at the struct we already created, we will be taking out the WithQuickAndDirtyLuminancePreservation variable completely due to the luminancePreservationFactor variable already in the struct. When it is set to 0 it performs the same function as the bool variable.
iChannel0 and iTime
These two variables are native to Shadertoy allowing inputs of media and tracking of time, respectively. iChannel<Index> can be replaced by a sampler2D variable in the struct most of the time - if the Shadertoy references only one iChannel, that means you will just use the original sampler variable. The iTime reference can be made into a slider variable and then modified during runtime.
In this case, we will be replacing iChannel0 with s.sampler while deleting iTime completely due to the next change.
iMouse and Original Temperature Selection
In the Shadertoy implementation, the shader allows the user to click and move their mouse across the image to change the temperature of the effect. In the case of PIXERA, we want the effect to influence the entire screen, and the changing of data is only done in the timeline. Also, the use of iMouse is not possible in PIXERA through the code, as that is a variable native to Shadertoy, making the following lines unusable:
float temperature = (iMouse.z > 0.0) ? mix(1000.0, 40000.0, iMouse.x / iResolution.x) : 6550.0; // mix(1000.0, 15000.0, (sin(iTime * (PI2 / 10.0)) * 0.5) + 0.5);
float temperatureStrength = (iMouse.z > 0.0) ? (1.0 - clamp((iMouse.y / iResolution.y) * (1.0 / 0.9), 0.0, 1.0)) : 1.0;
Luckily, the kelvin variable created in the struct and mix() method native to GLSL can take the place of these lines. The user will be able to modify the kelvin value from the timeline instead of using the mouse. This is the same for temperatureStrength as the mix variable takes its place directly.
Alongside the iMouse variable is an if statement in the code that cuts the bottom of the media off, allowing the slider to be visible. This if statement and the else section can be deleted, as it only works with the iMouse variable.
After making these specific changes to the code, large chunks of the program should have been deleted and the code should look like this:
// Color temperature (sRGB) stuff
// Copyright (C) 2014 by Benjamin 'BeRo' Rosseaux
// Because the german law knows no public domain in the usual sense,
// this code is licensed under the CC0 license
// http://creativecommons.org/publicdomain/zero/1.0/
#define WithQuickAndDirtyLuminancePreservation
const float LuminancePreservationFactor = 1.0;
const float PI2 = 6.2831853071;
// Valid from 1000 to 40000 K (and additionally 0 for pure full white)
vec3 colorTemperatureToRGB(const in float temperature){
 // Values from: http://blenderartists.org/forum/showthread.php?270332-OSL-Goodness&p=2268693&viewfull=1#post2268693
 mat3 m = (temperature <= 6500.0) ? mat3(vec3(0.0, -2902.1955373783176, -8257.7997278925690),
                                          vec3(0.0, 1669.5803561666639, 2575.2827530017594),
                                          vec3(1.0, 1.3302673723350029, 1.8993753891711275)) :
                                      mat3(vec3(1745.0425298314172, 1216.6168361476490, -8257.7997278925690),
                                            vec3(-2666.3474220535695, -2173.1012343082230, 2575.2827530017594),
                                          vec3(0.55995389139931482, 0.70381203140554553, 1.8993753891711275));
 return mix(clamp(vec3(m[0] / (vec3(clamp(temperature, 1000.0, 40000.0)) + m[1]) + m[2]), vec3(0.0), vec3(1.0)), vec3(1.0), smoothstep(1000.0, 0.0, temperature));
}
//@implements: sampler2D
struct ColorTemperature {
 sampler2D sampler;
 //@ label: "Mix[%]", editor: range, min: 0, max: 1, range_min: 0, range_max: 1, range_default: 0.5
 float mix;
 //@ label: "Kelvin Preset", editor: enum, enum_default: 0, values: "No_Preset, Candle_1800K, Sunrise_Sunset_2500K, Tungsten_3000K, Morning_3500K, Moonlight_4000K, Midday_5500K, Cloudy_6500K, Shade_7000K, Clear_Sky_10000K"
    int idKelvinPreset;

 //@ label: "Kelvin", editor: range, min: 1000, max: 10000, range_min: 1000, range_max: 10000, range_default: 1000
 float kelvin;
 //@ label: "Brightness[%]", editor: range, min: 0, max: 1, range_min: 0, range_max: 1, range_default: 1
 float luminancePreservationFactor;
};
vec4 texture(ColorTemperature s, vec2 tex_coords)
{
 vec3 inColor = texture(s.sampler, tex_coords).xyz;

 vec3 outColor = mix(inColor, inColor * colorTemperatureToRGB(s.kelvin), s.mix);
 outColor *= mix(1.0, dot(inColor, vec3(0.2126, 0.7152, 0.0722)) / max(dot(outColor, vec3(0.2126, 0.7152, 0.0722)), 1e-5), s.luminancePreservationFactor);
 return vec4(outColor, 1.0);
}
Step 4: Final Touches and Improvements
enum Usage for Preset effects
Before being finished, there is one more struct variable mentioned that is not implemented yet, that being idKelvinPreset.
//@ label: "Kelvin Preset", editor: enum, enum_default: 0, values: "No_Preset, Candle_1800K, Sunrise_Sunset_2500K, Tungsten_3000K, Morning_3500K, Moonlight_4000K, Midday_5500K, Cloudy_6500K, Shade_7000K, Clear_Sky_10000K"
int idKelvinPreset;
Adding an enum dropdown, allowing the user to choose between premade versions of the effect, is useful for quick changes and examples of possible uses of the effect.
In this case, the idKelvinPreset gives multiple preset Kelvin values describing respective light types. When selected in the dropdown, that preset takes over the effect, making the kelvin slider inactive. This is why a No_Preset option is available, so the user can go back to manual control.
As described earlier, the enums are referenced into the code as index values, allowing a switch statement to easily change what path the code goes down depending on what selection is made.
After these final additions, the code should look like this:
// Color temperature (sRGB) stuff
// Copyright (C) 2014 by Benjamin 'BeRo' Rosseaux
// Because the german law knows no public domain in the usual sense,
// this code is licensed under the CC0 license
// http://creativecommons.org/publicdomain/zero/1.0/
const float LuminancePreservationFactor = 1.0;
const float PI2 = 6.2831853071;
// Valid from 1000 to 40000 K (and additionally 0 for pure full white)
vec3 colorTemperatureToRGB(const in float temperature){
 // Values from: http://blenderartists.org/forum/showthread.php?270332-OSL-Goodness&p=2268693&viewfull=1#post2268693
 mat3 m = (temperature <= 6500.0) ? mat3(vec3(0.0, -2902.1955373783176, -8257.7997278925690),
      vec3(0.0, 1669.5803561666639, 2575.2827530017594),
      vec3(1.0, 1.3302673723350029, 1.8993753891711275)) :
         mat3(vec3(1745.0425298314172, 1216.6168361476490, -8257.7997278925690),
      vec3(-2666.3474220535695, -2173.1012343082230, 2575.2827530017594),
      vec3(0.55995389139931482, 0.70381203140554553, 1.8993753891711275));
 return mix(clamp(vec3(m[0] / (vec3(clamp(temperature, 1000.0, 40000.0)) + m[1]) + m[2]), vec3(0.0), vec3(1.0)), vec3(1.0), smoothstep(1000.0, 0.0, temperature));
}
//@implements: sampler2D
struct ColorTemperature {
 sampler2D sampler;
 //@ label: "Mix[%]", editor: range, min: 0, max: 1, range_min: 0, range_max: 1, range_default: 0.5
 float mix;
 //@ label: "Kelvin Preset", editor: enum, enum_default: 0, values: "No_Preset, Candle_1800K, Sunrise_Sunset_2500K, Tungsten_3000K, Morning_3500K, Moonlight_4000K, Midday_5500K, Cloudy_6500K, Shade_7000K, Clear_Sky_10000K"
    int idKelvinPreset;

 //@ label: "Kelvin", editor: range, min: 1000, max: 10000, range_min: 1000, range_max: 10000, range_default: 1000
 float kelvin;
 //@ label: "Brightness[%]", editor: range, min: 0, max: 1, range_min: 0, range_max: 1, range_default: 1
 float luminancePreservationFactor;
};
vec4 texture(ColorTemperature s, vec2 tex_coords) {
 vec3 inColor = texture(s.sampler, tex_coords).xyz;
 vec3 outColor = mix(inColor, inColor * colorTemperatureToRGB(s.kelvin), s.mix);
 switch(s.idKelvinPreset) {
 case 0:
   break;
 case 1:
   outColor = mix(inColor, inColor * colorTemperatureToRGB(1800.0), s.mix);
   break;
 case 2:
   outColor = mix(inColor, inColor * colorTemperatureToRGB(2500.0), s.mix);
   break;
 case 3:
   outColor = mix(inColor, inColor * colorTemperatureToRGB(3000.0), s.mix);
   break;
 case 4:
   outColor = mix(inColor, inColor * colorTemperatureToRGB(3500.0), s.mix);
   break;
 case 5:
   outColor = mix(inColor, inColor * colorTemperatureToRGB(4000.0), s.mix);
   break;
 case 6:
   outColor = mix(inColor, inColor * colorTemperatureToRGB(5500.0), s.mix);
   break;
 case 7:
   outColor = mix(inColor, inColor * colorTemperatureToRGB(6500.0), s.mix);
   break;
 case 8:
   outColor = mix(inColor, inColor * colorTemperatureToRGB(7000.0), s.mix);
   break;
 case 9:
   outColor = mix(inColor, inColor * colorTemperatureToRGB(10000.0), s.mix);
   break;
 default:
   outColor = vec3(1.0);
   break;
 }
 outColor *= mix(1.0, dot(inColor, vec3(0.2126, 0.7152, 0.0722)) / max(dot(outColor, vec3(0.2126, 0.7152, 0.0722)), 1e-5), s.luminancePreservationFactor);
 return vec4(outColor, 1.0);
}
This should be the visual in GPUpad once tested with the given values:
Step 5: PIXERA Use and Troubleshooting
Adding Shaders to PIXERA
After dragging the GLSL file into PIXERA, an effect will automatically be made and can be attached to a layer. From here, a few possibilities will occur.
- The effect works without an issue, and all the struct variables show in the timeline, changing the effect as they are changed.
- The effect appears to show up okay in the timeline; however, the media on the screen stutters.
- The effect appears to show up okay in the timeline; however, the media on the screen goes black.
- The effect does not show the struct variables in the timeline and causes one of the two screen issues described above.
In the case that 2-4 occur, it is because the GLSL shader code has an error within. This error could either be an error with the GLSL code or with how PIXERA requires its code to be formatted. Here are the most common errors leading to these problems:
-
Using the struct variable name instead of
s.<VariableName>:float num = thisNumber;→float num = s.thisNumber;
- Misspellings, especially in the struct variable comments.
-
Forgetting semicolons, commas, or quotes and using extra parentheses in code and comments:
//@ label: Mix[%]", editor: range min0, max: 1, range_min: 0, ranmax 1, range_default: 0.5→//@ label: "Mix[%]", editor: range, min: 0, max: 1, range_min: 0, range_max: 1, range_default: 0.5float num = 0→float num = 0;
Continuously check the code, comment out sections, and take time to find these errors until the effect runs correctly.
This should be the visual in PIXERA once tested with the given values:
Here is a link to download the effect: ColorTemperature.glsl
See Also
- Effects
- Managing Effects
- Effect Guide
- Layer Mapping Effects
- GLSL Shader for PIXERA
- Shadertoy to PIXERA GLSL Tutorial
PIXERA 1.9.221 | 31. September 2023