 Contact Us


The term API stands for “Application Programming Interface” and is used by software to access data, server software or other applications. Think of the API as a translator standing in-between two people who don’t speak the same language. In our case the API functions as a bridge between the internal Pixera objects and the outside world. Thereby, an external software can communicate and interact with Pixera using the API.
This image is an overview of the Pixera API terminology.

This article refers to the Native API and is not related to individual control Modules and their connection, as these can establish an independent connection outside the Native API. Internet Protocol Guide, TCP and UDP in Control
Documentation
The latest API documentation can be found in the settings section of Pixera. For the latest release, you can find them here: API Commands
Go to settings > help > show API Documentation files.


Security
Access to API functions can be restricted using the Allowlist to minimize potential security risks.
USAGE
Warning
UDP does not support response messages, if you have the chance to choose between UDP and TCP we suggest using TCP!
UDP
The User Datagram Protocol (UDP) is a simple connectionless Internet protocol. It functions without error-checking or package recovery. Which means that data is continuously sent to the recipient, whether or not they receive it. Although it is not ideal for services where data loss can’t be tolerated (like sending an email), it is largely preferred for real-time communications like broadcast or multitask network transmission. UDP is faster, simpler and more efficient than TCP, but it is not possible to retransmission lost data packets.
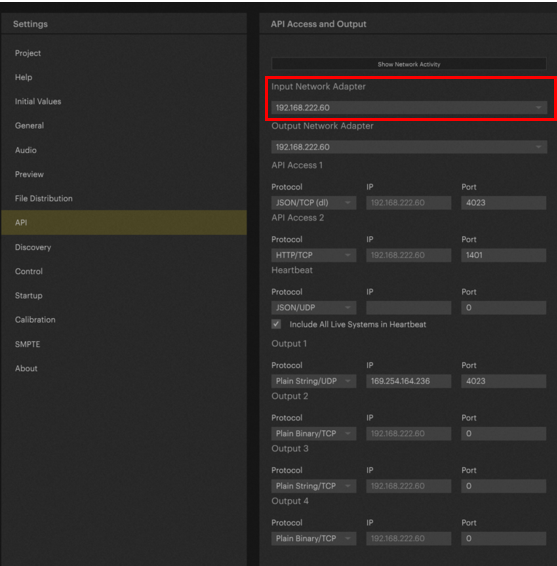
Open the settings tab in PIXERA (upper right corner).

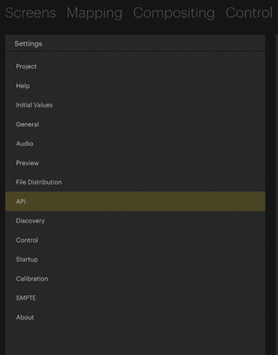
- Go to “API”.
- Herein you can choose from which device PIXERA receives data (Input Network Adapter) and to which device it should send to (Output Network Adapter). The device is specified by its IP-address. For instance, if you want to control a remote Pixera instance from a Manager device you have to connect both via a network cable and enter the IP-address of the remote device in Input Network Adapter.
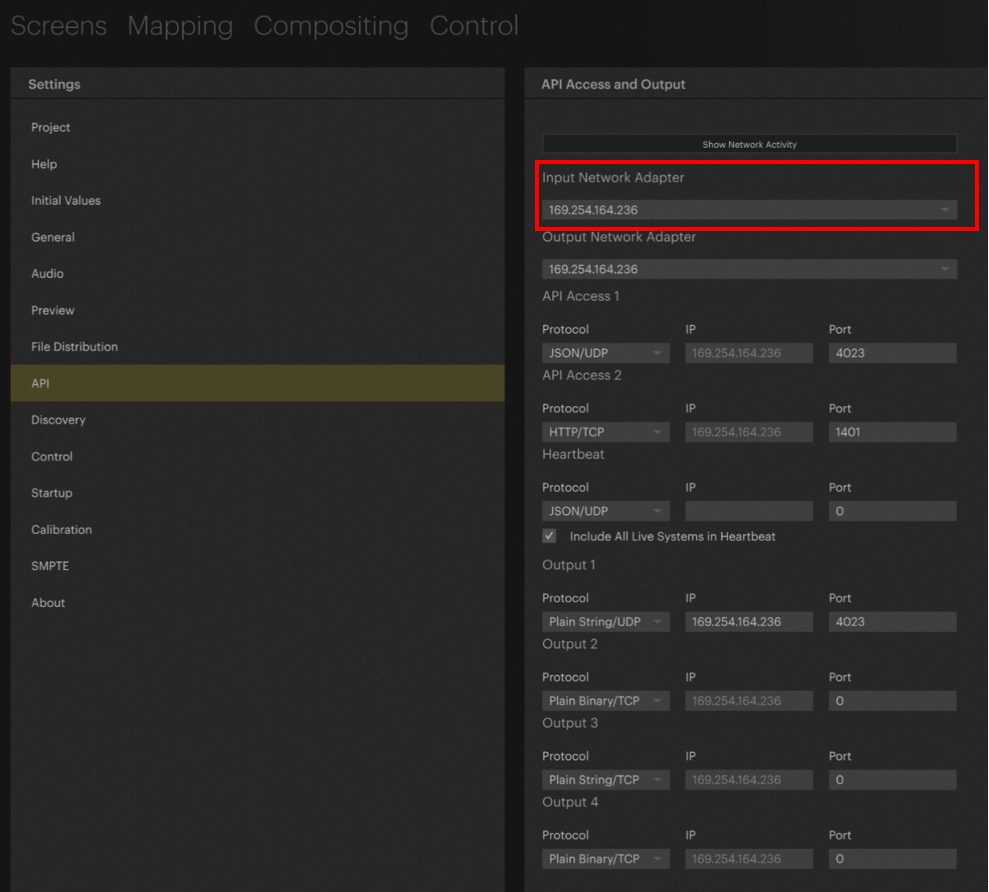
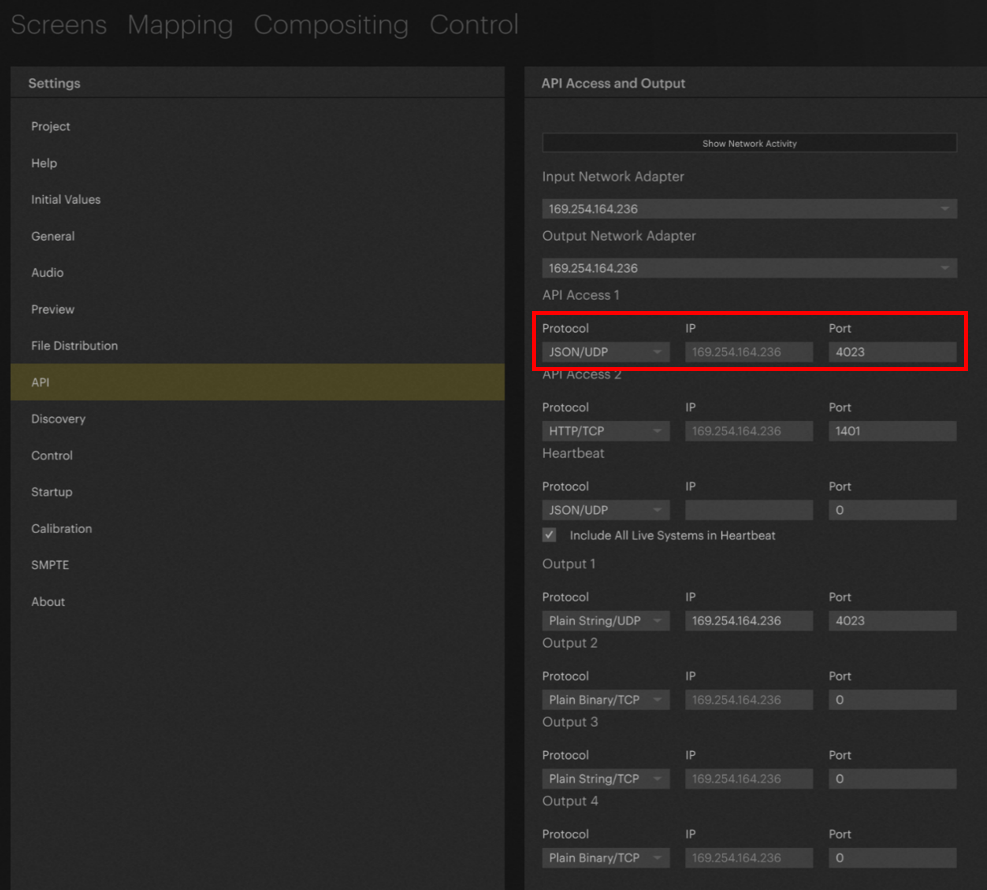
- The program then offers you two API access points as well as a Heartbeat port (which sends information regarding the other available ports every second in the form of a JSON string). Choose one of the two access ports and specify the protocol to use - in this case JSON/UDP – and a port number which can be any number i.e. You can find the utilized ports in Pixera Network Usage.
Warning
With the connection type UDP and OSC it is unable to receive data back from PIXERA
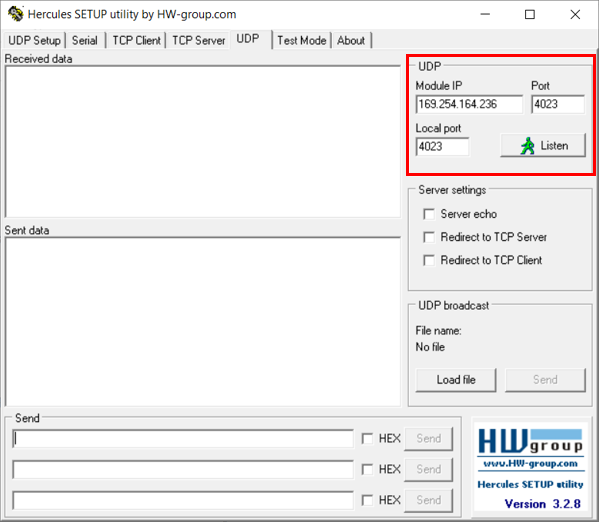
- For testing out and demonstrating the UDP connection we are using the “Hercules SETUP utility” which you can download via this link.
- After opening Hercules switch to the UDP tab and enter the IP-address you chose for the “Input Network Adapter” under “Module IP”. Enter your chosen port number under “Port” and “Local Port”. Click then on “Listen” to setup the connection.
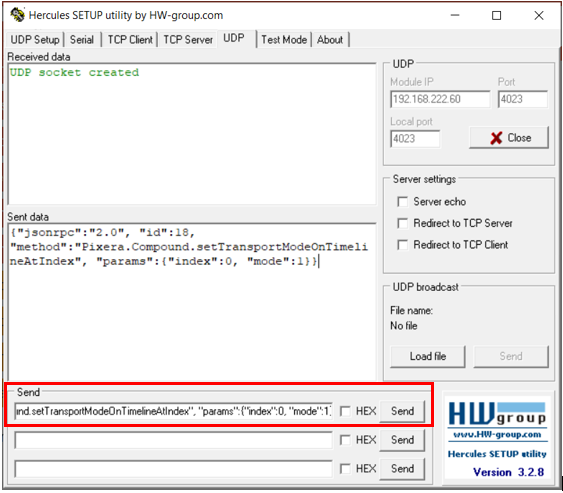
Our goal is now to remote control the PIXERA mini we connected. The most basic operation would be to start and pause the timeline. To achieve this, we enter the following command into one of the three “Send”-fields:
{"jsonrpc":"2.0", "id":18, "method":"Pixera.Compound.setTransportModeOnTimelineAtIndex", "params":{"index":0, "mode":1}}“index” specifies which timeline is targeted and “mode” what we want the timeline to do (Play = 1, Pause = 2, Stop = 3).
Clicking now on “Send” forwards the command to the mini and the timeline is started.
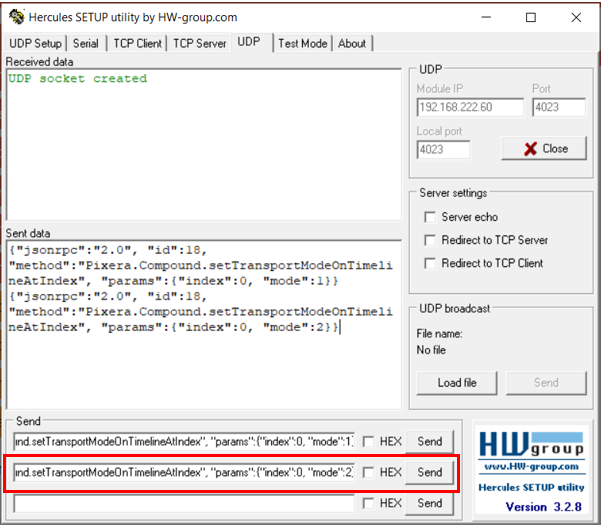
If we now want to pause the timeline again, we use:
{"jsonrpc":"2.0", "id":18, "method":"Pixera.Compound.setTransportModeOnTimelineAtIndex", "params":{"index":0, "mode":2}}
A collection of useful commands can be found at the end of this document.
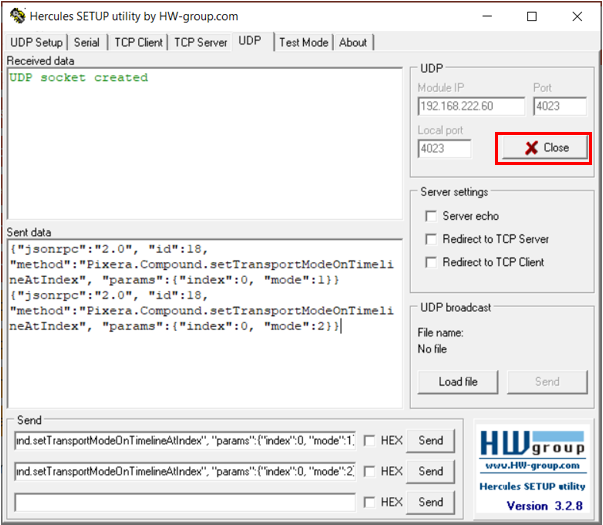
To end the connection again click on “Close”.
Tip
See all commands here API Commands
TCP(dl)
PIXERA acts as a TCP Server
Please note that when selecting TCP, PIXERA acts as a TCP Server, not a TCP Client, and therefore requires an outside connection, which will make manually editing the IP Address not possible, as the IP address is simply which NIC you are using for communication.
The “Transmission Control Protocol” is a connection-oriented protocol, which means, as long as a connection is held up data can be transmitted in two directions. TCP has, in contrast to UDP, a built-in system to check for errors and package loss. It is therefore ideal for transferring information like data files and still images, but also creates a large network overhead. TCP provides an ordered delivery of data from user to server but is also significantly slower compared to UDP. The TCP(dl) protocol here explained uses a delimiter after each command in the form of “0xPX”.
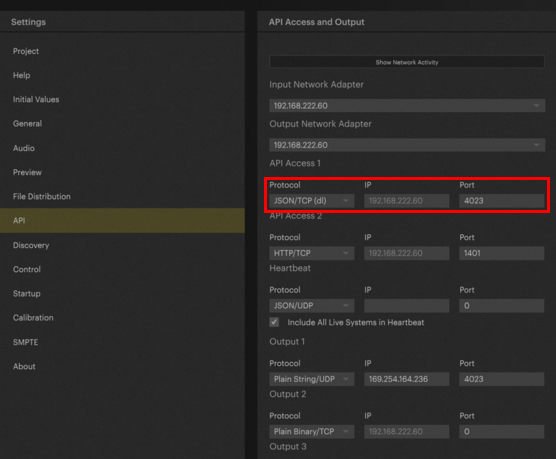
Open the settings tab in PIXERA (upper right corner).

Go to “API”.

Herein you can choose from which device PIXERA receives data (“Input Network Adapter”) and to which device it should send to (“Output Network Adapter”). The device is specified by its IP-address. For instance, if you want to control your PIXERA device with your laptop you connect both via a network cable and enter the IP-address of Pixera under “Input Network Adapter”.
The program then offers you two API Access points as well as a Heartbeat port (which sends information regarding the other available ports every second in the form of a JSON string). Choose one of the two access ports and specify the protocol to use – in this case JSON/TCP(dl) – and a port number which can be any number (here 4023).
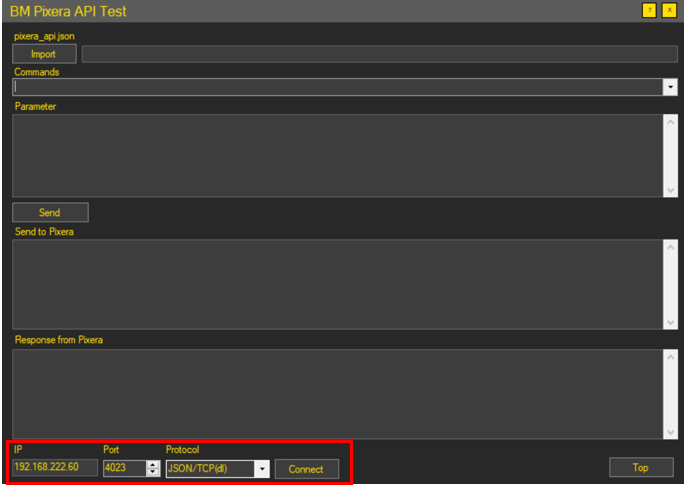
For testing out and demonstrating the TCP(dl) connection we are using the “BM Pixera API Test” by Benni Müller Link to Benni's Tools.
After opening API Test enter the IP-address you chose for the “Input Network Adapter” under “IP”, set “Port” to your chosen port number and set “Protocol” to JSON/TCP(dl). Click then on “Connect” to setup the connection.
The tool gives us the possibility to load the pixera_api.json file containing all API commands. This is done by clicking “Import” and selecting the path to the file, normally:
C:\Program Files\AV Stumpfl\Pixera\build_’version’\data\api\pixera_api.json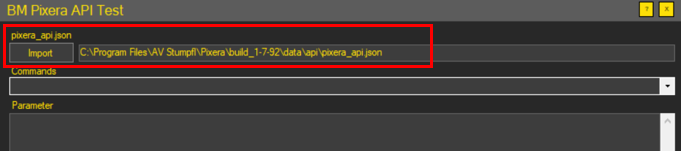
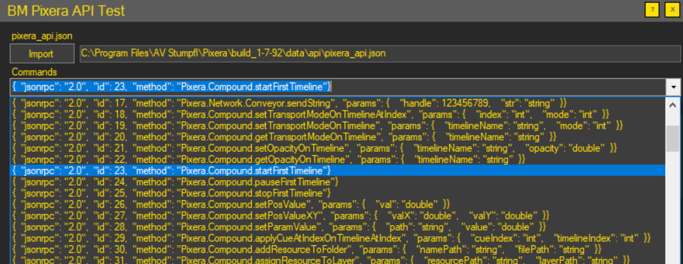
Instead of typing the different API commands we can now select them from the drop-down menu. For starting the timeline, we chose:
{"jsonrpc": "2.0","id": 23, "method": "Pixera.Compound.startFirstTimeline"}
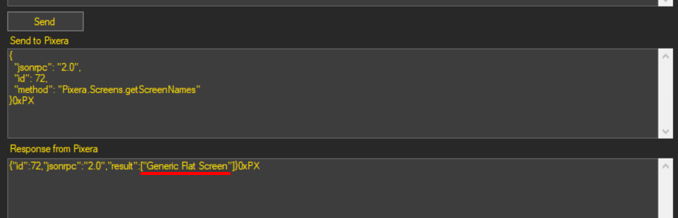
Clicking on “Send” will deliver the command to PIXERA and start the timeline. Since TCP allows for communication in both directions, we can now also get information back from PIXERA. If, for instance, we want to know which screens are present in our setup we can use the command:
{"jsonrpc": "2.0","id": 72, "method": "Pixera.Screens.getScreenNames"}
Which shows us that one “Generic Flat Screen is present.
For closing the connection click on “Disconnect”.
WORKING WITH IDENTIFIERS
Often a single object needs to be addressed e.g. a screen or a specific timeline. To achieve that there are two different approaches: by name or by handle. The name of the object is the string that is associated with its internal identification number, whereby the handle is the internal identification number.
Addressing by Name
These API-commands belong to the “Compound” namespace. It contains functions that can be used without first gathering additional information. If you know the name or the position on the timeline of your object you are good to go. For this example, with have two timelines (“Timeline 1” and “Timeline2”) with cues that should be played in a predefined manner.
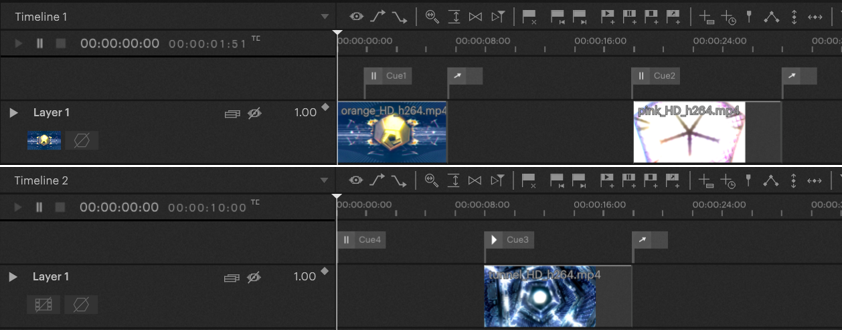
Firstly, the nowpointer of “Timeline 1” should be set to the position of “Cue1”. To achieve this, we are sending the following command over TCP(dl):
{"jsonrpc":"2.0", "id":29, "method":"Pixera.Compound.applyCueAtIndexOnTimelineAtIndex", "params":{"cueIndex":0, "timelineIndex":0}}0xPX
We are specifying the timeline and the cue via {"cueIndex":0,"timelineIndex":0}, since the indices are zero-based, we address the first timeline and the first cue via the index 0.
Next “Timeline 1” should be played:
{"jsonrpc":"2.0", "id":19, "method":"Pixera.Compound.setTransportModeOnTimeline", "params":{"timelineName":"Timeline1", "mode":1}}0xPX
Mode specifies the transport mode of the timeline (Play = 1, Pause = 2, Stop = 3).
After playing the content “Timeline 1” will hit the first jump cue and the nowpointer is transported to “Cue2”, where it is paused. Now “Timeline 2” should play its content. Therefore, at first we have to bring its nowpointer to “Cue3” (which is the second cue on this timeline):
{"jsonrpc":"2.0", "id":29, "method":"Pixera.Compound.applyCueAtIndexOnTimelineAtIndex", "params":{"cueIndex":1, "timelineIndex":1}}0xPX
“Timeline 2” is finished, and “Timeline 1” should be resumed. This can be done with a simple command:
{"jsonrpc": "2.0", id": 23,
"method": "Pixera.Compound.startFirstTimeline"}0xPX
Addressing objects by name and index is a convenient approach and will be sufficient in most cases, nevertheless it is an “quick and dirty” solution. While doing things this way on might encounter some problems:
• If a new cue is added, the indices of all following cues are changed.
• If cues or timelines are renamed, the API-commands must be modified as well.
• PIXERA will not prevent you from giving different objects the same name. Addressing one of those by its name will lead to undefines behavior.
Tip
When jumping on the timeline using API commands, stuttering may occur because the target position cannot be preloaded. This can be solved with a fade to time/cue delay.
Delay Fades and Jumps to Cues
For larger projects, we therefore recommend the use of Handles.
How to get and use API Handles
Read more:
API documentation files
Trigger Modules and Actions via API
API Test Website
Troubleshooting:
Syntax error while parsing
PIXERA 25.1 RC 9 | 21 May 2025 | J.B.