 Contact Us


This article is about how to use data layers and connect them to Pixera Control.
Data layers in PIXERA are used to display and animate user-defined data on a timeline.
Related Articles
Timeline Output Patching Artnet / sACN DMX
Animating Preview Camera
Setup
Load a PDFT onto the layer structure

Version 1: Connect directly to a Pixera Control module and action
This is for inputting values to your Data Layer from Control
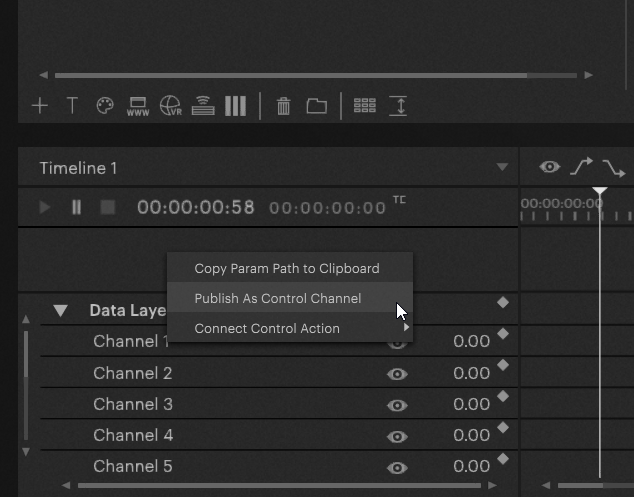
Right-Click on your desired PDTF parameter. Navigate to “Connect Control Action”, choose your Control module. Only modules that are in your workspace/project can be addressed. Here we choose the IOcore 2 module and route IOcore2>DMX_In_1 to data layer>channel 1

Version 2: Route Data Layer to the Pixera module API structure:
This is for receiving values from your Data Layer in Control
Right-Click on your desired PDTF parameter. Choose “Publish as Control Channel”.
Now the entry will have a different visual to it and the parameter name will be in brackets: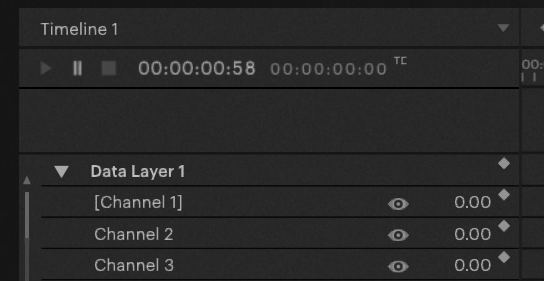

Examples:
This Example shows how to create a Data Layer and connect it in the node system to read out values
Example: Shutter Control
For shutter control a bool data layer can be used very well, with your bool data layer all keyframes are used as steps by default. this can be very useful.
<?xml version="1.0" encoding="utf-8"?>
<nodes>
  <param name="ShutterControl" min="0" max="1" default="0" kind="bool"/>
</folder>
</nodes>
Pixera 25.1 RC 11 | 27. May 2025 | J.B.