 Contact Us


To be able to synchronize different devices such as sound, light or video with each other, there is the so-called time code.
The timecode is a centrally generated clock that sets the timing for all devices in the setup. This ensures that everything runs synchronously.
In Pixera there are multiple ways to receive and send Timecode.
- SMPTE USB Interface
- LTC Timecode via Audio
- LTC Timecode via Dante
- Artnet Timecode
- Midi Timecode
The setup needs to be done in two steps:
- Define Timecode Source
- Assign to Timeline
The following explains how to use Timecode in PIXERA.
Note
Timecode input via Audio can be connected to either the Director or a Client. USB SMPTE Timecode Interfaces must be connected to the Director and are not supported on Clients.
SMPTE USB interface setup
Timecode via Audio
Artnet Timecode
MIDI Timecode
Warning
Only MIDI Timecode Input supported
Timecode Monitor
PIXERA has the function to display running timecode in the workspace.
As soon as the input settings have been configured, the timecode can be displayed with this icon.

Meaning of Timecode display colors:
- Grey: playback pause
- Green: playback play
-
Red: device input paused (via API function
setPauseSmpteInput)

Timeline - Timecode settings
In the next step, a timeline must be determined, which either receives or transmits timecode.
NOTE
in PIXERA only one Timecode input at the same time is possible.
With the new offset feature different offsets can be set up for individual timelines.
This allows proper timeline control of multiple timelines with on Timecode


Mode [1]
Determines whether the timecode is set to Send, Receive, or None.
No-Input Behavior [2]
Defines what happens when PIXERA detects a loss of timecode input after the specified timeout frames.
General Offset [3]
Adds or subtracts time from the incoming timecode.
By default, the offset is always negative, meaning it is subtracted from the timecode unless Subtract is explicitly enabled.
Pause Until TC Reaches Offset [4]
When enabled, this function waits for the first timecode input, subtracts the offset, and then sets the Now pointer to this adjusted time. The system then pauses until the timecode reaches this position before playback begins.
Example:
- Offset:
01:00:00:00 - Pause until:
00:10:00:00 - Incoming timecode starts at
01:00:00:00 - The Now pointer pauses at
00:09:59:58and starts running at00:10:00:00(timeline time).
Ensure Device Time at Pause [5]
When No-Input Behavior is set to Pause, this option ensures that the timeline jumps back to the last known timecode position upon signal loss.
Example:
- Timecode is lost at
00:10:00:00. - Playback continues until
00:10:00:04. - If enabled, the timeline jumps back to
00:10:00:00and pauses. - If disabled, it pauses at
00:10:00:04.
Correct Drift [6]
When enabled, the system continuously compares the Now pointer on the timeline with the incoming timecode and corrects any drift.
If disabled, the timeline starts once and does not perform further synchronization.
Hot Regions [7]
Defines specific time ranges where the timeline should follow the timecode.
Hot regions can be defined in the SMPTE settings. By pressing + additional hot regions can be added to the selected timeline.
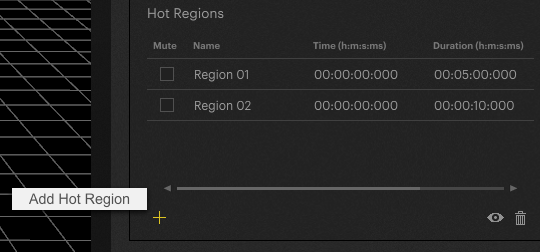
The hot region will be highlighted on the timeline with a green indication line:

Possible Workflow Examples
Different offsets can be assigned to individual timelines.
Example:
-
Song One – Timecode starts at
00:00:00:01 -
Song Two – Timecode starts at
01:00:00:01 - Song Three – (continues in increments)
By creating multiple timelines and assigning different timecode offsets (e.g., +1 hour, +2 hours, etc.), each timeline can be triggered independently while maintaining full timecode synchronization.
While the Timeline is running on SMPTE timecode, the play modes can no longer be manually influenced, and stop cues and pause cues have no effect on the timeline.

Pixera 26.2 INTER 119 | 24. July 2026 | J.B.