 Contact Us


The Property Builder is used to set up options on a Module for easier changes by a user of the Module. The main benefit being a user does not need to go into the LUA code and make changes for different functionality.
Options can be set to either send data into the Module, receive data from the Module, give information about the Module, or just activate Actions in the Module.
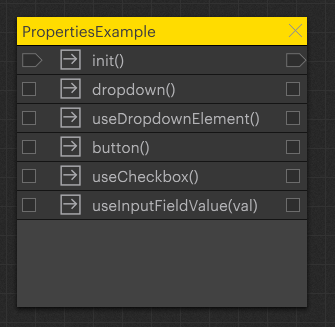
Example Module
The Property Builder can be called up by right-clicking on a Module. In this example, we use the “PropertiesExample” Module to show how the different functions are used.
This Module comes with the PIXERA installation, but if needed here is the download link: PropertiesExample.json:
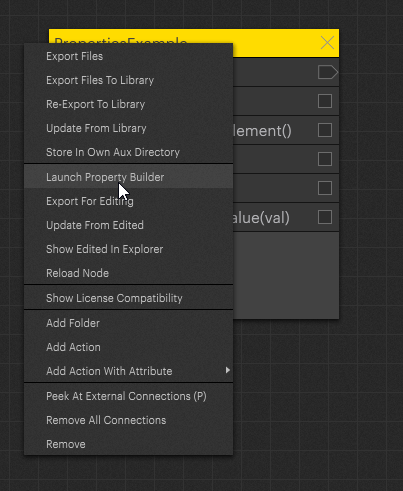
To open the Property Builder, right-click on the Module and select: “Launch Property Builder”:
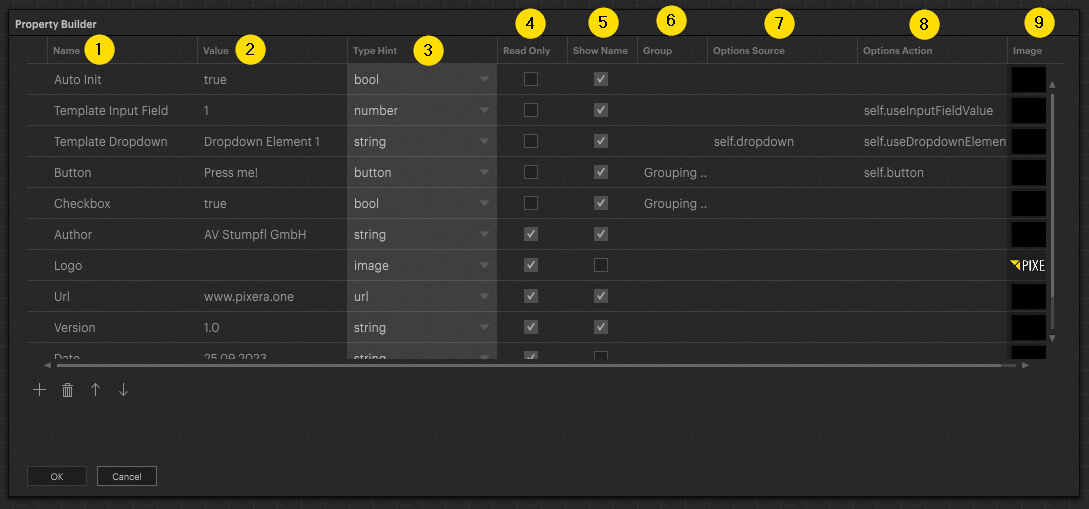
Overview
-
Name: Sets the name of the property, this is important for the assignment in the code and for the understanding of the user. Ideally, the name of the property is self-explanatory.
-
Value: Sets the default value of the property and in many cases can be defined by the user in real time. If read only is activated, this value can not be changed in the inspector.
-
Type Hint: Determines the Type of variable the Property is set as. This does not necessarily correspond to what can be read in the LUA code, for example number values are still used in LUA as string and so need converted.
-
Read Only: Defines whether the user can edit this property or not in the inspector.
-
Show Name: Specifies whether the name of the property is also visible to the user, or whether only the element itself is displayed.
-
Group: Acts as a folder, properties with the same Group name will appear under a Folder named as the Group.
- Options Source: Will run an inputted Action via the path to it entered. The format of the return inside the Action must be a one dimensional Table.
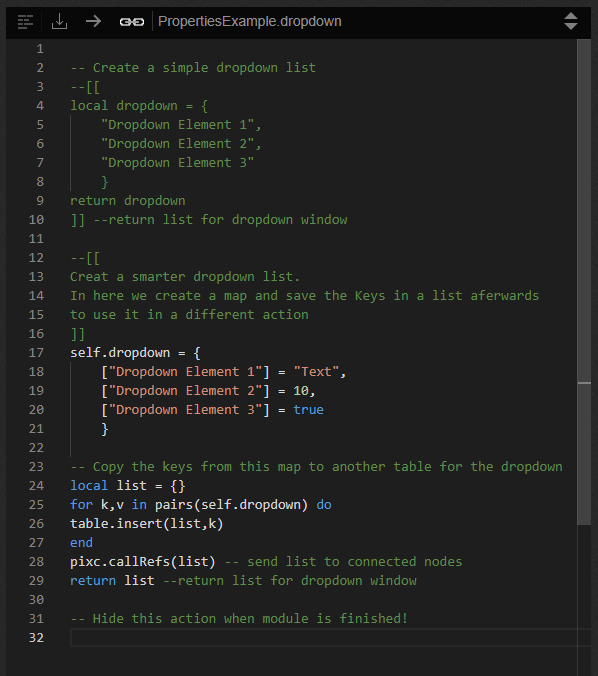
In the example code of this Module, a table is generated from a map, to hide the values that are not useful for the user, behind a meaningful text, so a value can be stored for different options.
-
Options Action: Used to call Actions when an option for the property is selected/inputted. The selected input is also sent to the connected Action. The init function can also be specified here if a Module needs to be reinitialized after a change.
- The reading of the set value can also be done with the self.helper:getProperty("My Property") function from the helper, this can be done at any time.
- The reading of the set value can also be done with the self.helper:getProperty("My Property") function from the helper, this can be done at any time.
- Image: A file can be stored which is displayed as an image in the Inspector. Please note that this image is saved directly in the Module and can significantly increase the data size of the Module.
Creating Properties
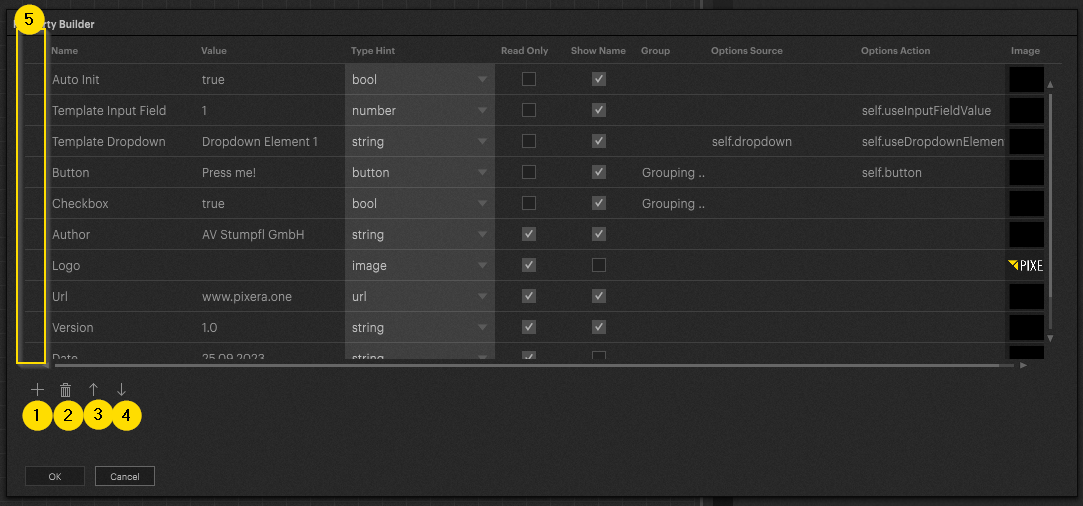
- New properties are added with this element, they will be added below the current selected element.
- This element is used to delete properties.
- This element changes the order of the selected element.
- This element changes the order of the selected element.
- The desired element can be selected in this area.
The “Auto Init” Action
This “Auto Init” Action has a special meaning, this property is included in almost all Modules and is executed from the C++ part of PIXERA when the LUA core is started (rebuilt). If this property is set to true, the Action of the Module with the name "init" is executed after any reload.
The “uninit” Action is always called when the LUA core gets closed or rebuild. This is a related to the name of the Action. The "uninit" Action is always called regardless of the "Auto Init" property.
Get and Set Properties
The standard use case for reading or writing properties is with the help of the helper library:
:setProperty and :getPorperty are the functions that should be used for this, the setProperty will create the Property if it is not found in the properties of the Module.
Example:
if self.helper == nil then
	require "pixcHelper"
	self.helper = createPixcHelper(pixc,self())
end

self.helper:setProperty("MyProperty",10)

local prop = self.helper:getProperty("MyProperty")

pixc.log(prop)
Get all Properties
It is also possible to read all properties directly and parse them into a Lua data structure using self.helper:loadAllProperties()
Example:
if self.helper == nil then
	require "pixcHelper"
	self.helper = createPixcHelper(pixc,self())
end

local properties = self.helper:loadAllProperties()

-- uses dump to show table structure
pixc.log(self.helper.dump(properties))
Get all Property Names
self.getPropertyNames() can be used in order to get the names of all properties as strings.
Example:
if self.helper == nil then
	require "pixcHelper"
	self.helper = createPixcHelper(pixc,self())
end


-- uses dump to show table structure
pixc.log(self.helper.dump(self.getPropertyNames()))
Log result:

PIXERA 26.1 RC 1 | 23. March 2026 | J.B. | J. G.