 Contact Us


This article refers to the TCP and UDP options provided within PIXERA Control and does not refer to the Native API. → Native API - Quick Start Guide
In this guide we will be going over the Internet Protocol and two Transport Protocols, TCP and UDP. We will describe what these protocols are, how they relate to each other, and how to use TCP and UDP in PIXERA Control to send and receive data.
Apart from that, there are many others not covered in this article but available in PIXERA control.
MQTT Module
OSC Module
HTTP Module
Midi
Serial
Artnet
sACN
Ads
Knx
Internet Protocol/IP
The Internet Protocol, IP, is used to have data move between networks and eventually arrive at a preset destination. This data is normally too large to be sent all at once, and so it is sent in smaller ‘packets’. These packets are then received and assembled together at the end destination. Transport Protocols will handle the incoming packets differently with benefits and negatives to their process, the two most common being TCP and UDP.
TCP (Transmission Control Protocol)
The Transmission Control Protocol, or TCP, is seen as reliable because it ensures the packets being received will arrive in the exact order they are meant to. Due to this, TCP requires extra steps and wait times to make sure all packets are present. It first must be connected to the recipient and keep this connection. Also, any missing packets will lead to longer loading time as TCP waits for the packets to be resent.
TCP Server vs Client
Please note that when selecting an API Output under Settings > API > Output 1-4, if you choose TCP, PIXERA will act as a TCP Server, not a TCP Client. This only applies if you are using something like the API Output Network Command within a Cue. If you would like to instead act as a TCP Client, you will need to use one of the following Control modules: “TcpClient” or "TcpConnection" in Connect Mode (see below)
UDP (User Datagram Protocol)
The User Datagram Protocol, or UDP, is the opposite of TCP regarding its benefits and negatives. UDP does not create a connection to send or receive packets. The packets will also be delivered in whatever order they arrive and not sorted into the correct order. Due to these stripped features, UDP works quickly, albeit not as reliably.
Use Cases
As for deciding whether to use TCP or UDP will depend on the message being sent and the time the message must arrive. If reliability is required with no mistakes in the message's order, then TCP is a safer choice, especially if waiting time is not an issue.
If the message must be sent as quickly as possible, in massive quantities, is simple, or can be organized by the receiver some other way, then UDP is your best bet.
TCP in PIXERA
There are three prebuilt Modules in PIXERA Control that can be used for sending and receiving via TCP. These are the ‘TcpServer’, ‘TcpClient’, and ‘TcpConnection’ Modules. Each of these Modules has a send Action which will send a message and may require a handle to receiver (For ‘TcpServer’). Each Module also has a “receive” Action which will display the message given from the sender.
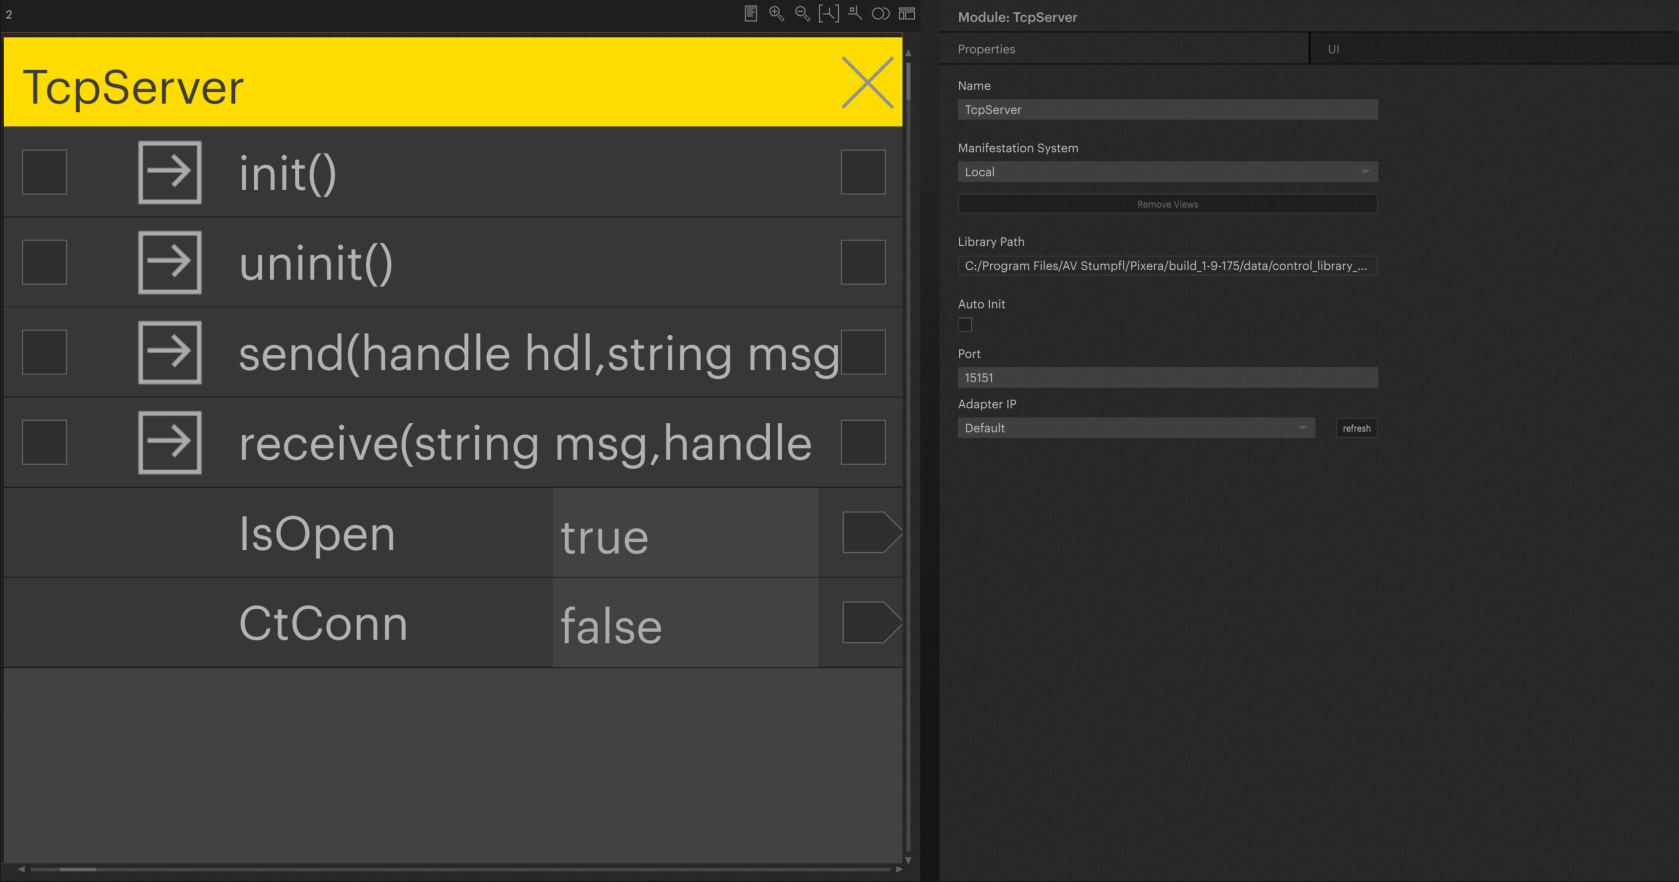
TcpServer Module
This Module will create a TCP server in PIXERA for sending and receiving messages to clients. In the Module's ‘Properties’ you must set the ‘Port’ and the ‘Adapter IP’ of the server. Keep in mind the ‘Default’ selection of ‘Adapter IP’ will be the selected adapter in ‘Settings/Discovery/Main Network Adapter’. Once inited the server will be created and clients can now connect to the server. The ‘IsOpen’ Action will show if the server has a connection and the ‘CTConn’ Action will show how many connections there are.
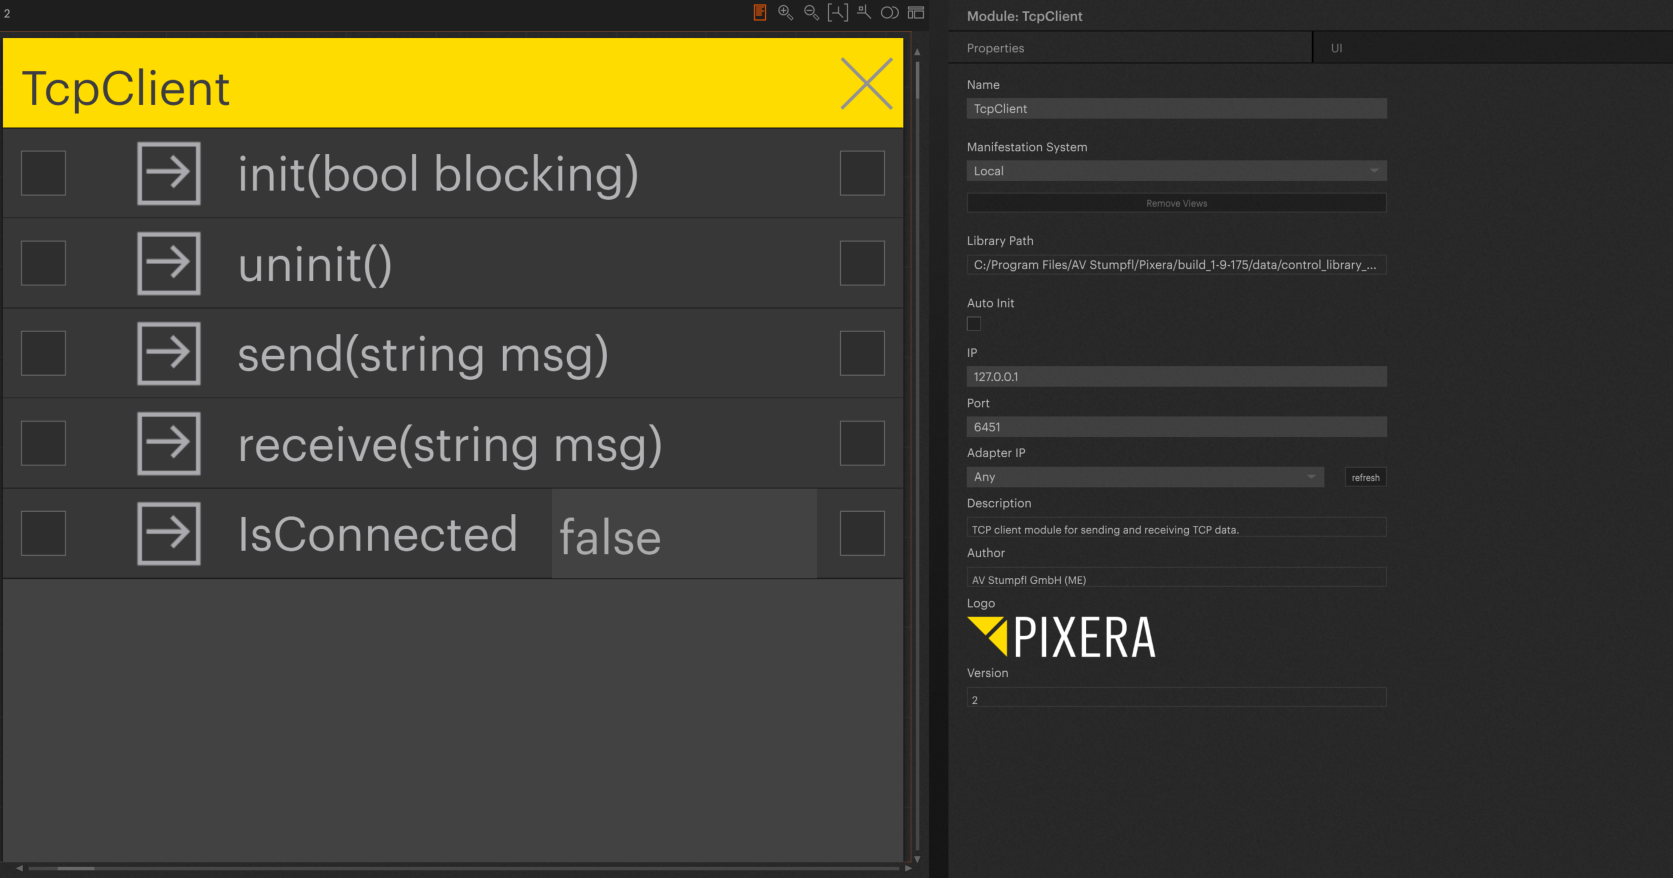
TcpClient Module
This Module will create a TCP client connection in PIXERA for sending and receiving messages from a server. In the Module's ‘Properties’ you must set the ‘IP’, ‘Port’, and ‘Adapter IP’ of the TCP server you will connect to. Once inited the client will be created and connect to the server. The ‘IsConnected’ Action will show if the client has a connection to a server.
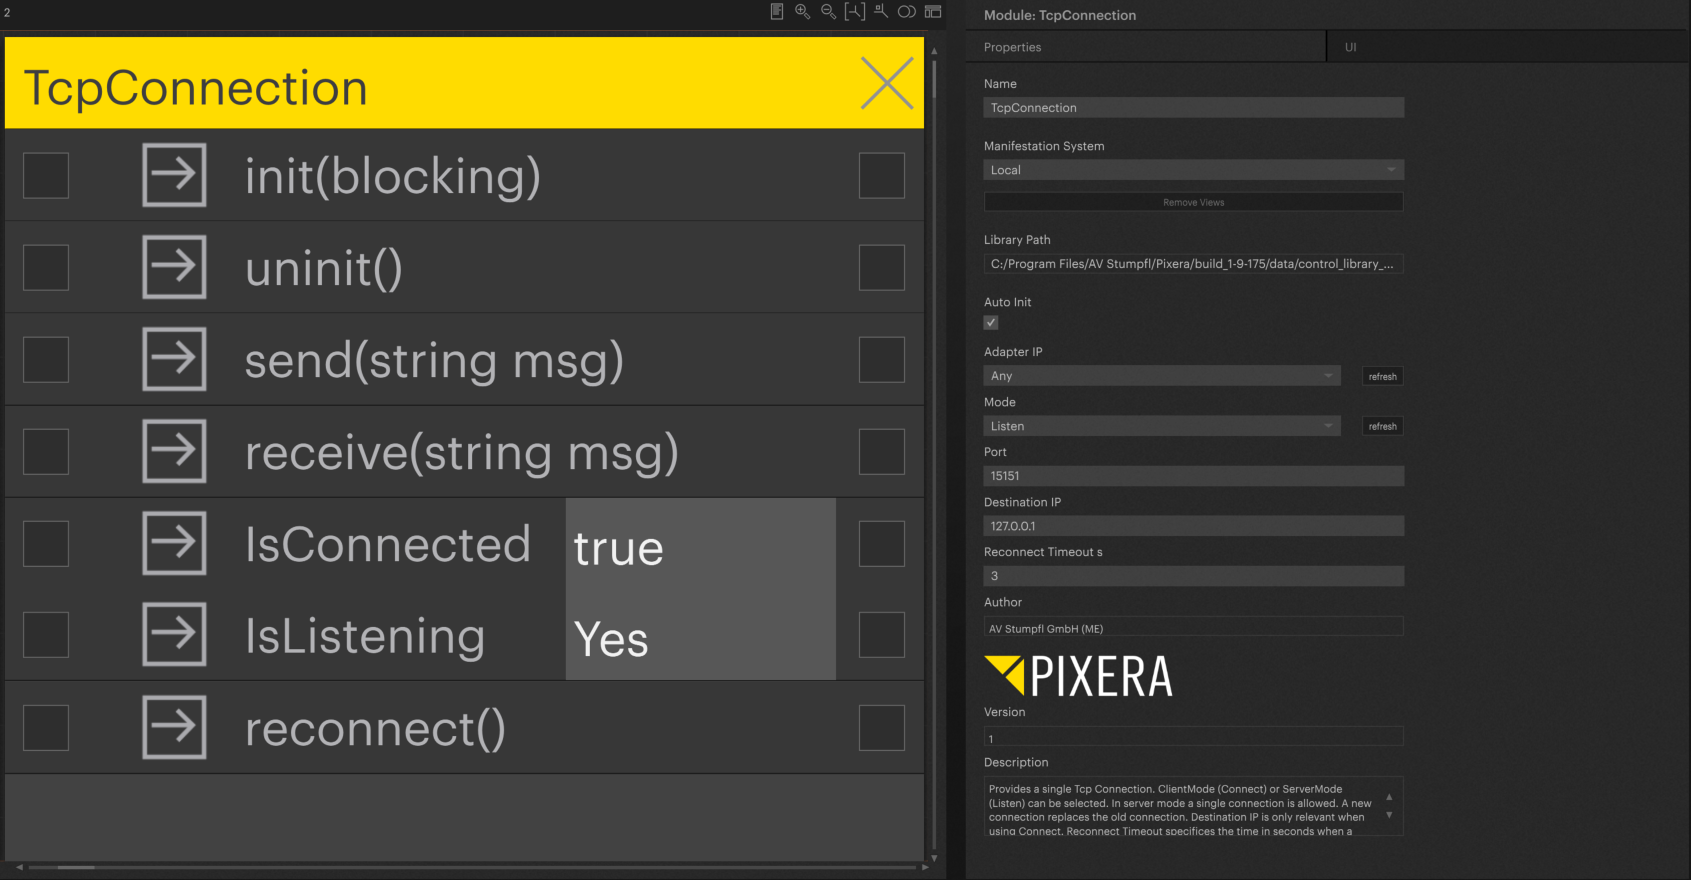
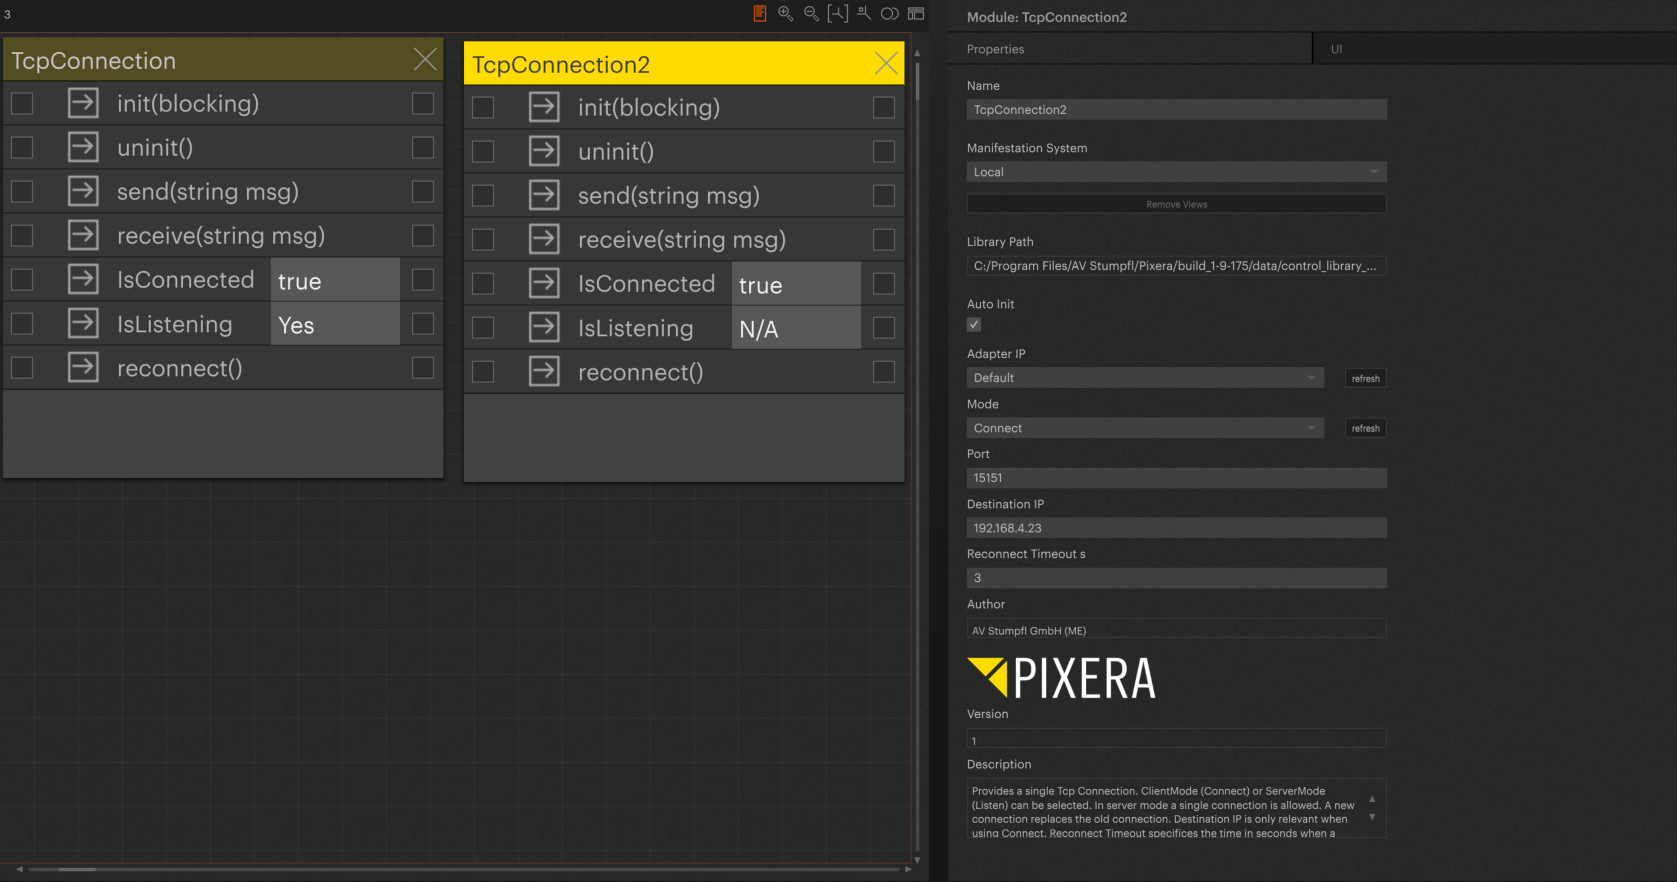
TcpConnection Module
This Module will allow you to create either a TCP client (Connect Mode) or a TCP server (Listen Mode). This way you can switch between these use cases in one Module. However, the Module can only provide a single TCP connection unlike the ‘TcpServer’ Module which can take multiple client connections.
To use the Module, you must set a variety of settings in the Module's ‘Properties’. These include: ‘Adapter IP’, ‘Mode’ which will be either ‘Connect’ for a client or ‘Listen’ for a server, ‘Port’, ‘Destination IP’, and ‘Reconnect Timeout s’ which will tell the Module how long to wait before trying to reconnect using the given ‘Properties’. The ‘IsConnected’ Action will show if there is a connection and the ‘IsListening’ Action will show if the Module is listening as a server.
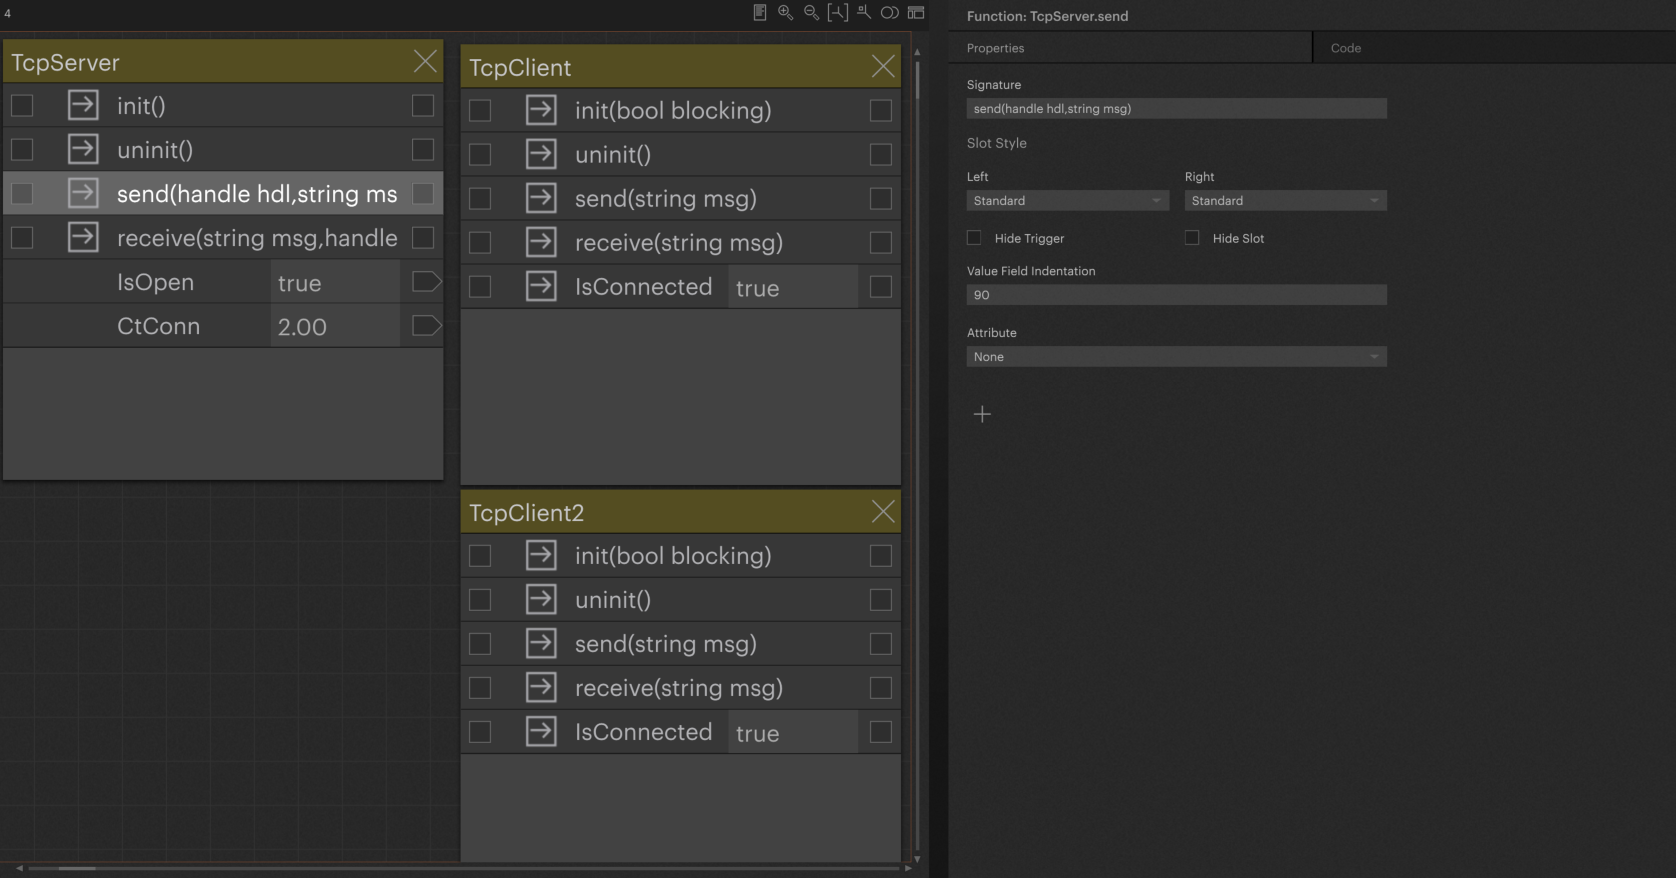
PIXERA TCP Example
Here are a couple examples of test setups using the Module's discussed.
This first image shows a ‘TcpServer’ Module connected to two ‘TcpClient’ Modules. As you can see the 'CtConn' Action is displaying two connections as a result.
In this second image there are now two ‘TcpConnection’ Modules. One is set to ‘Listen’, so it is acting as a server, and the other is set to ‘Connect’, so it is acting as a client.
UDP in PIXERA
There are three prebuilt Modules in PIXERA Control that can be used for sending and receiving via UDP. These are the ‘Udp’, ‘UdpBroadcast’, ‘UdpMulticast’ Modules. The difference between these Modules involves how the message is being sent, either via Unicast, Broadcast, or Multicast, respectively.
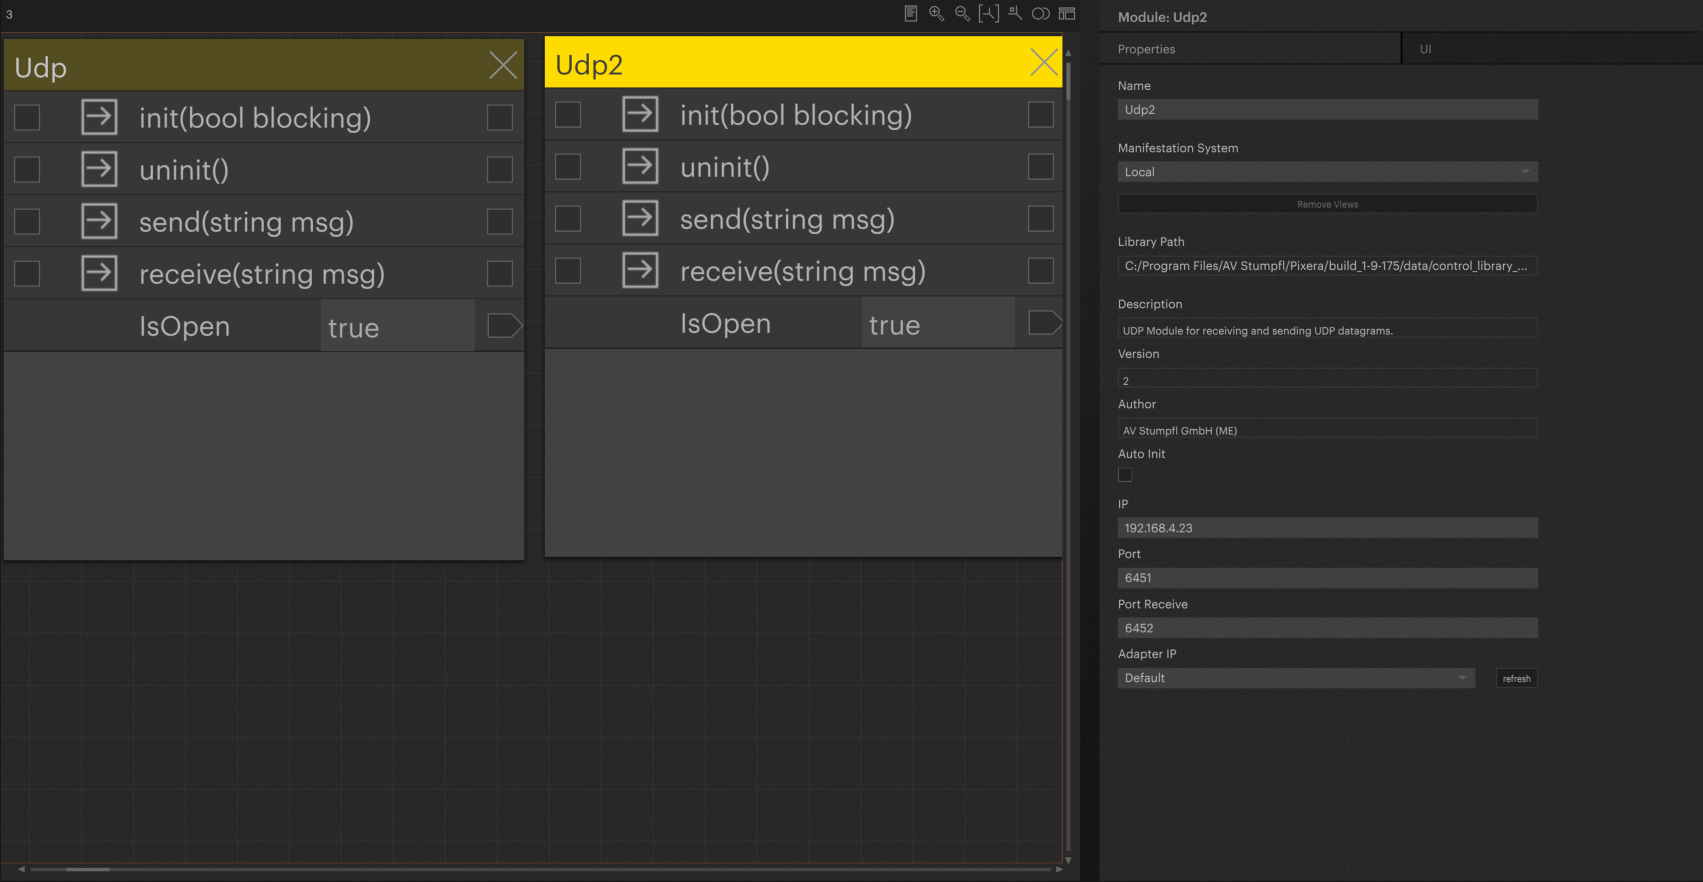
The ‘Udp’ Module sends via Unicast, meaning its message will be sent to one location only.
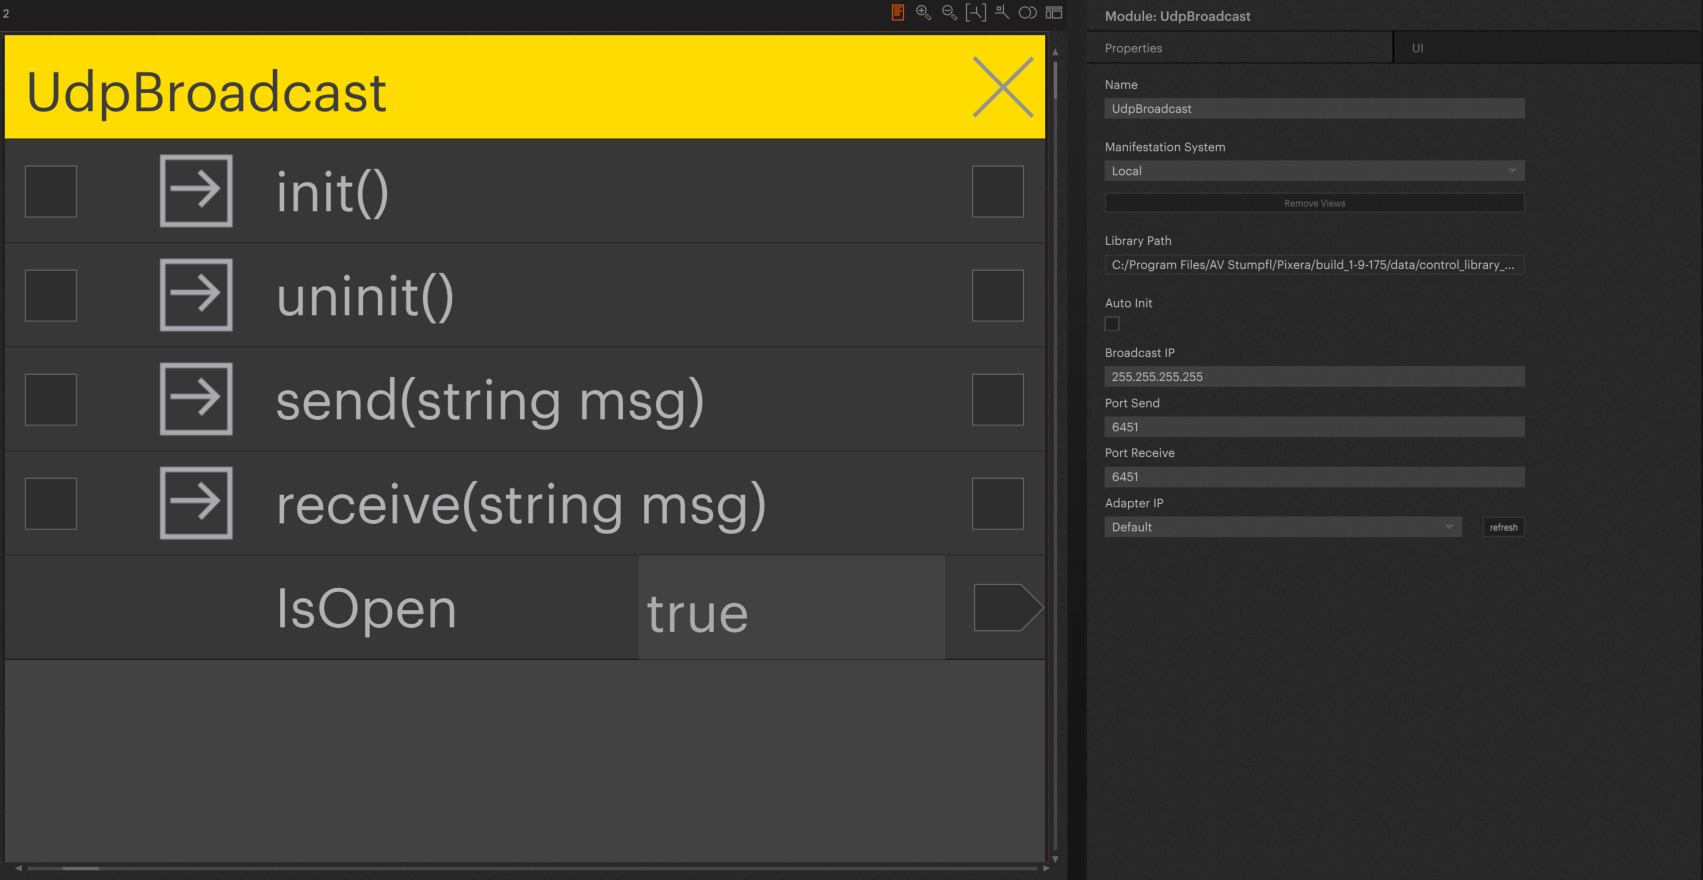
The ‘UdpBroadcast’ Module sends via Broadcast, meaning its message will be sent to all locations on the given IP.
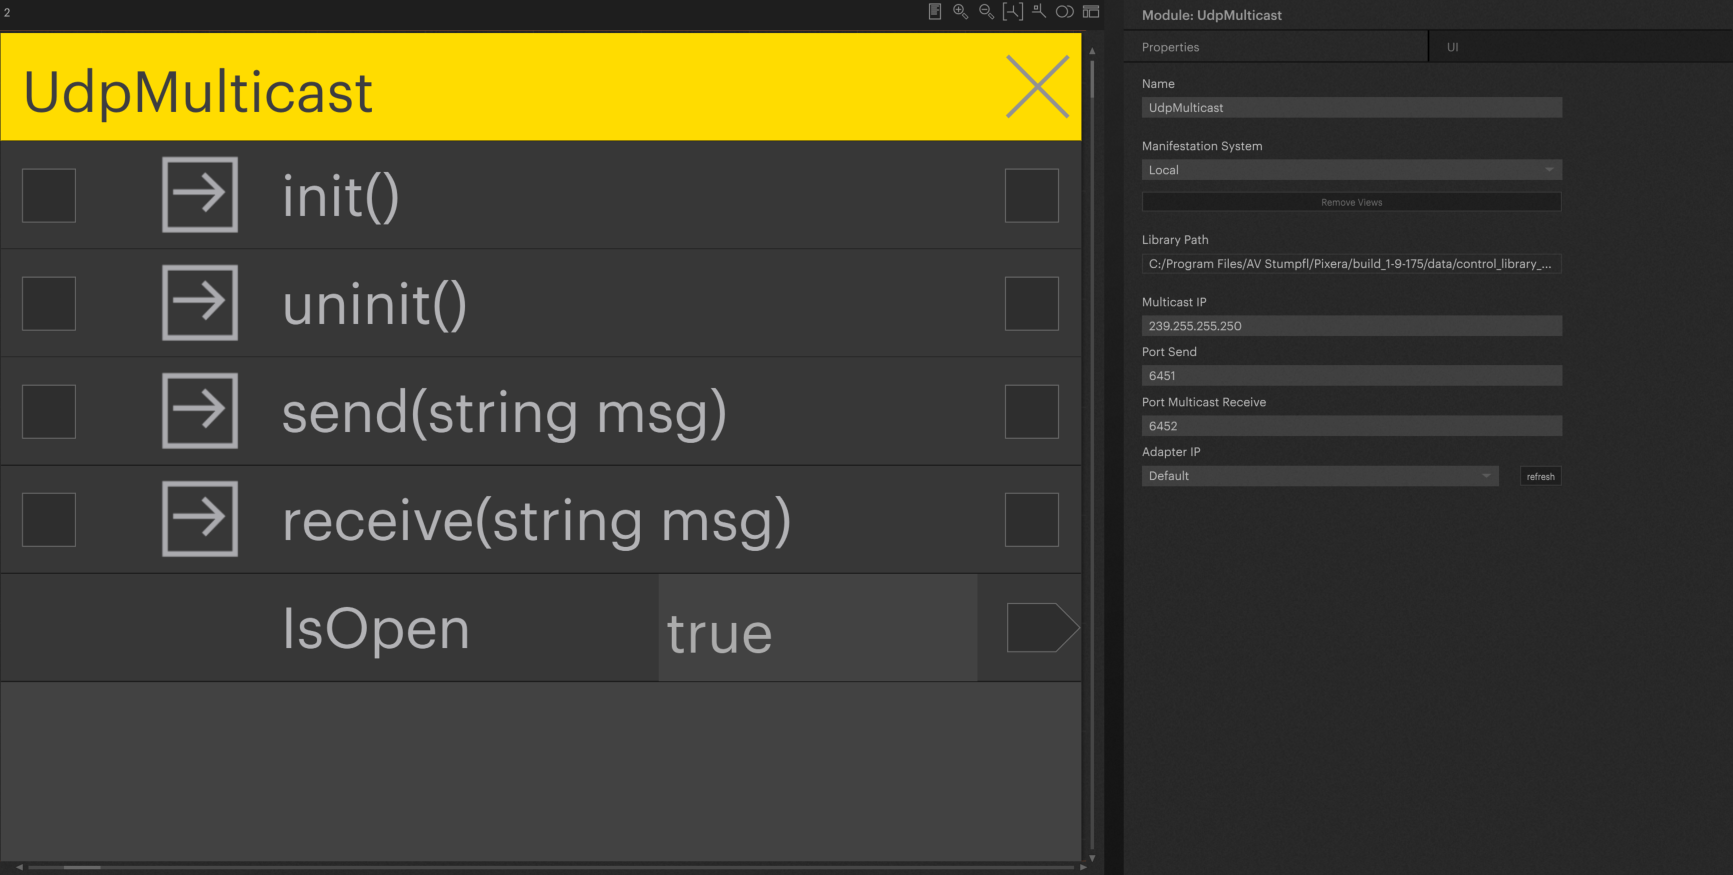
The ‘UdpMulticast’ Module sends via Multicast, meaning its message will be able to be sent to multiple locations alongside other Udp Multicast messages.
Each of these Modules have a send Action which will send a message and a receive Action which will display the message given from the sender. Each also has an ‘IsOpen’ Action which will display whether the Module is ready for sending or receiving messages.
Udp Module
This Module will create a UDP setup in PIXERA for sending and receiving messages. In the Module's ‘Properties’ you must set the ‘IP’, ‘Port’ which is the port to send to, ‘Port Receiving’ which is the port to receive a message from. and the ‘Adapter IP’. Keep in mind the ‘Default’ selection of ‘Adapter IP’ will be the selected adapter in ‘Settings/Discovery/Main Network Adapter’. Once inited the Module will be ready to send or receive messages.

UdpBroadcast Module
This Module will create a UDP setup in PIXERA set to Broadcast for sending and receiving messages. In the Module's ‘Properties’ you must set the ‘Broadcast IP’, ‘Port’ which is the port to send to, ‘Port Receiving’ which is the port to receive a message from, and the ‘Adapter IP’. Keep in mind the ‘Default’ selection of ‘Adapter IP’ will be the selected adapter in ‘Settings/Discovery/Main Network Adapter’. Once inited the Module will be ready to send or receive messages.
UdpMulticast Module
This Module will create a UDP setup in PIXERA set to Multicast for sending and receiving messages. In the Module's ‘Properties’ you must set the ‘Broadcast IP’, ‘Port’ which is the port to send to, ‘Port Receiving’ which is the port to receive a message from, and the ‘Adapter IP’. Keep in mind the ‘Default’ selection of ‘Adapter IP’ will be the selected adapter in ‘Settings/Discovery/Main Network Adapter’. Once inited the Module will be ready to send or receive messages.
PIXERA UDP Example
Here is an example of a test setup using the Udp Module discussed.
This image shows two ‘Udp’ Modules where ‘IsOpen’ is true showing the Modules being active and ready to send messages back and forth between each other.
Expansion
From these basic Modules you can create any Module you may need for sending or processing messages going through the protocols. There are also protocols which can be explored in their own Modules, all which can be found in the ‘Control/Library/Protocols’ section of PIXERA.
PIXERA 19.175 | 13 November 2023 | CL