 Contact Us


Licensing
Most tracking modules require a Pixera Enterprise license. The SPNet, Psn, ZacTrack and FreeD modules are available in all Control licenses.
If no Enterprise license is found, all other tracking modules will be available in a demo mode. That means that the modules can be used, but the Tracking information is blocked after 15 minutes. After that, a new activation of the "init" action inside the module is required.
Available Tracking Modules:
- Optitrack (NatNet)
- MoSys
- FreeD
- Blacktrax
- Stype
- Trackmen
- PSN
- SPNet
- EzTack
- ZacTrack
Basics
All tracking modules are built in the same way. This means that the workflow of each module is almost the same.
The basic workflow:
- Add the module to the Pixera Control workspace
- Modify the Properties of the module
- Init the module
- Select the UI of the Module
- Click Start learning
- Wait until the Tracking object are found
- Click Update actions form learned data
- Save the Project
- Connect the Tracking actions to the Pixera API
Adding the module
Drag the module from Library to the workspace
In this example, we use the SPNet module for Stage Precision located in Drivers -> StagePrecision -> SPNet
Modifying the properties
Select the properties tab in the inspector after selecting the module.
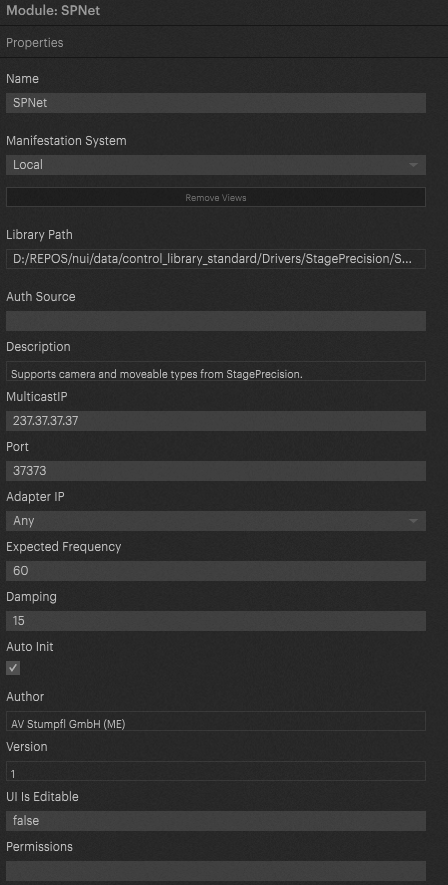
Depending on the Tracking module, there are different properties. The properties have default values, but they may need to be modified.
- Multicast Ip: If the tracking Protocol is using multicast, the address can be set here.
- Port: The local UDP port where the packets are received.
- Adapter IP: Local network adapter where the tracking packets are expected
- Expected Frequency: The expected frequency of messages being received from the sending protocol
- Damping: The interpolation/fade time between two position messages. Only important if the “Expected Frequency” value is a multiple of the refresh rate of the system, then an interpolation can occur
- Auto Init: Needs to be enabled
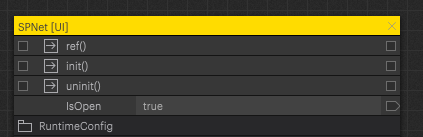
Initialize the module
If Auto Init is enabled, this can be skipped, otherwise the “init” action of the module has to be executed. The IsOpen slot will be set to true:
The learning function of the tracking configuration
Select the module and switch to the UI tab of the inspector.
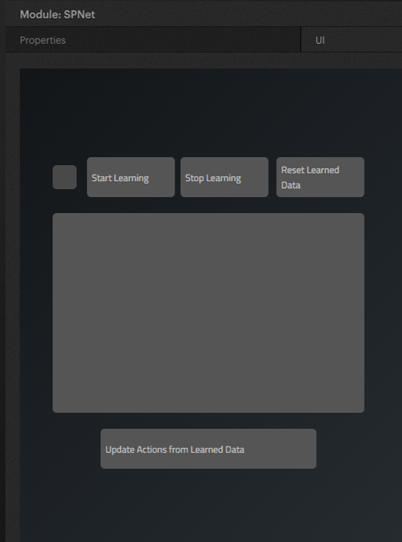
Inside this UI, it is possible to discover the tracking objects and generate the required actions.
After pressing the “Start Learning” button, the indicator will change to green, and the module starts collection tracking objects. The collected objects are listed. It is important, that the tracking system is sending all objects. For example, if the sender is set to send on change only and the object is not moving no data is sent, and the objects are not found.
“Stop Learning” stops the collection of the tracking data.
“Reset Learned Data” cleans the collected data, to start from the beginning.
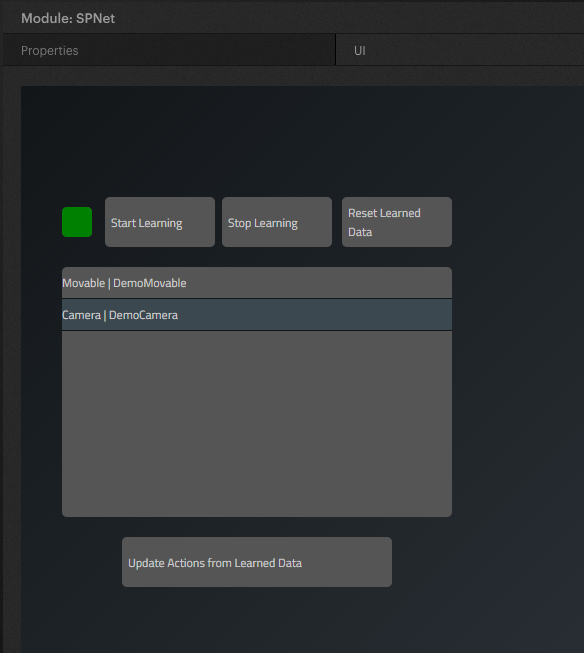
When all available tracking objects are found, the button “Update Actions from Learned Data” must be selected. The actions of the module gets updated with the available moving objects, and the module is reinitialized if Auto Init is set. Otherwise, the “init” action must be triggered manually. The new actions are named depending on type and ID/ name. After that, the UI tab is not required anymore and can be empty.
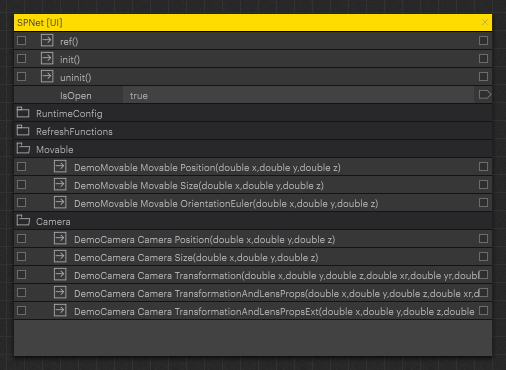
Depending on the Tracking module, the names of the tracking objects can vary, but the main structure is always the same. For this example, Stage Precision is providing two objects. A Movable with the name “DemoMovable” and a Camera with the name “DemoCamera”. Depending on the type, different actions are generated.
Warning
When tracking with the Direct API is used, no studio camera position and settings can be manually set anymore.
To be able to set it again, you have to disable the tracking modules with "uninit".

This action needs to be connected to a corresponding action of the Pixera module. The tracking values are only visible after the connection is placed established.
Screen Tracking
To connect the data from any tracking system to screens or layer in PIXERA please follow this article:
Related Articles
Known issues and current limitations
- Stype:
Stype Modules initially show demo licence even if a PIXERA control Enterprise licence is available.
Workaround: Reinitialise the module so that the correct licence is recognised. - PSN:
Naming trackers with certain characters in the name can cause problems, so please avoid using “_” and possibly other special characters in the name.
Pixera 25.1 R1 | 16 June 2025 | C.L.