 Contact Us


Expanding your Modules
Actions define the functionalities of a Module. If Modules are the building blocks of a project, then Actions specify what a single building block does. These might be simple operations like starting or stopping the Timeline, or whole show control scripts.
To create a new Action, right click onto the Module and select “Add Action”. Enter a name for your action and press “OK”.
Connecting Modules
Each Action can receive an Input, send an Output, and trigger other Actions. To define a connection, you can draw a “wire” between two Actions. Just click on the box to the right end of your first Action and drag it to the box on the left end of your second Action.
The first Action will now send its Output over the wire, triggering the connected Action and giving it any sent values to use in its code.
Creating a PLAY Action over Wire Connection
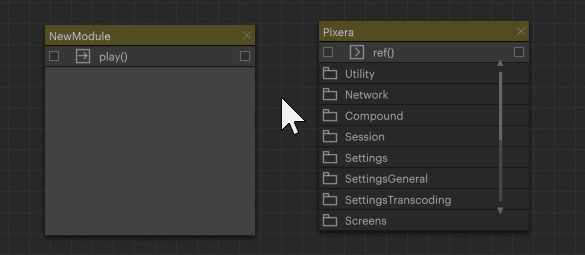
Below goes over the steps to create a Module that Plays the Timeline when ran. First, drag “NewModule” into the workspace.
Create a new Action in your Module called “play()” and drag the “Pixera” Module, which is already in the Workspace, next to your new Module.
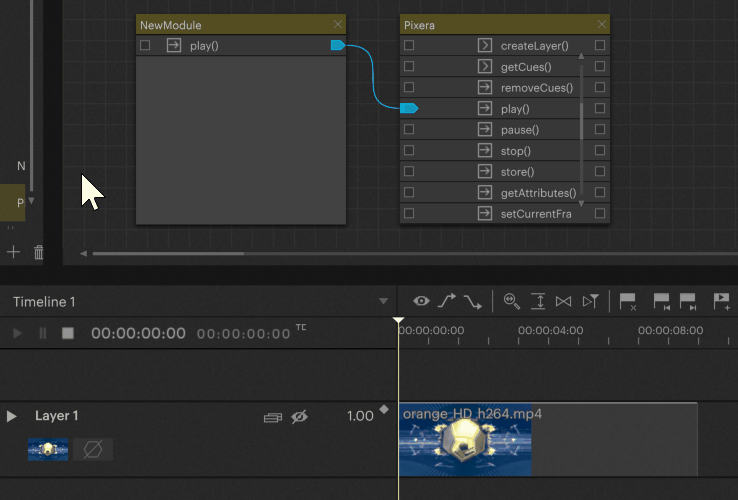
Search in the “Pixera” Module for the “Timeline” folder. Open it by pressing the folder symbol.
Now all available Timelines will be displayed. Select the Timeline of your choice (in our case “Timeline 1”) and expand it by pressing on the bracket symbol.
In here, all properties of the Timeline are shown. To start the Timeline, connect the “play()” Action of your own Module to the “play()” of the timeline.
Your new Action can now play the Timeline. To test it, click on the arrow symbol to the left of the name to run the Action.
Connecting an Action to a Button
Below goes over the steps to attach a button to an Action for easier activation.
First, create a UI on the Module from the UI tab, turn on the “edit” mode using the pencil symbol in the top left corner, and add a “Button” using the “+” plus symbol in the top left corner.

Next, select the button and open the “Action” field in its properties by pressing on the arrow.

Now, your Module’s name should be displayed. If it isn’t, keep the button selected, click on the expand symbol shown below and select its name from the popup.

When clicking on the Module name, all its Actions are shown. Select the Action you want to connect to the button. You can scroll through the list by left-clicking and dragging it.

Once an Action is selected, save your changes in the UI with the button shown below.

To test the button out, deactivate the edit mode. Now, when clicking the button, the Action is triggered.

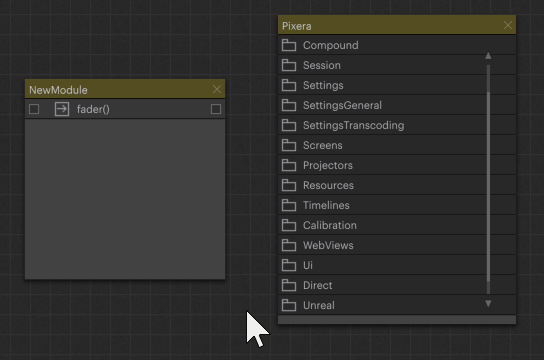
Creating a Master Fader via a Wire Connection
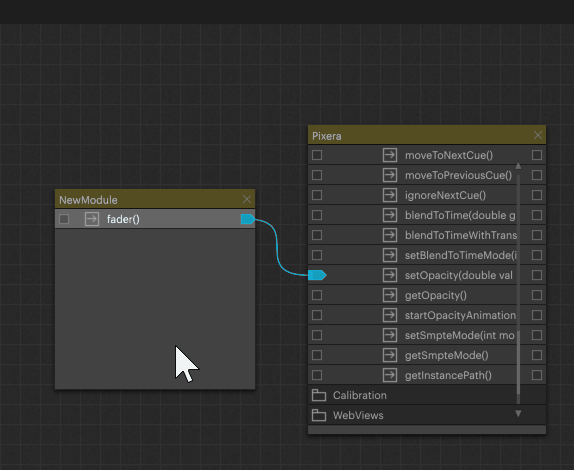
Below goes over the steps to create, a Module uses a “Fader” to control a Timeline's opacity. First, create an Action called “fader()”.
Again, drag the “Pixera” Module next to your Module and open the Timeline folder.
Search for the “setOpacity(double value)” property of your Timeline and connect your Action to it.
The value variable in the “setOpacity()” Action will be what the “fader()” Action sends. This value will then be set as that Timeline's opacity.
You can try this by right-clicking on “fader()” and selecting “Run”. There, you can enter a value that will be passed on to the Action. In our case, “fader()” will directly forward its inputted value to the Timeline. Note that possible opacity values are between 0 (invisible) and 1 (opaque).
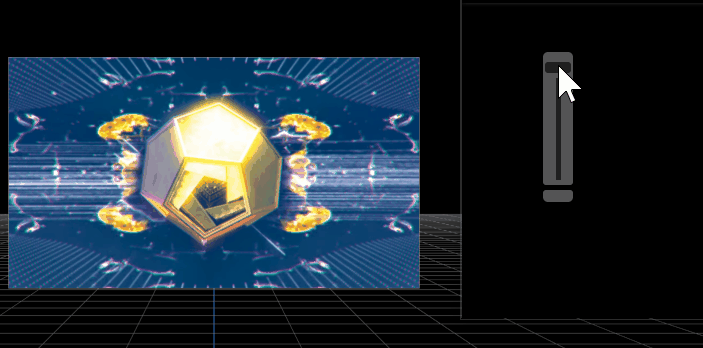
Of course, we want to change the opacity dynamically by using a Slider/Fader. Switch to the UI and create a new Slider.
Connect the “fader()” Action to the Slider. The default value range of a Slider is [0-100], therefore we have to adjust the range to [0-1], with a default value of 1. This is done in the “Range” section of the Slider's settings.

Using the Slider will now directly adjust the opacity of the Timeline.
PIXERA 2.0.239 | 06 February 2025 | CL